vue3使用xgPalyer实现截图功能的方法详解
作者:山间板栗
在vue3中,用西瓜视频播放器插件xgPalyer,实现一个video组件。
本文章主要介绍:
① 如何放开截图功能
② 如何自定义插件
③ 插件如何挂载vue组件
④ 挂载组件如何同父(祖)组件通讯
xgPlayer 版本: 3.0.12-rc.0
正常应该用release版本,因为最新的release版本(3.0.11)不满足我的功能需要(开启截图功能,但关闭自动下载),所以用3.0.12-rc.0 版本。
安装及使用xgPalyer
安装xgPalyer
安装西瓜视频播放器插件pnpm install xgPlayer@3.0.12-rc.0
使用xgPalyer
在页面中引入依赖
import Player from "xgplayer";
import { Events, Plugin } from "xgplayer";

import "xgplayer/dist/index.min.css";
具体使用
template代码
<template>
  <div id="mse" ref="videoPlayer" />
</template>
  // 播放器 基础用法
  new Player({
    // el: videoPlayer.value,
    id: "mse",
    lang: "zh",
    width: "100%",
    height: "100%",
    // 默认静音
    volume: 0,
    autoplay: false,
    videoInit: true,
    url: videoUrl || "",

    fluid: deviceDetection(),
    plugins: [],
    //传入倍速可选数组
    playbackRate: [0.5, 0.75, 1, 1.5, 2]
  });
放开截图配置。
并配置,截图后不自动下载saveImg: false 以及允许跨域访问videoAttributes: { crossOrigin: "anonymous" }
简要代码如下
  const basicConfig = {
    //...
  };
  const screenShotConfig = {
    // 截图配置
    screenShot: {
      saveImg: false, // 禁止截图后下载图片
      quality: 0.92,
      type: "image/png",
      format: ".png",
      position: Plugin.POSITIONS.CONTROLS_RIGHT
    },
    videoAttributes: {
      crossOrigin: "anonymous"
    }
  };

  new Player(Object.assign(basicConfig, screenShotConfig));
自定义插件,并注入
自定义插件
官方文档介绍自定义插件 在官方文档的基础上,简单做一点调整~
给xgPalyer注入插件
注入插件、并给插件传入参数。
下面是省略的写法
// 在video组件中,初始化组件
const vedioConfig = { //... } // 配置内容省略
const player = new Player(vedioConfig);

const params = { //... }
// 方法二:调用接口注册插件,并注入参数
player.value.registerPlugin(screenshotListPlugin, params);
给自定义的插件,注入一些参数方法
player.value.registerPlugin(screenshotListPlugin, params);
在自定义插件中接收参数
constructor(args) {
    super(args);

    this.info = args.config; // 传给这个插件的参数在args.config
}
完整的自定义插件代码如下
import { createApp } from "vue";

import { Plugin } from "xgplayer";
import ScreenshotList from "./screenshotList.vue";
const { POSITIONS } = Plugin;

export default class screenshotListPlugin extends Plugin {
  // 插件的名称,将作为插件实例的唯一key值
  static get pluginName() {
    return "screenshotListPlugin";
  }

  static get defaultConfig() {
    return {
      // 挂载在controls的右侧,如果不指定则默认挂载在播放器根节点上
      position: POSITIONS.CONTROLS_RIGHT
    };
  }

  constructor(args) {
    super(args);
    this.vm = null;
    this.onScreenshot = this.onScreenshot.bind(this);

    this.player = args.player;
    this.videoInfo = args.config; // 暂存传给这个插件的参数,后续传给vue组件使用
  }

  beforePlayerInit() {
    const screenshotListDom = this.find(".screenshot-plugin");
    const tipDom = this.find(".cut-num-tip");
    this.vm && this.vm.updatePopInfo(screenshotListDom, this.videoInfo, tipDom);
    // TODO 播放器调用start初始化播放源之前的逻辑
  }

  afterPlayerInit() {
    // TODO 播放器调用start初始化播放源之后的逻辑
  }

  // ... 其他插件方法

  onScreenshot(val) {
    // 找到挂载的组件,触发截图方法
    this.vm && this.vm.screenshotHanlde(val);
  }

  afterCreate() {
    const screenshotListDom = this.find(".screenshot-plugin");

    /**
     * 自定义插件 打开列表
     * root.__root__为根节点Vue模板data值
     */
    this.onIconClick = e => {
      console.log("class为screenshot-list元素点击回调", e);
      const listExited = ["block"].includes(screenshotListDom.style.display);
      screenshotListDom.style.display = listExited ? "none" : "block";
    };

    // 对当前插件根节点内部类名为.screenshot-list的元素绑定click事件
    this.bind(".screenshot-list", "click", this.onIconClick);

    // 对当前插件根节点绑定click事件
    //TODO 插件实例化之后的一些逻辑

    // 使用 Vue 组件
    const ScreenshotListComponent = createApp(ScreenshotList);
    this.vm = ScreenshotListComponent.mount(".screenshot-plugin");
  }

  destroy() {
    // 解绑事件等清理工作
    this.unbind(".screenshot-list", "click", this.onIconClick);
    // 播放器销毁的时候一些逻辑
    super.destroy();
  }

  render() {
    return `<div>
              <button class="screenshot-list" style="position: relative;
                right: 6px;
                width: 85px;
                height: 30px;
                line-height: 26px;
                font-size: 12px;
                top: 5px;
                vertical-align: top;
                cursor: pointer;
                border-radius: 8px;
                background: transparent;
                color: #fff;
                right: 0;
                border: 2px solid #fff;
                text-align: center;
                "
              >
                查看录像截图
                <span class="cut-num-tip" style="
                  position: absolute;
                  width: 18px;
                  height: 18px;
                  line-height: 18px;
                  top: -12px;
                  right: -3px;
                  border-radius: 50%;
                  display: inline-block;
                  padding: 0 0px;
                  font-size: 12px;
                  text-align: center;
                  background-color: #FF5722;
                  color: #fff;
              ">0</span>
              </button>
              <div class="screenshot-plugin" style="
                display: none;
                width: 370px;
                height: 250px;
                position: absolute;
                top: -250px;
                right: 0px;
                background: #fff;
                border-radius: 4px;
              "></div>
            </div>
          `;
  }
}
自定义插件如何挂载vue组件
纯html、css实现的页面,过于原生态了。浅浅挂载一个vue组件,实现插件内的元素展示。
import { createApp } from "vue";
import ScreenshotList from "./screenshotList.vue";


export default class screenshotListPlugin extends Plugin {
  // ...
  afterCreate() {

    // 在插件实例化后,把vue组件,挂载在实例化的插件元素上

    // 使用 Vue 组件
    const ScreenshotListComponent = createApp(ScreenshotList);
    this.vm = ScreenshotListComponent.mount(".screenshot-plugin");
  }

}
ps. vue插件内用的element-plus框架的组件需要单独引入使用,且要再次引入对应的css,否则既无样式,组件也不会生效。 例如
<script setup lang="ts">
import { ElPopconfirm } from "element-plus";
import "element-plus/dist/index.css";
</script>
这篇文章写得跟裹脚布一样,又臭又长。有点写烦了。
挂载组件如何同父(祖)组件通讯
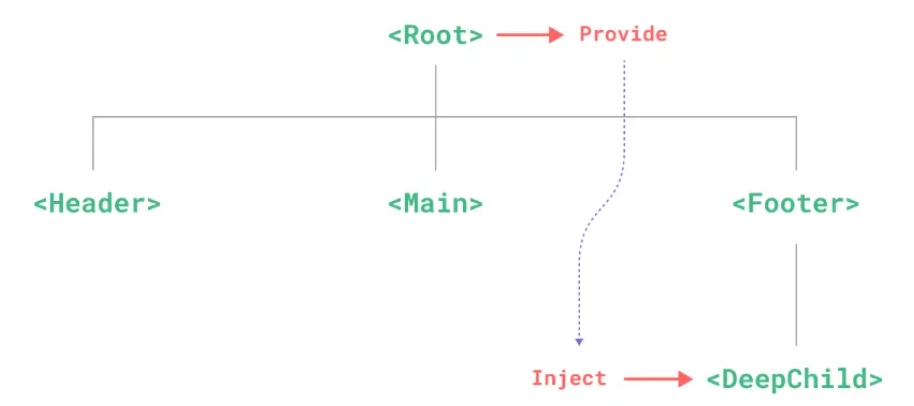
用 provide / inject 给组件通讯,只要是同一个祖先,都可以接收到

① 祖辈组件:暴露注册方法provide("reloadFun", reloadFun);
② 子辈组件:注入方法 const reloadFun = inject("reloadFun");
剩下的就是,子辈和插件间的方法通讯了~~
介绍一个小方法 videoInfo.value.callReloadPage
  async function batchFunname() {
    try {
      addLoadingMask();
      const params = {  };
      await queryFun(params);
      message("成功", { type: "success", duration: 3000 });
      onSearch();


      // callReloadPage 这个方法流转的时序是
      // 1. 祖辈(XXXComponent/index) 组件的暴露方法reloadFun
      // 2. video组件中,注入方法reloadFun
      // 3. video组件中,通过引入插件时,传参给自定义插件
      // 4. 自定义插件在解构时 (constructor) 暂存方法再videoInfo对象中
      // 5. 自定义插件,在截图列表(screenshotList)的组件挂载在dom元素后,把videoInfo传给 组件(screenshotList)
      // 6. 组件(screenshotList)接收到后,传给hook
      // 7. hook中批量存证后,刷新表格页面,展示最新的存证信息。
      // ps. 裹脚布都没这么长

      setTimeout(() => {
        videoInfo.value.callReloadPage && videoInfo.value.callReloadPage();
      }, 1500);
    } catch (err) {
      console.error(err);
    } finally {
      loadingMask.value?.close();
    }
  }
到此为止了,白白
到此这篇关于vue3使用xgPalyer实现截图功能的方法详解的文章就介绍到这了,更多相关vue3 xgPalyer截图内容请搜索脚本之家以前的文章或继续浏览下面的相关文章希望大家以后多多支持脚本之家!
