
使用JavaScript实现二值化图像
作者:xuliang
黑白二值图像的像素只有黑色和白色两种颜色。将图像转换为黑白有多种用途:
- 减少文件大小:与24位彩色图像相比,1位黑白图像所需的存储数据通常更少。
- 图像处理:许多图像处理算法需要先将图像转换为二值图。
- 用于显示和打印:一些输入/输出设备,如激光打印机、传真机和显示器,只能处理二值图。
- 美学:二值图像的像素明显,可以算作一种像素艺术。
将图像转换为黑白的过程称为阈值处理(thresholding),通常执行以下操作:
- 将图像转换为灰度
- 如果像素的灰度值小于阈值,则将该像素替换为黑色;如果大于阈值,则将该像素替换为白色
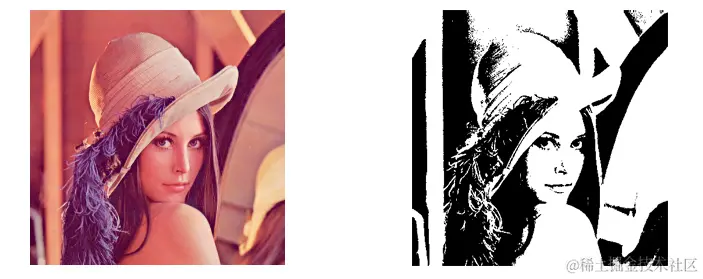
转换为黑白的示例图像:
在本文中,我们将讨论使用JavaScript将图像转换为黑白二值图的两种方法。
- Canvas
- Dynamic Web TWAIN ,一个文档扫描SDK
编写一个HTML5页面以转换图像为黑白
使用以下模板创建一个新的HTML5页面,然后让我们为其添加图像颜色转换功能。
<!DOCTYPE html>
<html lang="en">
<head>
  <meta charset="UTF-8">
  <meta name="viewport" content="width=device-width, initial-scale=1.0">
  <title>Convert an Image to Black and White</title>
  <style>
  </style>
</head>
<body>
  <div class="home">
    <h2>Convert an Image to Black and White</h2>
    <button id="convertButton">Convert</button>
  </div>
  <script>
  </script>
</body>
</html>
加载图片
添加用于选择文件的input元素,并使用按钮触发它。图片将被加载到两个img元素中,一个用于显示转换的结果,另一个用于存储原始图像。
HTML:
<button id="loadFileButton">Load a File</button>
<input style="display:none;" type="file" id="file" onchange="loadImageFromFile();" accept=".jpg,.jpeg,.png,.bmp" />
<div class="imageContainer">
  <img id="image"/>
  <img id="imageHidden"/>
</div>
<style>
  .imageContainer {
    max-width: 50%;
  }

  #image {
    max-width: 100%;
  }

  #imageHidden {
    display: none;
  }
</style>
JavaScript:
function loadImageFromFile(){
  let fileInput = document.getElementById("file");
  let files = fileInput.files;
  if (files.length == 0) {
    return;
  }
  let file = files[0];
  fileReader = new FileReader();
  fileReader.onload = function(e){
    document.getElementById("image").src = e.target.result;
    document.getElementById("imageHidden").src = e.target.result;
  };
  fileReader.onerror = function () {
    console.warn('oops, something went wrong.');
  };
  fileReader.readAsDataURL(file);
}
使用Canvas将图像转换为黑白
HTML5提供了一个canvas标签,我们可以用它操作图像数据。我们可以使用它将图像转换为黑白。
向页面添加一个隐藏的canvas元素。
<canvas id="canvasHidden"></canvas>
<style>
  #canvasHidden {
    display: none;
  }
</style>
添加用于指定旋转阈值的input元素。
<div class="thresholdControls" style="display:inline">
  <label>
    Threshold (0-255):
    <input id="threshold" type="number" min="0" max="255" value="127">
  </label>
</div>
将canvas的大小设置为图像的大小。
const image = document.getElementById("image");
const canvas = document.getElementById("canvasHidden");
canvas.width = image.naturalWidth;
canvas.height = image.naturalHeight;
获取canvas的context以执行操作。
const context = canvas.getContext("2d");
将图像绘制到canvas上。
context.drawImage(image, 0, 0);
获取图像的ImageData:
const imageData = context.getImageData(0, 0, canvas.width, canvas.height);
ImageData以RGBA顺序将像素值存储在Uint8ClampedArray中,取值范围是0到255。像素从左上角到右下角逐行排列。
创建一个函数以根据RGB值计算灰度值。
//https://github.com/image-js/image-js/blob/9ab86a86f6c13a9a7d14c62566c1396c3c6f54f4/src/image/transform/greyAlgorithms.js
function RGBToGrayScale(red,green,blue){
  //return red * 0.2126 + green * 0.7152 + blue * 0.0722;
  return (red * 6966 + green * 23436 + blue * 2366) >> 15;
}
计算灰度值的方法有很多。这里,我们使用Rec. 709亮度系数进行转换。使用基于整数的乘法计算和移位优化了计算速度。
创建一个函数以根据阈值确定像素值应该为黑色还是白色。
//return true if the value should be black. return false if the value should be white
function threshold(grayscale){
  const thresholdValue = parseInt(document.getElementById("threshold").value);
  if (grayscale < thresholdValue) {
    return true;
  }else{
    return false;
  }
}
遍历所有像素,将RGB值设置为我们计算出的黑白值,黑色是0,白色是255。
const pixels = imageData.data; //[r,g,b,a,...]
for (var i = 0; i < pixels.length; i += 4) {
  const red = pixels[i];
  const green = pixels[i + 1];
  const blue = pixels[i + 2];
  const grayscale = RGBToGrayScale(red, green, blue)
  if (threshold(grayscale)) {
    pixels[i] = 0;
    pixels[i + 1] = 0;
    pixels[i + 2] = 0;
  }else{
    pixels[i] = 255;
    pixels[i + 1] = 255;
    pixels[i + 2] = 255;
  }
}
放回ImageData。
context.putImageData(imageData, 0, 0);
显示转换后的图像。
image.src = canvas.toDataURL();
使用OTSU方法确定阈值
我们可以使用OTSU方法自动确定分离背景和前景的最佳阈值。
在页面中包含以下JS文件。
//https://github.com/cawfree/otsu/
const histo = (data, bins) =>
  data.reduce((arr, e) => {
    arr[bins.indexOf(e)] += 1;
    return arr;
  }, [...Array(bins.length)].fill(0));

const width = (hist, s, e) => {
  let v = 0;
  for (let i = s; i < e; i += 1) {
    v += hist[i];
  }
  return v;
};

const bins = data => Array.from(new Set(data)).sort((e0, e1) => e0 - e1);

const weight = (hist, s, e, total) => {
  let v = 0;
  for (let i = s; i < e; i += 1) {
    v += hist[i];
  }
  return v / total;
};

const mean = (hist, bins, s, e, width) => {
  let v = 0;
  for (let i = s; i < e; i += 1) {
    v += hist[i] * bins[i];
  }
  return v * width;
};

const variance = (hist, bins, s, e, mean, width) => {
  let v = 0;
  for (let i = s; i < e; i += 1) {
    const d = bins[i] - mean;
    v += d * d * hist[i];
  }
  return v * width;
};

const cross = (wb, vb, wf, vf) => wb * vb + wf * vf;

const otsu = (data) => {
  const b = bins(data);
  const h = histo(data, b);
  const { length: total } = data;
  const vars = [...Array(b.length)].map((_, i) => {
    const s0 = 0;
    const e0 = i;
    const s1 = i;
    const e1 = h.length;

    const w0 = 1 / width(h, s0, e0);
    const w1 = 1 / width(h, s1, e1);

    const wb = weight(h, s0, e0, total);
    const vb = variance(h, b, s0, e0, mean(h, b, s0, e0, w0), w0);

    const wf = weight(h, s1, e1, total);
    const vf = variance(h, b, s1, e1, mean(h, b, s1, e1, w1), w1);

    const x = cross(wb, vb, wf, vf);

    return !isNaN(x) ? x : Number.POSITIVE_INFINITY;
  });

  return b[vars.indexOf(Math.min(...vars))];
};
使用OTSU计算阈值。我们需要将灰度直方图传递给otsu函数。
function calculateThresholdWithOTSU(){
  const image = document.getElementById("imageHidden");
  const canvas = document.getElementById("canvasHidden");
  const width = image.naturalWidth;
  const height = image.naturalHeight;
  const context = canvas.getContext('2d');
  canvas.width = width;
  canvas.height = height;
  context.drawImage(image, 0, 0);
  const imageData = context.getImageData(0, 0, canvas.width, canvas.height);
  const pixels = imageData.data; //[r,g,b,a,...]
  const grayscaleValues = [];
  for (var i = 0; i < pixels.length; i += 4) {
    const red = pixels[i];
    const green = pixels[i + 1];
    const blue = pixels[i + 2];
    const grayscale = RGBToGrayScale(red, green, blue)
    grayscaleValues.push(grayscale);
  }
  document.getElementById("threshold").value = otsu(grayscaleValues);
}
使用Dynamic Web TWAIN将图像转换为黑白
Dynamic Web TWAIN是一个文档扫描SDK,可以在浏览器中扫描文档。它提供了各种图像处理方法。我们可以使用其ConvertToBW方法转换图像为黑白。
使用它的优点是,它可以用于批量处理大量图像,因为处理是使用本地进程完成的。由于使用了libpng等本地图像库根据颜色信息输出文件,输出文件的尺寸也会更优。
以下是使用它的步骤:
在页面中引入Dynamic Web TWAIN。
<script src="https://unpkg.com/dwt@18.4.2/dist/dynamsoft.webtwain.min.js"></script>
初始化一个Web TWAIN的实例并使用它来转换图像。可以在此处申请其许可证。
let DWObject;
Dynamsoft.DWT.AutoLoad = false;
Dynamsoft.DWT.ProductKey = "DLS2eyJoYW5kc2hha2VDb2RlIjoiMjAwMDAxLTE2NDk4Mjk3OTI2MzUiLCJvcmdhbml6YXRpb25JRCI6IjIwMDAwMSIsInNlc3Npb25QYXNzd29yZCI6IndTcGR6Vm05WDJrcEQ5YUoifQ=="; //one-day trial
Dynamsoft.DWT.ResourcesPath = "https://unpkg.com/dwt@18.4.2/dist";

async function convertWithDWT(){
  if (!DWObject) {
    await initDWT();
  }
  DWObject.RemoveAllImages();
  let response = await fetch(document.getElementById("imageHidden").src);
  let buffer = await response.arrayBuffer();
  DWObject.LoadImageFromBinary(buffer,
  function(){
    const convert = async () => {
      const thresholdValue = parseInt(document.getElementById("threshold").value);
      await DWObject.RunCommandAsync({command:"convertToBW",parameter:{index:0,threshold:thresholdValue}});
      document.getElementById("image").src = DWObject.GetImageURL(0);
    }
    convert();
  },
  function(errorCode, errorString){
    console.log(errorString);
  })
}

function initDWT(){
  return new Promise((resolve, reject) => {
    const title = document.querySelector("h2").innerText;
    document.querySelector("h2").innerText = "Loading Dynamic Web TWAIN...";
    Dynamsoft.DWT.CreateDWTObjectEx(
    {
      WebTwainId: 'dwtcontrol'
    },
    function(obj) {
      DWObject = obj;
      document.querySelector("h2").innerText = title;
      resolve();
    },
    function(err) {
      console.log(err);
      document.querySelector("h2").innerText = "Failed to load Dynamic Web TWAIN";
      reject(err);
    }
  );
  })
}
源代码
可以在以下仓库中找到所有代码和在线演示:
github.com/tony-xlh/Color-Conversion-JavaScript
到此这篇关于使用JavaScript实现二值化图像的文章就介绍到这了,更多相关JavaScript二值化图像内容请搜索脚本之家以前的文章或继续浏览下面的相关文章希望大家以后多多支持脚本之家!