Vue中scrollIntoView()方法详解与实际运用举例
作者:老电影故事
前言
因为工作中用到了锚点设置,滚动定位到列表的某一行,常用的总是出问题,后来扒拉出了这个属性,详细研究了下方便 日 后使用
一、介绍scrollIntoView()的详细属性
1、简介
该scrollIntoView()方法将调用它的元素滚动到浏览器窗口的可见区域。
- 根据其他元素的布局,元素可能无法完全滚动到顶部或底部。
- 页面(容器)可滚动时才有用!
2、语法
element.scrollIntoView(); // 等同于element.scrollIntoView(true)
element.scrollIntoView(alignToTop); //布尔参数
element.scrollIntoView(scrollIntoViewOptions); //对象参数
3、语法参数
| align To Top | [可选],目前之前这个参数得到了良好的支持 |
|---|---|
| true | 元素的顶部将对齐到可滚动祖先的可见区域的顶部。对应于scrollIntoViewOptions: {block: “start”, inline: “nearest”}。这是默认值 |
| false | 元素的底部将与可滚动祖先的可见区域的底部对齐。对应于scrollIntoViewOptions: {block: “end”, inline: “nearest”}。 |
| scrollIntoViewOptions | [可选],目前这个参数浏览器对它的支持并不好,可以查看下文兼容性详情 |
|---|---|
| behavior | [可选]定义过渡动画。“auto”,“instant"或"smooth”。默认为"auto"。 |
| block | [可选] “start”,“center”,“end"或"nearest”。默认为"center"。 |
| inline | [可选] “start”,“center”,“end"或"nearest”。默认为"nearest"。 |
4、示例
var element = document.getElementById("box");

element.scrollIntoView();
element.scrollIntoView(false);
element.scrollIntoView({block: "end"});
element.scrollIntoView({behavior: "instant", block: "end", inline: "nearest"});
5、应用场景
URL中hash标记的进化
聊天窗口滚动显示最新的消息
往一个列表添加item后滚动显示最新的添加的item
回到顶部(#)
滚动到指定位置(#xxx)
6、浏览器兼容性

二、实际运用

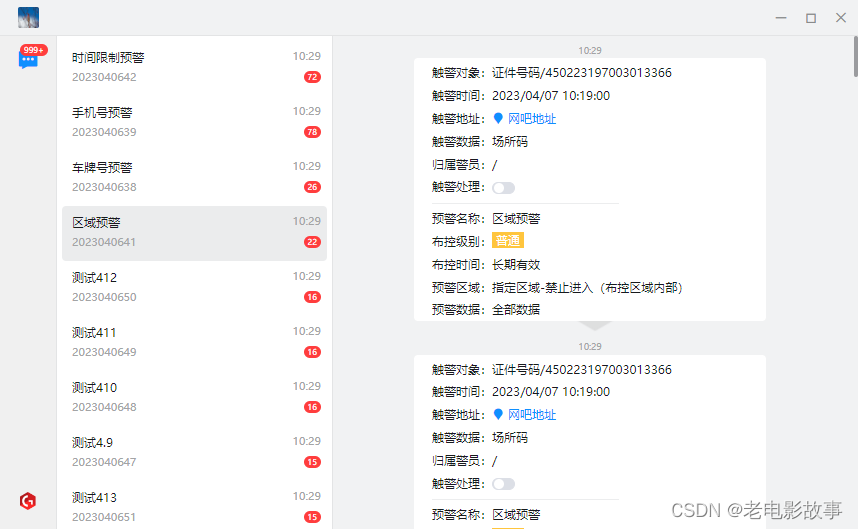
如图所示一个类似微信一样的electron项目,这个是消息列表,然后有消息过来的时候,就是右下角托盘消息提醒的时候,点击消息提示中的某一项,然后就打开这个页面,定位到选中的某一个,再右边显示详细信息
先说下具体思路:在Vue 3中,可以使用v-for指令的ref属性来绑定每个列表项的引用。然后,使用computed属性来获取要滚动到的元素,并使用scrollIntoView方法将其滚动到可见区域。
以下是在Vue 3中使用v-for和computed实现根据列表的索引定位到某一行的示例:
<template>
  <div>
    <div v-for="(item, index) in list" :key="index" :ref="'listItem-' + index">{{ item }}</div>
  </div>
</template>

<script>
import { computed, ref } from 'vue';

export default {
  setup() {
    const list = ref(['Item 1', 'Item 2', 'Item 3', 'Item 4', 'Item 5']);
    const activeIndex = ref(null);

    // 计算要滚动到的元素
    const activeElement = computed(() => {
      if (activeIndex.value !== null) {
        return document.querySelector(`[ref="listItem-${activeIndex.value}"]`);
      }
      return null;
    });

    // 滚动到指定的列表项
    const scrollToIndex = (index) => {
      activeIndex.value = index;
      if (activeElement.value) {
        activeElement.value.scrollIntoView();
      }
    };

    return {
      list,
      scrollToIndex
    };
  }
};
</script>
在上面的代码中,使用v-for指令循环遍历列表,并将每个列表项的引用绑定到ref属性上。然后,使用computed属性来计算要滚动到的元素。在scrollToIndex方法中,使用activeIndex来存储要滚动到的元素的索引,并使用activeElement计算出要滚动到的元素。最后,使用scrollIntoView方法将该元素滚动到可见区域。
在组件中触发scrollToIndex方法,可以在需要滚动到指定列表项时调用该方法。例如,可以在按钮的点击事件处理程序中调用scrollToIndex方法:
<button @click="scrollToIndex(3)">Scroll to Index 3</button>
在上面的代码中,单击按钮将调用scrollToIndex方法,并将3作为参数传递给该方法,以滚动到索引为3的列表项。
再看下我具体写的:

watch(clickId, async() => {
  // console.log('clickId changed from', oldValue, 'to', newValue)
  // eslint-disable-next-line
  const data = await window.app.windowGetData(store.userBaseInfo.username + '.data.warn')
  let code = 0
  const index = data.findIndex((item:any) => (
    item.configId === clickId.value
  ))
  data.forEach((item:any) => {
    if (item.configId === clickId.value) {
      code = Number(item.code)
    }
  })
  if (index !== -1) {
    itemClick(index, code)
    scrollToIndex() // 点击托盘消息的时候触发这里
  }
})
// 计算要滚动到的元素
const activeElement = computed(() => {
  if (activeIndex.value) {
    return document.getElementById(`listItem-${ activeIndex.value }`)
  }
  return null
})
// 滚动到指定的列表项
const scrollToIndex = () => {
  if (activeElement.value) {
    activeElement.value.scrollIntoView(false)
  }
}
完事!
总结
到此这篇关于Vue中scrollIntoView()方法详解与实际运用的文章就介绍到这了,更多相关Vue scrollIntoView()方法详解内容请搜索脚本之家以前的文章或继续浏览下面的相关文章希望大家以后多多支持脚本之家!
