
vite+vue3项目中使用SVG方式
作者:加麻加辣多香菜
这篇文章主要介绍了vite+vue3项目中使用SVG方式,具有很好的参考价值,希望对大家有所帮助,如有错误或未考虑完全的地方,望不吝赐教
vite+vue3项目中使用SVG
在开发过程中发现在vite+vue3项目中与在vue2项目中使用SVG的方式有所区别。
下面将详细操作记录下来。
首先我们先来看一下项目目录。

stept1
安装svg-sprite-loader
yarn add svg-sprite-loader -D
stept2
在components目录下创建SvgIcon.vue文件
<template>
<svg :class="svgClass" v-bind="$attrs" :style="{ color: color }">
<use :xlink:href="iconName" rel="external nofollow" />
</svg>
</template>
<script setup>
import { defineProps, computed } from "vue"
const props = defineProps({
name: {
type: String,
required: true
},
color: {
type: String,
default: ""
}
})
const iconName = computed(() => `#icon-${props.name}`)
const svgClass = computed(() => {
console.log(props.name, "props.name")
if (props.name) {
return `svg-icon ${iconName.value}`
}
return "svg-icon"
})
</script>
<style scoped>
.svg-icon {
width: 1em;
height: 1em;
fill: currentColor;
vertical-align: middle;
}
</style>stept3
在src目录下创建icons目录,用来存放SVG文件

stept4
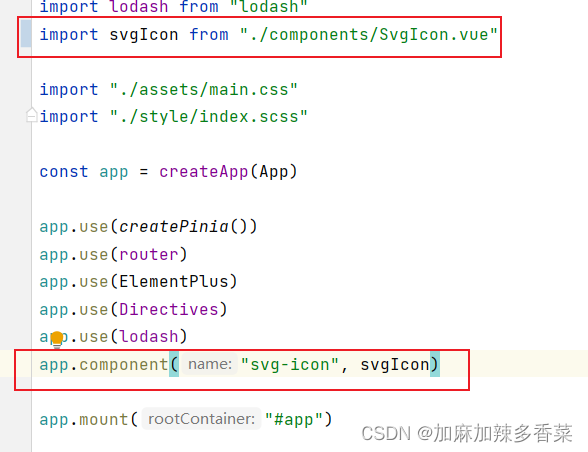
在main.js中将我们的SvgIcon组件全局注册
stept5
在src下新建plugins文件夹,创建svgBuilder.js
import { readFileSync, readdirSync } from "fs"
let idPerfix = ""
const svgTitle = /<svg([^>+].*?)>/
const clearHeightWidth = /(width|height)="([^>+].*?)"/g
const hasViewBox = /(viewBox="[^>+].*?")/g
const clearReturn = /(\r)|(\n)/g
function findSvgFile(dir) {
const svgRes = []
const dirents = readdirSync(dir, {
withFileTypes: true
})
for (const dirent of dirents) {
if (dirent.isDirectory()) {
svgRes.push(...findSvgFile(dir + dirent.name + "/"))
} else {
const svg = readFileSync(dir + dirent.name)
.toString()
.replace(clearReturn, "")
.replace(svgTitle, ($1, $2) => {
// console.log(++i)
// console.log(dirent.name)
let width = 0
let height = 0
let content = $2.replace(clearHeightWidth, (s1, s2, s3) => {
if (s2 === "width") {
width = s3
} else if (s2 === "height") {
height = s3
}
return ""
})
if (!hasViewBox.test($2)) {
content += `viewBox="0 0 ${width} ${height}"`
}
return `<symbol id="${idPerfix}-${dirent.name.replace(".svg", "")}" ${content}>`
})
.replace("</svg>", "</symbol>")
svgRes.push(svg)
}
}
return svgRes
}
export const svgBuilder = (path, perfix = "icon") => {
if (path === "") return
idPerfix = perfix
const res = findSvgFile(path)
// console.log(res.length)
// const res = []
return {
name: "svg-transform",
transformIndexHtml(html) {
return html.replace(
"<body>",
`
<body>
<svg xmlns="http://www.w3.org/2000/svg" xmlns:xlink="http://www.w3.org/1999/xlink" style="position: absolute; width: 0; height: 0">
${res.join("")}
</svg>
`
)
}
}
}stept6
在vite.config.js修改配置

stept7
在项目中使用,name和color必传

总结
以上为个人经验,希望能给大家一个参考,也希望大家多多支持脚本之家。