vue3使用echarts绘制折线图的代码示例
作者:大聪明2_0
这篇文章主要为大家学习介绍了Vue3如何使用echarts实现绘制折线图,文中有详细的示例代码供大家参考,感兴趣的小伙伴可以跟随小编一起学习一下
简单折线图配置
引入echarts
``` npm install echarts  //下载依赖
    import * as echarts from 'echarts'  //引入
初始化及其调用
```const renderChart = () => {
        const el = document.querySelector('“获取到元素”')
	const myChart = echarts.init(el)
	myChart.setOption(
		{
		xAxis: {
				type: 'category', //x轴类型
				data: ['', '5', '10', '15', '20', '25', '30'],
				axisLine: { //坐标轴轴线相关设置。数学上的x轴
					show: false, //不显示X轴
					lineStyle: {//X轴样式
						color: "rgba(100,100,100,1)" //X轴字体颜色
					}
				},
				axisPointer: { //坐标轴指示器配置项
					type: 'shadow'
				},
				boundaryGap: false,//坐标轴两边留白
				axisTick: { // 是否显示坐标轴刻度
					show: false, //不显示刻度
					alignWithLabel: true //刻度与标签对齐
				},
				axisLabel: { // 坐标轴刻度标签的相关设置
					color: '#666', //字体颜色
					fontSize: 12 //字体大小
				}
			},
		yAxis: {
				type: 'value', // y轴类型
				min: 0, // y轴最小值
				max: 100, // y轴最大值
				interval: 20, // y轴间隔
				splitLine: { //网格线
					show: true,
					lineStyle: { // 网格线样式
						color: '#d9d9d9',// 网格线颜色
						type: 'dashed', //设置网格线类型 dotted:虚线   solid:实线
						width: 1 //设置网格线宽度
					}
				},
				axisLine: { //坐标轴轴线相关设置。数学上的x轴
					show: false //不显示X轴
				},
				axisTick: { // 是否显示坐标轴刻度
					show: false //不显示刻度
				},
				splitArea: { //网格区域
					show: false //不显示网格区域
				}
			},
		grid: { //图表位置
                                top: '30px',
                                left: '0px',
                                right: '10px',
                                bottom: '0px',
                                containLabel: true, // 是否预留坐标轴宽度
                              },
		series: [ //数据
				{
					// q: 如何让x轴也共享y轴上的0
					// a: 1.设置y轴的min为0
					data: [4, 43, 23, 76, 45, 4, 43], //数据
					type: 'line',//
					smooth: true,//平滑曲线
					symbol: 'circle',
					symbolSize: 0,//拐点大小
					itemStyle: {//拐点颜色
						color: '#00a0e9' //拐点颜色
					},
					lineStyle: {//线条颜色
						color: '#00a0e9' //线条颜色
					}
				}
			]
		}
	)
}
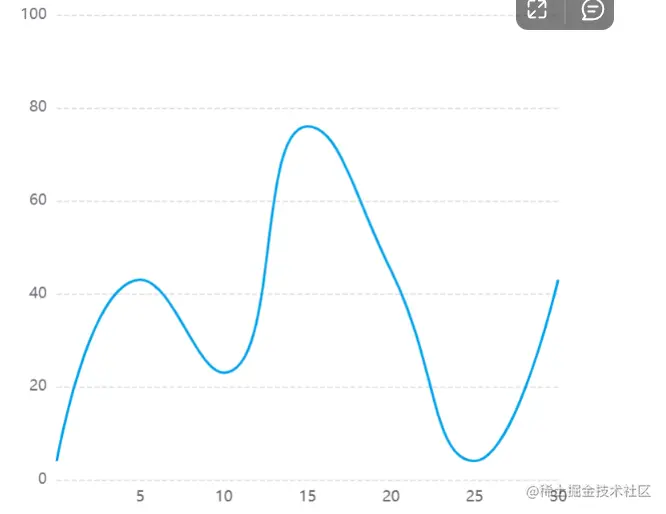
效果图:

稍微复杂折线图
封装成了一个组件,和上面的简单折线图多了一些配置,直接上代码:
``` <script setup>
import { onMounted, ref } from 'vue'
import * as echarts from 'echarts';
const brokenLine = () => {
  //获取对应的dom元素
  const el = document.querySelector('.chart-box1')
  // 初始化
  const myLine = echarts.init(el)
  // 设置option
  let option = ref({})
  myLine.setOption(
    option.value = {
      tooltip: {  //类似于hover效果鼠标放上显示弹框
        borderColor: '#EBEEF5',
        borderWidth: 1,
        padding: [5, 16, 5, 14],
        trigger: 'axis', //触发类型为坐标轴
        backgroundColor: 'rgba(255,255,255,0.96)',
        formatter: (params) => {
          return (
            '<span style="color:#818693;font-size:12px;margin-right:17px;margin-bottom:4px;display:inline-block">日期:</span>' +
            '<span style="color:#20232A;font-size:12px;display:inline-block">' +
            params[0].name +
            '</span>' +
            '<br />' +
            ('<span style="color:#818693;font-size:12px;margin-bottom:4px;display:inline-block">订单总量:</span>' +
              '<span style="color:#20232A;font-size:12px;display:inline-block;float:right">' +
              params[0].data +
              '笔' +
              '</span>')
          )
        }
      },
      grid: { //图表位置
        left: '3%',
        right: '4%',
        bottom: '3%',
        containLabel: true // 是否预留坐标轴宽度
      },
      xAxis: {
        type: 'category',  //x轴类型
        boundaryGap: true, // 坐标轴两边留白
        data: ['2022-11', '2022-12', '2023-01', '2023-02', '2023-03', '2023-04'], //x轴数据折线图下面数据
        axisLabel: { // 坐标轴刻度标签的相关设置。
          show: true,  //显示x轴
          interval: 0, // 设置为 1,表示『隔一个标签显示一个标签』
          textStyle: {
            color: '#20232A',
            fontStyle: 'normal',
            fontFamily: '微软雅黑',
            fontSize: 12
          },
          margin: 17
        },
        axisTick: {
          // 坐标轴刻度相关设置。
          show: false , //不显示刻度
          alignWithLabel:true  // 刻度与标签对齐
        },
        axisLine: {  //坐标轴轴线相关设置 --x轴
          // 坐标轴轴线相关设置
          lineStyle: {  // x轴样式
            color: '#E5E9ED'  // x轴字体颜色
            // opacity:0.2
          }
        },
        splitLine: {//splitLine的作用是将坐标轴上的数值分隔开来,splitLine通常是水平或垂直的,
          // 坐标轴在 grid 区域中的分隔线。
          show: false,  // 不显示x轴
          lineStyle: {    //x轴样式
            color: '#E5E9ED'
            // 	opacity:0.1
          }
        }
      },
      yAxis: [
        {
          type: 'value',  //y轴类型
          // splitNumber: 5,  //刻度的数量
          axisLabel: {  //axisLabel指的是坐标轴上的标签,用于标识坐标轴上每个刻度所代表的具体数值。axisLabel通常包括数值的单位和数值的格式等信息,以帮助读者更好地理解数据。
            textStyle: {
              color: '#a8aab0',
              fontStyle: 'normal',
              fontFamily: '微软雅黑',
              fontSize: 12
            }
          },
          axisLine: {  //坐标抽轴线相关设置
            show: false  //不显示
          },
          axisTick: {  //是否显示坐标轴刻度
            show: false  //不显示
          },
          splitLine: {  //网格线
            show: true,
            lineStyle: {  //网格线样式
              color: '#E5E9ED'
              // 	opacity:0.1
            }
          }
        }
      ],
      series: [
        {
          symbol: 'circle',  //类型
          symbolSize: 6,  //拐点大小
          name: '2019',
          type: 'line',
          itemStyle: {  //拐点颜色
            normal: {
              color: '#E25433',
              lineStyle: {  //线条颜色
                color: '#E25433',//线条颜色
                width: 1
              },
              areaStyle: {
                color: new echarts.graphic.LinearGradient(0, 1, 0, 0, [
                  {
                    offset: 0,
                    color: 'rgba(225,85,54,0.21)'
                  },
                  {
                    offset: 1,
                    color: 'rgba(225,85,54,0.00)'
                  }
                ])
              }
            }
          },
          data: [24322, 74423, 12244, 13312, 14132, 15532], //数据
        }
      ]
    },
    myLine.setOption(option),
      // 当窗口或者大小发生改变时执行resize,重新绘制图表
      window.addEventListener('resize', function() {
        myLine.resize()
      })
    )
}
onMounted(() => {
  brokenLine()
})
</script>
<template>
  <div class="chart-box1"></div>
</template>
<style lang="scss" scoped>
.chart-box1 {
  width: 100%;
  height: 400px;
  // background-color: antiquewhite;
}
</style>
效果图如下:

到此这篇关于vue3使用echarts绘制折线图的代码示例的文章就介绍到这了,更多相关vue3 echarts折线图内容请搜索脚本之家以前的文章或继续浏览下面的相关文章希望大家以后多多支持脚本之家!
