
VueRouter路由模式全面解析
作者:dralexsanderl
VueRouter路由模式
前端路由的实现方式主要有两种:hash模式和history模式。
hash模式
在window.location对象中有一个hash字段,可以获取地址栏中#字符及后边的所有字符。
hash也称作锚点,本身是用来做页面定位的,可以使对应id的元素显示在可是区域内。
比如说下面这张动图,通过锚点直接跳转到footer:
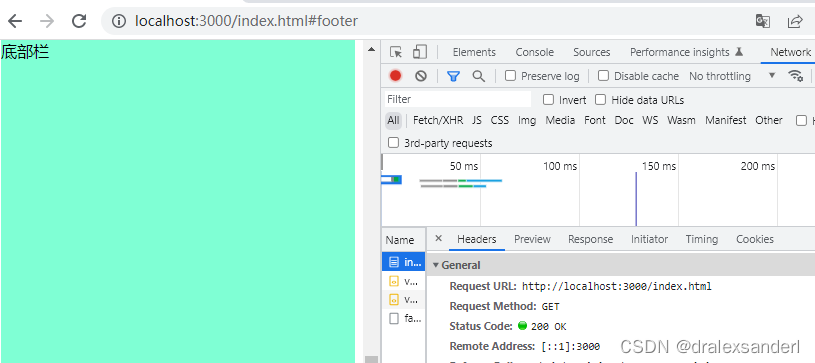
hash 虽然出现在 URL 中,但不会被包括在 HTTP 请求中,不会对请求有影响。
下图可以看到虽然地址是http://localhost:3000/index.html#footer,但是network中的请求是http://localhost:3000/index.html。
由于hash值变化不会导致浏览器向服务器发出请求,而且hash改变会触发hashchange事件,浏览器的进后退也能对其进行控制,所以在 html5 的 history 出现前,开发者基本都是使用 hash 来实现前端路由的。
history模式
HTML5规范提供了history.pushState和history.replaceState来进行路由控制。
通过这两个方法可以改变url且不向服务器发送请求。
同时不会像hash有一个#,更加的美观。
但是如果刷新页面,那么请求的资源就是当前地址栏中的地址了,对于SPA应用来说就需要进行配置将所有的路由重定向到根页面。
调用pushState跳转到相同的路由时仍可以成功且路由栈数量会加1。
这个可以重写pushState方法来进行过滤。
const stack = [];
const originPushState = window.history.pushState;
window.history.pushState = function() {
  if(stack[stack.length - 1] === arguments[2]) {
    return;
  }
  stack.push(arguments[2])
  originPushState.call(history, ...arguments);
}
history.replaceState 和 history.pushState 却不会触发 popstate 事件,不过可以手动创建一个PopStateEvent并触发该事件。
function createPopStateEvent(state, title) {
  return new PopStateEvent("popstate", {
    state: state,
    title: title
  });
}
window.history.pushState = function() {
  if(stack[stack.length - 1] === arguments[2]) {
    return;
  }
  stack.push(arguments[2])
  window.dispatchEvent(createPopStateEvent(...arguments));
  originPushState.call(history, ...arguments);
}
VueRouter中的路由模式
文章中介绍的vue-router源码版本为v3.4.9。
hash模式
在hash模式中,VueRouter主要还是以history.pushState为首选,在不支持history的浏览器中才会通过改变location.hash的值来实现路由切换。
在源码中的hash.js文件中的pushHash方法明确定义。
// src/history/hash.js
function pushHash (path) {
  if (supportsPushState) {
    pushState(getUrl(path))
  } else {
    window.location.hash = path
  }
}同时在beforeCreate监听hashchange方法,防止用户直接在地址栏上修改url。
通过点击跳转的方式VueRouter做了处理并不会触发该方法。
const eventType = supportsPushState ? 'popstate' : 'hashchange'
window.addEventListener(
  eventType,
  handleRoutingEvent
)
hash模式为什么首先考虑使用history.pushState呢?
因为通过history.pushState可以设置state值,VueRouter在每个路由跳转时带有唯一的key,可以用于在浏览器后退前进时恢复到之前的滚动的位置。
在源码中的pushState方法中可以看到,在跳转前保存当前路由的滚动条位置,同时为跳转路由添加一个新key标识新路由。
function pushState (url?: string, replace?: boolean) {
  saveScrollPosition()
  const history = window.history
  // safari存在问题,路由栈中只能保存100,超过100个异常捕获用location来替换路由对象
  try {
    if (replace) {
      const stateCopy = extend({}, history.state)
     stateCopy.key = getStateKey()
     history.replaceState(stateCopy, '', url)
   } else {
     history.pushState({ key: setStateKey(genStateKey()) }, '', url)
   }
 } catch (e) {
    window.location[replace ? 'replace' : 'assign'](url)
  }
}
history模式
在初始化history模式时,监听popstate,在路由变化时恢复滚动条位置。
// src/history/html5.js
this.transitionTo(location, (route) => {
  if (supportsScroll) {
    handleScroll(router, route, current, true)
  }
})
window.addEventListener('popstate', handleRoutingEvent)前面提到history.pushState和history.replaceState两个方法不会触发popstate方法,因此在push和replace方法中,在路由切换成功后手动执行hashScroll方法。
// src/history/html5.js
push(location: RawLocation, onComplete?: Function, onAbort?: Function) {
    const { current: fromRoute } = this
    this.transitionTo(
      location,
      (route) => {
        pushState(cleanPath(this.base + route.fullPath))
        handleScroll(this.router, route, fromRoute, false)
        onComplete && onComplete(route)
      },
      onAbort
    )
  }
abstract模式
在VueRouter中除了hash和history两种模式外,还新增了一个abstract模式,用来在不支持浏览器的环境中充当一个备用方案(例如Weex)。
在abstract模式中新建了一个对象用来模拟浏览器中路由栈。
this.stack = []
同时提供了三个路由跳转方法push、replace和go,这三种方法跟hash和history模式中的push、replace和go方法类似,来看看是怎么实现的。
// src/history/abstract.js push()方法
route => {
  // 在路由栈中添加一个新路由
  this.stack = this.stack.slice(0, this.index + 1).concat(route)
  this.index++
  onComplete && onComplete(route)
}因为非浏览器环境中没有前进后退按钮,因此replace其实就是替换掉路由栈中的最后一个路由。
// src/history/abstract.js replace()方法
route => {
  // 在路由栈中替换掉最后一个路由
  this.stack = this.stack.slice(0, this.index).concat(route)
  this.index++
  onComplete && onComplete(route)
}在go方法中同样对传入的数字进行判断是否在路由栈的范围内,否则不执行。
// src/history/abstract.js go()方法
const targetIndex = this.index + n
if (targetIndex < 0 || targetIndex >= this.stack.length) {
  return
}
之后直接将路由索引指向需要跳转的路由索引同时更新当前路由。
// src/history/abstract.js go()方法
const route = this.stack[targetIndex]
this.confirmTransition(
  route,
  () => {
  this.index = targetIndex
  this.updateRoute(route)
  // ...
)
// src/history/base.js
updateRoute(route: Route) {
  this.current = route
  this.cb && this.cb(route)
}无论是hash还是history模式都需要对浏览器当前的URL产生影响,通过与abstract结合也可以实现在已存在的路由页面中内嵌其他的路由页面,而保持在浏览器当中依旧显示当前页面的路由path。
比如定义了一个hash模式并存在两个路由的实例挂载在app上,其中第二个路由中又定义一个abstract模式的路由。这时候切换/route1和/route2并不会影响URL。
const routes = [
  {
    path: '/',
    component: { template: `<div>default view</div>` }
  },
  {
    path: '/abstractRoute',
    component: {
      name: "abstract",
      template: '<div><h1 @click="toRoute(1)">跳转到router1</h1><h1 @click="toRoute(2)">跳转到router2</h1><router-view></router-view></div>',
      methods: {
        toRoute(num) {
          this.$router.push(`/route${num}`);
        }
      },
      router: new VueRouter({
        routes: [
          {
            path: '/route1',
            component: {template:'<h1>abstract route 1</h1>'}
          },
          {
            path: '/route2',
            component: { template:'<h1>abstract route 2</h1>'}
          },
        ],
        mode: 'abstract'
      })
    }
  },
]
const app = new Vue({
  router: new VueRouter({
    routes,
    mode: 'hash'
  }),
  template: `<div><router-link to="/">to /</router-link>
    <router-link to="/abstractRoute">to abstractRoute</router-link>
    <router-view></router-view>
    </div>`,
}).$mount('#app')
总结
以上为个人经验,希望能给大家一个参考,也希望大家多多支持脚本之家。