
Knife4j+Axios+Redis前后端分离架构下的 API 管理与会话方案(最新推荐)
作者:布说在见
一、Swagger 与 Knife4j 的深度理解及配置要点
Knife4j是Swagger的加强版
对于Swagger的理解
API文档自动生成,Swagger通过注解或代码扫描,生成交互式API文档。接口测试与调试
Knife4j 是为 Swagger 量身定制的增强 UI 框架,解决了原生 Swagger UI 的一些痛点:
优化界面布局,支持分组、搜索、离线文档等功能
增强文档可读性,如参数说明高亮、响应示例格式化
提供更多扩展功能,如接口排序、在线调试增强等
Knife4j 配置关键要点
1.Spring MVC 路径匹配策略配置
关于Knife4j需要注意一点的是需要在yml添加
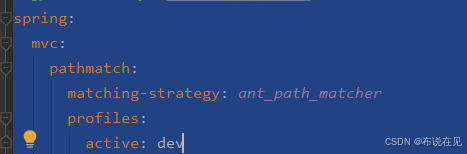
spring:
  mvc:
    pathmatch:
      matching-strategy: ant_path_matcher
      profiles:
        active: dev
2. 扫描包与路径分层配置
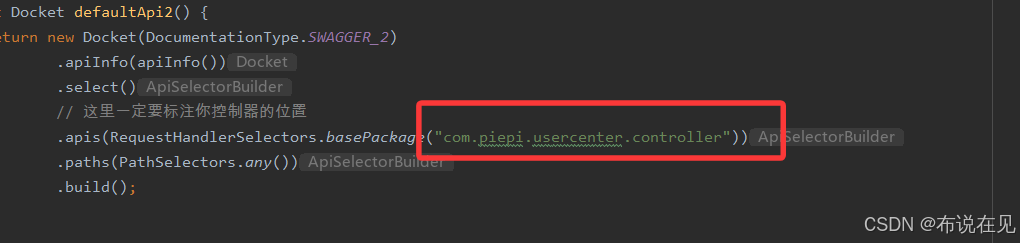
通过 SwaggerConfig 类指定扫描范围,按业务模块分层管理接口:
对于扫描器需要注意下面的包
二、如何前端与后端对接
1.axios是什么?
axios是一个基于Promise的HTTP客户端,用于浏览器和Node.js环境。它支持发送异步HTTP请求,并提供了拦截请求/响应、转换请求/响应数据、取消请求等功能。
2.安装方式
使用 npm:
 npm install axios
使用 bower:
 bower install axios
使用 yarn
    yarn add axios
使用 cdn:
<script src="https://unpkg.com/axios/dist/axios.min.js"></script>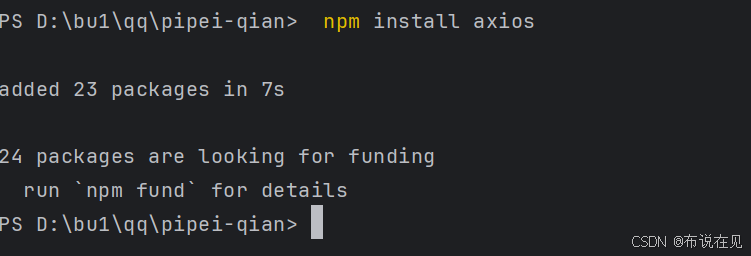
前端
如果文件是JavaScript ,myAxios.js
如果文件 TypeScript。myAxios.ts
新建plugins文件夹,新建myAxios.ts文件。
// Set config defaults when creating the instance
//自定义实例默认值
import axios from "axios";
const myAxios = axios.create({
    baseURL: 'http://localhost:8080/api'
});
//拦截器
// 添加请求拦截器
myAxios.interceptors.request.use(function (config) {
    // 在发送请求之前做些什么
    console.log("请求发送了",config)
    return config;
}, function (error) {
    // 对请求错误做些什么
    return Promise.reject(error);
});
// 添加响应拦截器
myAxios.interceptors.response.use(function (response) {
    // 对响应数据做点什么
    console.log("请求收到了了",response)
    return response;
}, function (error) {
    // 对响应错误做点什么
    return Promise.reject(error);
});
export default myAxios;
如何实现 Axios 的请求重试机制?
核心实现思路:
在响应拦截器中捕获错误,判断是否需要重试(如状态码 5xx、网络超时);
使用递归或定时器实现重试,搭配指数退避策略控制间隔;
通过计数器限制最大重试次数,超过则抛出异常。
三、分布式session是花里胡哨还是什么?
在传统单体架构中,Session通常存储在服务器内存中,用户请求由单一服务器处理,不存在Session共享问题。但在分布式系统中,多台服务器共同处理请求,
解决跨服务器的会话共享问题。
我就以redis分布式Session实现登录的原理来展开介绍。
1.登录:生成Session标识与数据存储
- 用户认证:用户提交密码后,服务器进行身份验证
- 生成唯一Session ID : 认证通过后,服务器生成一个全局唯一的 id,作为Session的标识
- 存储Session数据到Redis:
- 将用户信息封装为JSON对象,以Session ID为键,存储到Redis中
- 设置合理的过期时间,避免内存浪费,实现自动过期失效
代码
- 设置合理的过期时间,避免内存浪费,实现自动过期失效
import javax.servlet.*;
import javax.servlet.http.Cookie;
import javax.servlet.http.HttpServletRequest;
import javax.servlet.http.HttpServletResponse;
import java.io.IOException;
/**
 * Session过滤器:验证请求的Session有效性
 */
public class SessionFilter implements Filter {
    private final RedisSessionManager sessionManager = new RedisSessionManager("localhost", 6379);
    @Override
    public void doFilter(ServletRequest request, ServletResponse response, FilterChain chain)
            throws IOException, ServletException {
        HttpServletRequest httpRequest = (HttpServletRequest) request;
        HttpServletResponse httpResponse = (HttpServletResponse) response;
        // 1. 从Cookie中获取Session ID
        String sessionId = extractSessionIdFromCookie(httpRequest);
        // 2. 验证Session
        UserInfo userInfo = sessionManager.getSession(sessionId);
        if (userInfo == null) {
            // 未登录,重定向到登录页
            httpResponse.sendRedirect("/login");
            return;
        }
        // 3. 将用户信息存入请求属性,供后续处理使用
        httpRequest.setAttribute("currentUser", userInfo);
        // 4. 继续请求处理
        chain.doFilter(request, response);
    }
    /**
     * 从Cookie中提取Session ID
     */
    private String extractSessionIdFromCookie(HttpServletRequest request) {
        Cookie[] cookies = request.getCookies();
        if (cookies != null) {
            for (Cookie cookie : cookies) {
                if ("JSESSIONID".equals(cookie.getName())) {
                    return cookie.getValue();
                }
            }
        }
        return null;
    }
}
实际项目中还需:
配置 Redis 集群连接
添加异常处理机制
实现 Session 数据加密
配置 Web 容器注册过滤器
添加日志记录功能
总结
到此这篇关于Knife4j+Axios+Redis:前后端分离架构下的 API 管理与会话方案的文章就介绍到这了,更多相关Knife4j Axios Redis内容请搜索脚本之家以前的文章或继续浏览下面的相关文章希望大家以后多多支持脚本之家!