java web开发之实现购物车功能
作者:menu520
这篇文章主要为大家详细介绍了java web开发之实现购物车功能的相关资料,文中示例代码介绍的非常详细,具有一定的参考价值,感兴趣的小伙伴们可以参考一下
为了方便自己以后复习,所以写的比较仔细,记录下自己的成长。
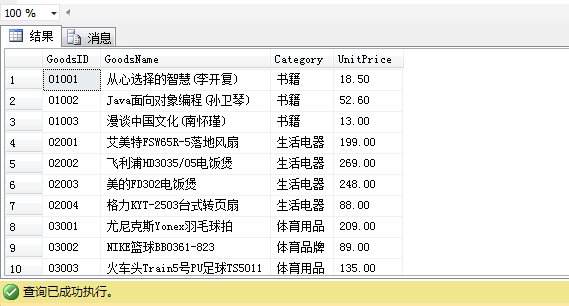
既然是做购物车,那么前提条件是首先需要一系列商品,也就是要建一个实体,这里建了一个商品表

通过查询在浏览器上显示

基本显示已经做好了,现在进入我们的重头戏,Servlet
点击放入购物车时,将访问Servlet

购物车代码
package com.servlet;

import java.io.IOException;
import java.io.PrintWriter;
import java.util.HashMap;
import java.util.Map;

import javax.servlet.ServletException;
import javax.servlet.http.HttpServlet;
import javax.servlet.http.HttpServletRequest;
import javax.servlet.http.HttpServletResponse;

import com.dao.GoodsDAO;
import com.entity.Goods;
import com.entity.GoodsItem;

public class PutCarServlet extends HttpServlet {

 public void doGet(HttpServletRequest request, HttpServletResponse response)
  throws ServletException, IOException {

 response.setContentType("text/html");
 PrintWriter out = response.getWriter();

 doPost(request, response);
 }

 public void doPost(HttpServletRequest request, HttpServletResponse response)
  throws ServletException, IOException {

 response.setContentType("text/html");
 PrintWriter out = response.getWriter();
 //得到编号
 String id = request.getParameter("goodsID");

 //通过编号得到商品对象的所有信息
 GoodsDAO dao = new GoodsDAO();
 Goods g = dao.getGoodsByID(id);
 //将商品放入购物车

 //map集合 就是购物车
 // map<键,值> 商品编号作为键 商品项作为值

 //1.判断是否存在购物车
 //购物车是放在session中的
 //从session去取购物车
 Map<String,GoodsItem> gwc = (Map<String,GoodsItem>)request.getSession().getAttribute("gwc");
 //判断是否存在
 if(gwc==null){
  //创建购物车
  gwc = new HashMap<String, GoodsItem>();
 }

 //将商品项放入购物车
 //put(商品编号,商品项) 向gwc集合中添加数据
 //你要想 购物车中是否已存在该商品
 // 说白了 就是在gwc集合中去匹配是否存在这样一个商品项 ==》去集合中匹配是否存在这样一个商品编号的key

 //判断是否存在商品编号的键

 if(gwc.containsKey(id)){
  //存在
  //设置数量+1

  //通过键 获得值
  //键为商品编号 值为商品项 商品项里面包含商品对象信息 和数量信息
  GoodsItem spx = gwc.get(id);
  //得到原来的数量
  int yldsl = spx.getCount();
  //在原来的数量上+1
  gwc.get(id).setCount(yldsl+1);

//  gwc.get(id).setCount(gwc.get(id).getCount()+1) ;

 }else{
  //不存在
  //创建一个新的商品项 数量为1
  GoodsItem gi = new GoodsItem(g, 1);

  //将此商品项放入gwc
  gwc.put(id, gi);
 }

 //将购物车放入session
 request.getSession().setAttribute("gwc", gwc);

 //继续购物
 response.sendRedirect("index.jsp");
 }

}
执行结果:

以上就是本文的全部内容,希望对大家的学习有所帮助,也希望大家多多支持脚本之家。
