深入理解Java的Spring框架中的IOC容器
作者:JinhaoPlus
Spring IOC的原型
spring框架的基础核心和起点毫无疑问就是IOC,IOC作为spring容器提供的核心技术,成功完成了依赖的反转:从主类的对依赖的主动管理反转为了spring容器对依赖的全局控制。
这样做的好处是什么呢?
当然就是所谓的“解耦”了,可以使得程序的各模块之间的关系更为独立,只需要spring控制这些模块之间的依赖关系并在容器启动和初始化的过程中将依据这些依赖关系创建、管理和维护这些模块就好,如果需要改变模块间的依赖关系的话,甚至都不需要改变程序代码,只需要将更改的依赖关系进行修改即可,spring会在再次启动和初始化容器的过程中使得这些新的依赖关系重新建立符合新需求的模块,在这个过程中,需要注意的是代码本身不需要体现对于模块具体依赖情形的声明而只需要定义其所需模块的接口,所以这是一种典型的面向接口思想,同时最好将依赖关系以配置文件或者注解的形式表述出来,相关的spring处理类会根据这些外部的配置文件组装模块,或者扫描注解调用内部的注解处理器组装模块,以此完成IOC的过程。
IOC的目的是称为DI的依赖注入,通过IOC技术,最终容器将帮助我们完成模块间的依赖注入。
另外,最终的一点是,在spring IOC的过程中,我们必须始终清楚以上这条主线,即时语法和类的结构再复杂,但是其作用和目的都是一样的:就是通过依赖描述的配置文件这一装配“图纸”去完成模块的“组装”,复杂的语法只是完成这一目的的手段罢了。
所谓的IOC原型,为了展示最简单的IOC原理图,我们不妨做一个完全简单的原型来说明这个过程:
首先是我们定义的几个模块,包括主模块和两个接口定义的依赖模块:
class MainModule{
  private DependModuleA moduleA;
  private DependModuleB moduleB;
  public DependModuleA getModuleA() {
    return moduleA;
  }
  public void setModuleA(DependModuleA moduleA) {
    this.moduleA = moduleA;
  }
  public DependModuleB getModuleB() {
    return moduleB;
  }
  public void setModuleB(DependModuleB moduleB) {
    this.moduleB = moduleB;
  }

}

interface DependModuleA{
  public void funcFromModuleA();
}

interface DependModuleB{
  public void funcFromModuleB();
}

class DependModuleAImpl implements DependModuleA{

  @Override
  public void funcFromModuleA() {
    System.out.println("This is func from Module A");
  }

}

class DependModuleBImpl implements DependModuleB{

  @Override
  public void funcFromModuleB() {
    System.out.println("This is func from Module B");
  }

}
如果我们不采用IOC,而是依靠主模块本身去控制其依赖模块的创建,那么会是这样的:
public class SimpleIOCDemo {
  public static void main(String[] args) throws ClassNotFoundException {
    MainModule mainModule = new MainModule();
    mainModule.setModuleA(new DependModuleAImpl());
    mainModule.setModuleB(new DependModuleBImpl());
    mainModule.getModuleA().funcFromModuleA();
    mainModule.getModuleB().funcFromModuleB();
  }
}
这是我们经过简化定义的IOC容器原型,容器在启动后初始化的时候会读取用户写入的配置文件,这里我们以简单的properties配置文件为例,只有当用户调取getBean方法的时候才会真正地按照配置文件组装加载相应的bean,在我们定义的容器原型内部维护着一个用于保存装配好的bean 的map,如果在其中有满足要求的bean的话就不需要再新建了:
class SimpleIOCContainer{
  private Properties properties = new Properties();
  private Map<String, Object> moduleMap = new HashMap<>();
  {
    try {
      properties.load(new FileInputStream(new File("SimpleIOC.properties")));
    } catch (Exception e) {
      e.printStackTrace();
    }

  }
  public Object getBean(String moduleName) throws ClassNotFoundException {
    Object instanceObj;
    if(moduleMap.get(moduleName)!=null){
      System.out.println("return old bean");
      return moduleMap.get(moduleName);
    }
    System.out.println("create new bean");
    String fullClassName = properties.getProperty(moduleName);
    if(fullClassName == null)
      throw new ClassNotFoundException();
    else{
      Class<? extends Object> clazz = Class.forName(fullClassName);
      try {
        instanceObj = clazz.newInstance();
        instanceObj = buildAttachedModules(moduleName,instanceObj);
        moduleMap.put(moduleName, instanceObj);
        return instanceObj;
      } catch (InstantiationException e) {
        e.printStackTrace();
      } catch (IllegalAccessException e) {
        e.printStackTrace();
      }
    }
    return null;
  }
  private Object buildAttachedModules(String modulename , Object instanceObj) {
    Set<String> propertiesKeys = properties.stringPropertyNames();
    Field[] fields = instanceObj.getClass().getDeclaredFields();
    for (String key : propertiesKeys) {
      if(key.contains(modulename)&&!key.equals(modulename)){
        try {
          Class<? extends Object> clazz = Class.forName(properties.getProperty(properties.getProperty(key)));
          for (Field field : fields) {
            if(field.getType().isAssignableFrom(clazz))
              field.set(instanceObj, clazz.newInstance());
          }
        } catch (Exception e) {
          e.printStackTrace();
        }

      }
    }
    return instanceObj;
  }
}
这是我们使用properties配置文件写成的依赖关系配置文件,这个配置文件是我们装配模块的“图纸”,这里的语法个是完全是我们定义的,在真实的spring IOC容器中,为了表达更为复杂的依赖逻辑,会使用更为发达的xml格式配置文件或者更新的注解配置,依靠注解处理器来完成图纸的解析:
mainModule=com.rocking.demo.MainModule
mainModule.moduleA=moduleA
mainModule.moduleB=moduleB
moduleA=com.rocking.demo.DependModuleAImpl
moduleB=com.rocking.demo.DependModuleBImpl
这是测试代码,可以看到的是我们可以完整的通过我们定义的IOC容器获取到符合要求的模块,同时也可以发现我们定义的容器可以为我们维护这些bean,当有bean已经组装创建出来之后就不需要再创建了。
public class SimpleIOCDemo {
  public static void main(String[] args) throws ClassNotFoundException {
    SimpleIOCContainer container = new SimpleIOCContainer();
    DependModuleA moduleA = (DependModuleA) container.getBean("moduleA");
    moduleA.funcFromModuleA();
    DependModuleB moduleB = (DependModuleB) container.getBean("moduleB");
    moduleB.funcFromModuleB();
    MainModule mainModule = (MainModule) container.getBean("mainModule");
    mainModule.getModuleA().funcFromModuleA();
    mainModule.getModuleB().funcFromModuleB();
    container.getBean("mainModule");
  }
}
这就是我依据IOC的基本思想创建的IOC容器原型,spring IOC虽然语法复杂,但是说到底完成的任务在核心上都是一样的,所谓的“万变不离其宗”。
Spring IOC 的具体过程
上回展示了IOC的大致实现的原型,那么在Spring框架中具体是怎么实现这个容器根据metadata元信息配置加载POJO的过程的呢?在整个Spring IOC容器的工作过程中有很多地方是设计地相当灵活的,供给使用者很多空间去完成自己的任务,而不是一味地只是完成容器的机械过程。
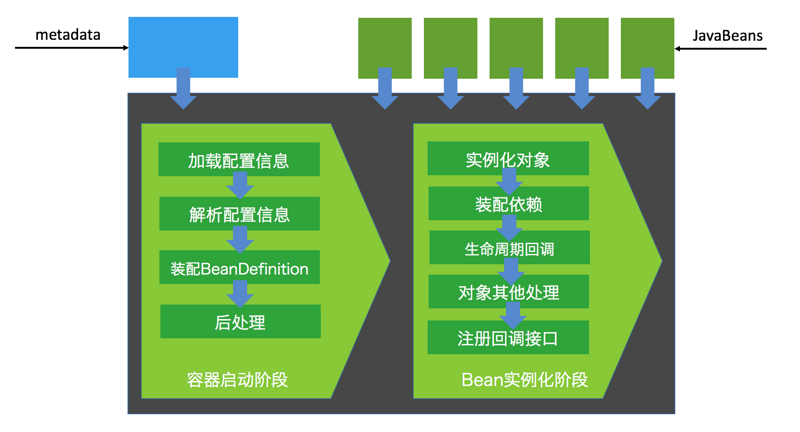
这是整个IOC容器工作过程的过程图:

1、容器启动阶段
(1)加载配置文件信息
(2)解析配置文件信息
(3)装配BeanDefinition
(4)后处理
首先配置文件或者注解等元信息和JavaBean的类信息被加载到IOC容器中,容器读取到xml格式的配置文件,这个配置文件是使用者声明的依赖关系和装配中需要特别关注的地方,是装配Bean的早期“外部图纸”,容器中的解析引擎可以把我们写入的文本形式的字符元信息解析成容器内部可以识别的BeanDefinition,可以把BeanDefinition理解成为类似反射机制的类结构,这个通过对JavaBean和配置文件进行分析得到的BeanDefinition获取了组装一个符合要求的JavaBean的基本结构,如果需要除了BeanDefinition之后还要对这个BeanDefinition再做修改的话则执行这个后处理,后处理一般是通过Spring框架内的BeanFactoryPostProcessor处理的。
我们仍然使用上次使用过的例子来说明这个BeanDefinition的运作原理:有三个bean,主模块MainModule和依赖模块DependModuleA,DependModuleB,前者依赖后面两个模块构成,在配置文件里我们一般会这么进行依赖的声明:
<?xml version="1.0" encoding="UTF-8"?>
<beans xmlns="http://www.springframework.org/schema/beans"
  xmlns:xsi="http://www.w3.org/2001/XMLSchema-instance"
  xsi:schemaLocation="http://www.springframework.org/schema/beans
  http://www.springframework.org/schema/beans/spring-beans-3.0.xsd">

  <bean id="mainModule" class="com.rocking.demo.MainModule">
    <property name="moduleA">
      <ref bean="moduleA"/>
    </property>
    <property name="moduleB">
      <ref bean="moduleB"/>
    </property>
  </bean>
  <bean id="moduleA" class="com.rocking.demo.DependModuleAImpl"></bean>
  <bean id="moduleB" class="com.rocking.demo.DependModuleBImpl"></bean>
</beans>
这是我们的程序演示一个标准的BeanFactory容器(Spring IOC容器的实现之一)对上面配置文件的装配:
class MainModule {
  private DependModuleA moduleA;
  private DependModuleB moduleB;

  public DependModuleA getModuleA() {
    return moduleA;
  }

  public void setModuleA(DependModuleA moduleA) {
    this.moduleA = moduleA;
  }

  public DependModuleB getModuleB() {
    return moduleB;
  }

  public void setModuleB(DependModuleB moduleB) {
    this.moduleB = moduleB;
  }

}

interface DependModuleA {
  public void funcFromModuleA();
}

interface DependModuleB {
  public void funcFromModuleB();
}

class DependModuleAImpl implements DependModuleA {

  @Override
  public void funcFromModuleA() {
    System.out.println("This is func from Module A");
  }

}

class DependModuleBImpl implements DependModuleB {

  @Override
  public void funcFromModuleB() {
    System.out.println("This is func from Module B");
  }

}

public class SimpleIOCDemo {
  public static void main(String[] args) throws ClassNotFoundException {
    DefaultListableBeanFactory beanFactory = new DefaultListableBeanFactory();
    XmlBeanDefinitionReader reader = new XmlBeanDefinitionReader(beanFactory);
    reader.loadBeanDefinitions("Beans.xml");
    MainModule mainModule = (MainModule) beanFactory.getBean("mainModule");
    mainModule.getModuleA().funcFromModuleA();
    mainModule.getModuleB().funcFromModuleB();
  }
}
这里我们的配置文件和JavaBean被加载读取并被解析,这里的BeanDefinition生成使用过程掩藏在其中,这是实际上在IOC内部发生的大致过程:
public class SimpleIOCDemo {
  public static void main(String[] args) throws ClassNotFoundException {
    DefaultListableBeanFactory beanFactory = new DefaultListableBeanFactory();
    AbstractBeanDefinition mainModule = new RootBeanDefinition(MainModule.class);
    AbstractBeanDefinition moduleA = new RootBeanDefinition(DependModuleAImpl.class);
    AbstractBeanDefinition moduleB = new RootBeanDefinition(DependModuleBImpl.class);

    beanFactory.registerBeanDefinition("mainModule", mainModule);
    beanFactory.registerBeanDefinition("moduleA", moduleA);
    beanFactory.registerBeanDefinition("moduleB", moduleB);

    MutablePropertyValues propertyValues = new MutablePropertyValues();
    propertyValues.add("moduleA", moduleA);
    propertyValues.add("moduleB", moduleB);
    mainModule.setPropertyValues(propertyValues);

    MainModule module = (MainModule) beanFactory.getBean("mainModule");
    module.getModuleA().funcFromModuleA();
    module.getModuleB().funcFromModuleB();
  }
}
对xml的元信息进行加载读取后,IOC解析引擎会将其中提到的模块依据其真实类型创建成BeanDefinition,这个BeanDefinition可以看成是一种反射或者代理的过程,目的是为了让IOC容器清楚以后要创建的实例对象的bean结构,然后将这些bean结构注册到BeanFactory中去,之后将主模块的依赖以setter注入的形式加入到主模块的属性中去,(这一点要看主模块提供的是setter方法还是初始化方法),这个过程结束后注册完所有“图纸”上规定的bean的Definition后,BeanFactory就已经成型。之后只要调用getBean方法即可将符合要求的bean生产出来,这是下一阶段的过程,我们之后再说。
在将BeanDefinition这一“图纸”上的信息注册到BeanFactory完毕后,我们仍然可以对已经注册完的BeanDefinition进行改动的操作,这就是我们前面提到的Spring为使用者设计的灵活的地方之一,不是说所有的过程不可控,而是在很多地方留了很多使用者可以发挥的余地。具体的办法是使用BeanFactory处理器BeanFactoryPostProcessor来介入对BeanFactory的处理以进一步改写我们需要修改的BeanDefinition部分。这个过程对应流程里的“后处理”过程。
以常见的处理器之一:属性占位符配置处理器为例,就是在已经构建完成已注册完毕的BeanFactory之后再对它处理,以使得BeanDefinition相应属性里的内容修改为配置处理器指定配置文件里的信息:
DefaultListableBeanFactory beanFactory = new DefaultListableBeanFactory();
XmlBeanDefinitionReader reader = new XmlBeanDefinitionReader(beanFactory);
reader.loadBeanDefinitions( new ClassPathResource( "Beans.xml"));
PropertyPlaceholderConfigurer configurer = new PropertyPlaceholderConfigurer();
configurer.setLocation( new ClassPathResource( "about.properties"));
configurer.postProcessBeanFactory( beanFactory);
BeanFactoryPostProcessor将对BeanFactory处理,处理的结果就是把BeanDefinition中定义的某些属性改成BeanFactoryPostProcessor定义位置处的某些信息。
2、Bean 实例化阶段
有了经过处理的BeanDefinition的“内部图纸”的指导下,容器可以进一步把BeanDefifnition通过反射或CGLIB动态字节码生产的方式化为存在于内存中的活化实例对象,再将BeanDefinition规定的依赖对象通过setter注入或者初始化注入的方式装配进新创建的实例对象中,这里是实实在在地将依赖对象的引用赋给需要依赖的对象属性中。
但是这里需要注意的是创建的实例不仅仅是一个简单的bean定义的实例,而是一个经过Spring包装的BeanWrapper实例,这里为什么要采用BeanWrapper的方式来包装bean呢?是因为BeanWrapper提供了统一访问bean属性的接口,在创建完了基本的bean的框架后要对其中的属性进行设置,每个bean的setter方法都不一样,所以如果直接用反射设置的话会非常复杂,所以spring提供这种包装来简化属性设置:
BeanWrapper beanWrapper = new BeanWrapperImpl(Class.forName("com.rocking.demo.MainModule"));
beanWrapper.setPropertyValue( "moduleA", Class.forName("com.rocking.demo.DepModuleAImpl").newInstance());
beanWrapper.setPropertyValue( "moduleB", Class.forName("com.rocking.demo.DepModuleBImpl").newInstance());
MainModule mainModule= (MainModule) beanWrapper.getWrappedInstance();
mainModule.getModuleA().funcFromA();
mainModule.getModuleB().funcFromB();
以上的过程展示了在Spring内部,通过获取类的反射容器了解将来包装的实例bean的结构并作出包装,使用统一的属性设置方法setPropertyValue来对这个包装的实例设置属性,最后得到的bean实例通过getWrappedInstance拿到,可以发现已经成功将其属性赋值。
这个时候的bean实例其实已经完全可以使用了,但是Spring同样在实例化阶段也为我们准备了灵活的策略以完成使用者对这个阶段的介入,和容器启动阶段的BeanFactoryPostProcessor控制BeanDefinition类似,在实例化阶段,Spring提供了BeanPostProcessor处理器来对已经装配好的实例进行操作,以完成可能需要的改动:、
这里举个例子来说明,定义一个BeanPostProcessor的实现类,实现其中的方法postProcessAfterInitialization和postProcessBeforeInitialization来定义对在bean实例装配之后和之前分别进行的操作,在BeanFactory添加了这个处理器后就会在每次调用getBean方法装配实例的时候,都会传入根据“图纸”装配出的bean实例(包括装配过程中创建的依赖实例bean)调用这两个方法,这些方法可以对这些bean实例实施修改。
下面是一个这样的例子(MainModule及其依赖关系和本文之前的例子相同):
class ModuleC {
  private String x;

  public String getX() {
    return x;
  }

  public void setX(String x) {
    this.x = x;
  }

}

class ModulePostProcessor implements BeanPostProcessor{

  @Override
  public Object postProcessAfterInitialization(Object object, String string)
      throws BeansException {
    System.out.println(string);
    if(object instanceof ModuleC){
      System.out.println(string);
      ((ModuleC)object).setX("after");
    }
    return object;
  }

  @Override
  public Object postProcessBeforeInitialization(Object object, String string)
      throws BeansException {
    if(object instanceof ModuleC){
      ((ModuleC)object).setX("before");
    }
    return object;
  }

}

public class VerySimpleIOCKernal {
  public static void main(String[] args) throws ClassNotFoundException, BeansException, InstantiationException, IllegalAccessException {
    DefaultListableBeanFactory beanFactory = new DefaultListableBeanFactory();
    XmlBeanDefinitionReader reader = new XmlBeanDefinitionReader(beanFactory);
    reader.loadBeanDefinitions(new ClassPathResource("Beans.xml"));
    ModulePostProcessor postProcessor = new ModulePostProcessor();
    beanFactory.addBeanPostProcessor(postProcessor);
    MainModule module = (MainModule) beanFactory.getBean("mainModule");
    ModuleC moduleC = (ModuleC) beanFactory.getBean("moduleC");
    System.out.println(moduleC.getX());
  }
}
这是bean的依赖关系配置文件:
<?xml version="1.0" encoding="UTF-8"?>
<beans xmlns="http://www.springframework.org/schema/beans"
  xmlns:xsi="http://www.w3.org/2001/XMLSchema-instance"
  xsi:schemaLocation="http://www.springframework.org/schema/beans http://www.springframework.org/schema/beans/spring-beans.xsd">
  <bean id="mainModule" class="com.rocking.demo.MainModule">
    <property name="moduleA">
      <ref bean="moduleA"/>
    </property>
    <property name="moduleB">
      <ref bean="moduleB"/>
    </property>
  </bean>
  <bean id="moduleA" class="com.rocking.demo.DepModuleAImpl">
    <property name="infoA">
      <value>${moduleA.infoA}</value>
    </property>
  </bean>
  <bean id="moduleB" class="com.rocking.demo.DepModuleBImpl">
    <property name="infoB">
      <value>info of moduleB</value>
    </property>
  </bean>
  <bean id="moduleC" class="com.rocking.demo.ModuleC">
  </bean>
</beans>
从最终的结果我们可以看出,每次调用getBean方法得到的bean实例(包括因依赖关系生成的)都将被BeanPostProcessor获取进行前置和后置处理。
除了类似上面的BeanPostProcessor的办法对装配好的bean再做处理外,Spring还可以通过配置init-method和destroy-method来对bean的初始化和销毁过程设置回调函数,这些回调函数也还可以灵活地提供更改bean实例的机会。
整个Spring IOC的过程其实总体来说和我们自己写的IOC原型在本质上是一样的,只不过通过复杂的设计使得IOC的过程能够更灵活有效地提供给使用者更多的发挥空间,除此之外,Spring的IOC也在安全性、容器的稳定性、metadata到bean转换的高效性上做到了精美的设计,使得IOC这一Spring容器的基础得以稳固。
