Springboot通过配置WebMvcConfig处理Cors非同源访问跨域问题
作者:ForestSpringH
关于Cors跨域的问题,前端有代理和jsonp的常用方式解决这种非同源的访问拒绝策略,什么是同源?即域名一致端口一致但是端口下访问的接口api不同的两种或者几种的互相访问叫做同源访问,但是若是接口不一致或者域名不一致(这里泛指IP不一致),那么对应的就属于非同源访问,浏览器会拒绝发出请求,直接回复404,有时候我也见过恢复202的就是发出去了但是被后端的Mvc处理hander链给拒绝了。那么配置MVC是后端处理Cors问题的一种解决思路。
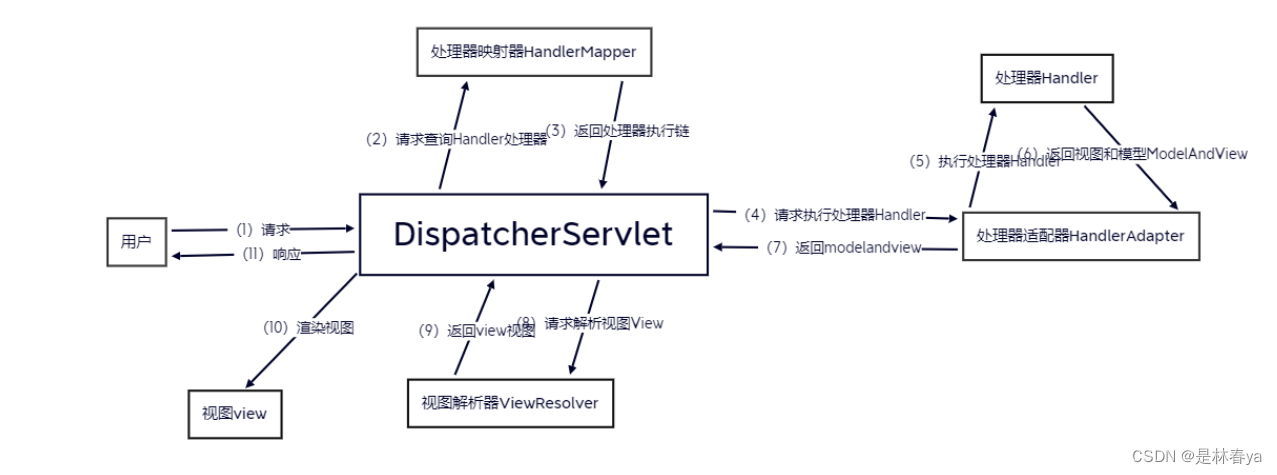
之前学习过MVC的处理链路,从一次请求发过来到回复数据总共11次处理:

请求发送到服务器端时是由我们的MVC进行处理的,而统一调配任务流程的则是我们的请求分发器,注意这里请求到处理器之后回去寻找处理器适配器(符合校验处理的请求才能被允许例如接口含有的合法api,以及跨域原则),之前我们的微信小程序开发过程中是没有考虑跨域问题的,原因是我们知道小程序的请求处理都是由微信后台进行分发处理的,也就是在微信的后台时就做了前端的跨域处理,大概是采用动态代理的方式解决了小程序的跨域。
那么我们先看看MVC的配置接口 WebMvcConfigurer 的源代码:
public interface WebMvcConfigurer {
    default void configurePathMatch(PathMatchConfigurer configurer) {
    }
    default void configureContentNegotiation(ContentNegotiationConfigurer configurer) {
    }
    default void configureAsyncSupport(AsyncSupportConfigurer configurer) {
    }
    default void configureDefaultServletHandling(DefaultServletHandlerConfigurer configurer) {
    }
    default void addFormatters(FormatterRegistry registry) {
    }
    default void addInterceptors(InterceptorRegistry registry) {
    }
    default void addResourceHandlers(ResourceHandlerRegistry registry) {
    }
    default void addCorsMappings(CorsRegistry registry) {
    }
    default void addViewControllers(ViewControllerRegistry registry) {
    }
    default void configureViewResolvers(ViewResolverRegistry registry) {
    }
    default void addArgumentResolvers(List<HandlerMethodArgumentResolver> resolvers) {
    }
    default void addReturnValueHandlers(List<HandlerMethodReturnValueHandler> handlers) {
    }
    default void configureMessageConverters(List<HttpMessageConverter<?>> converters) {
    }
    default void extendMessageConverters(List<HttpMessageConverter<?>> converters) {
    }
    default void configureHandlerExceptionResolvers(List<HandlerExceptionResolver> resolvers) {
    }
    default void extendHandlerExceptionResolvers(List<HandlerExceptionResolver> resolvers) {
    }
    @Nullable
    default Validator getValidator() {
        return null;
    }
    @Nullable
    default MessageCodesResolver getMessageCodesResolver() {
        return null;
    }
}
它的内部是具备一些处理器解析器以及映射的添加与配置的方法的,那么我们要解决Cros跨域问题就是要考虑addCorsMappings 配置Cros映射,所以我们点进去看看这注册Cros的 CorsRegistry 的源码:
public class CorsRegistry {
    private final List<CorsRegistration> registrations = new ArrayList();
    public CorsRegistry() {
    }
    public CorsRegistration addMapping(String pathPattern) {
        CorsRegistration registration = new CorsRegistration(pathPattern);
        this.registrations.add(registration);
        return registration;
    }
    protected Map<String, CorsConfiguration> getCorsConfigurations() {
        Map<String, CorsConfiguration> configs = CollectionUtils.newLinkedHashMap(this.registrations.size());
        Iterator var2 = this.registrations.iterator();
        while(var2.hasNext()) {
            CorsRegistration registration = (CorsRegistration)var2.next();
            configs.put(registration.getPathPattern(), registration.getCorsConfiguration());
        }
        return configs;
    }
}
从上述代码中不难发现,内部有一个不可改变的 CorsRegistration 数组链表,以及增加映射的方法,主要还是看看它具备的元素 CorsRegistration 含有什么配置项:
public class CorsRegistration {
    private final String pathPattern;
    private CorsConfiguration config;
    public CorsRegistration(String pathPattern) {
        this.pathPattern = pathPattern;
        this.config = (new CorsConfiguration()).applyPermitDefaultValues();
    }
    public CorsRegistration allowedOrigins(String... origins) {
        this.config.setAllowedOrigins(Arrays.asList(origins));
        return this;
    }
    public CorsRegistration allowedOriginPatterns(String... patterns) {
        this.config.setAllowedOriginPatterns(Arrays.asList(patterns));
        return this;
    }
    public CorsRegistration allowedMethods(String... methods) {
        this.config.setAllowedMethods(Arrays.asList(methods));
        return this;
    }
    public CorsRegistration allowedHeaders(String... headers) {
        this.config.setAllowedHeaders(Arrays.asList(headers));
        return this;
    }
    public CorsRegistration exposedHeaders(String... headers) {
        this.config.setExposedHeaders(Arrays.asList(headers));
        return this;
    }
    public CorsRegistration allowCredentials(boolean allowCredentials) {
        this.config.setAllowCredentials(allowCredentials);
        return this;
    }
    public CorsRegistration maxAge(long maxAge) {
        this.config.setMaxAge(maxAge);
        return this;
    }
    public CorsRegistration combine(CorsConfiguration other) {
        this.config = this.config.combine(other);
        return this;
    }
    protected String getPathPattern() {
        return this.pathPattern;
    }
    protected CorsConfiguration getCorsConfiguration() {
        return this.config;
    }
}
我们可以发现内部是具备允许放行:请求头,请求路径,请求方法,请求源策略的方法的,所以我们在这里的 重写addCorsMappings方法配置一个 CorsRegistry 添加相应的路径方法与请求策略放行不就可以解决跨域的问题了?
我们写一个WebMvcConfig配置类实现刚刚研究的WebMvcConfigurer接口重写addCrosMappings配置CrosRegistry即可(或者在api与Controller控制类上打上@CrossOrigin注解也可以解决问题(注解默认放行所有来源的请求)):
/**
 * 配置前端跨域访问请求
 */
@Configuration
public class WbMvcConfig implements WebMvcConfigurer {
    @Override
    public void addCorsMappings(CorsRegistry registry) {
       registry.addMapping("/**")
               .allowedHeaders("Content-Type","X-Request-With","Access-Control-Request-Method","Access-Control-Request-Headers","token")
               .allowedMethods("*")
               .allowedOriginPatterns("*")
               /*注意当这个配置为真是我们不能将允许源设置为*而是将源路径设置为*即可*/
               .allowCredentials(true);
    }
    @Bean
    public FormContentFilter httpPutFormContentFilter(){
        return new FormContentFilter();
    }
}
我们利用axios写一个简单的请求发送按钮:
    <input type="button" value="get" class="get">
    <script>
        document.querySelector(".get").onclick = function () {
            // 跨域一般是是后端解决的事情
            axios.get("http://127.0.0.1:8080/all").then(
                function (response) {
                    console.log(response)
                }
            )
        }
    </script>
再用SpringBoot写一个简单的controller的api:
@RestController
public class testController {
    @Autowired
    private ProductServiceImpl productService;
    @GetMapping("/all")
    @ResponseBody
    public List<Product> all() {
        Page<Product> page = productService.page(1L);
        List<Product> productList = new LinkedList<>();
        productList.add(page.getRecords().iterator().next());
        return productList;
    }
}
这里我们在浏览器打开5050端口下的这个html文件就可以点击按钮访问接口了:

这里可以看到请求访问数据成功了!
到此这篇关于Springboot通过配置WebMvcConfig处理Cors非同源访问跨域问题的文章就介绍到这了,更多相关Springboot Cors非同源访问跨域内容请搜索脚本之家以前的文章或继续浏览下面的相关文章希望大家以后多多支持脚本之家!
