SpringBoot加载多个配置文件实现dev、product多环境切换的方法
作者:lans_g
前言
在公司真正的开发和生产中,同一套程序会被部署到几个不同的环境,比如:开发、测试、生产等。其中每个环境的数据库地址、服务器端口等等配置都会不同,这样通过多个配置文件就做到了隔离,多个环境之间不会相互影响。但是这么多配置文件,项目启动时SpringBoot如何确定加载哪一个呢?
1.SpringBoot中实现多环境切换
在SpringBoot中,除了application.properties,我们新建的其他配置文件的文件名需要满足application-{profile}.properties的格式,其中{profile}对应你的环境标识(不一定是.properties文件,也可以是.yml)其对应的{profile}值是开发者自定义的(如dev,product),在项目启动的时候,只需要添加对应的参数,springboot就会去读取该配置文件了。具体profile的配置在application.properties文件中通过spring.profiles.active属性来设置。接下来我们以一个例子来说明
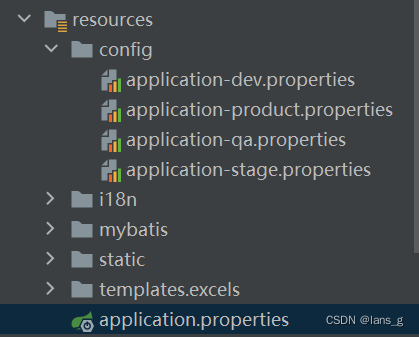
(1)首先这里创建了dev、product、qa、stage和默认的application五个配置文件

(2)加载配置文件时会先加载application.properties配置文件(这里一般存放一些公共配置),在该文件中配置要加载的环境的配置文件,这里有两种配置方法。
例如要加载dev环境,可以在application.properties中这样配置
spring.profiles.active=dev
或者使用@spring.profiles.active@,如下所示
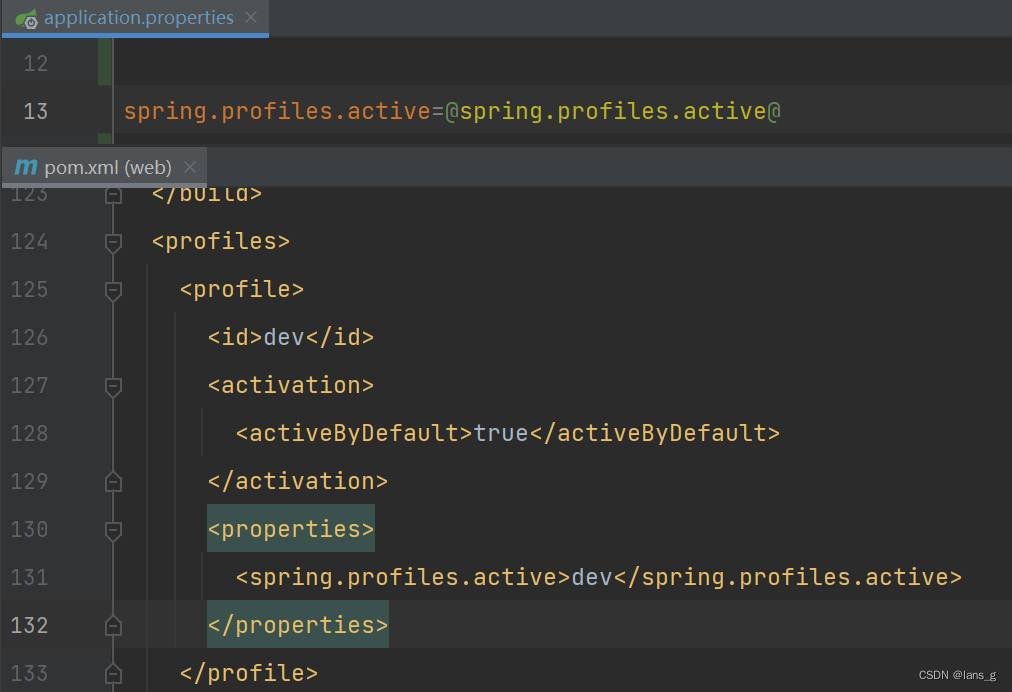
spring.profiles.active=@spring.profiles.active@
如果使用这种方式则需要在pom.xml中添加以下内容,其中activeByDefault标签来指定项目启动时默认加载的配置文件。
<profiles>
  <profile>
    <id>dev</id>
    <activation>
      <activeByDefault>true</activeByDefault>
    </activation>
    <properties>
      <spring.profiles.active>dev</spring.profiles.active>
    </properties>
  </profile>
  <profile>
    <id>qa</id>
    <properties>
      <spring.profiles.active>qa</spring.profiles.active>
    </properties>
  </profile>
  <profile>
    <id>stage</id>
    <properties>
      <spring.profiles.active>stage</spring.profiles.active>
    </properties>
  </profile>
  <profile>
    <id>product</id>
    <properties>
      <spring.profiles.active>product</spring.profiles.active>
    </properties>
  </profile>
</profiles>
当执行mvn clean package -P dev 命令对项目进行打包发布时,打出来的jar/war包中的配置文件中@spring.profiles.active@ 会被替换成 dev。
注意
@spring.profiles.active@要与pom中的标签<spring.profiles.active>> 保持一致,否则会报错。

2.SpringBoot中配置文件加载顺序
配置文件的优先级排序(以哪个配置文件为准):
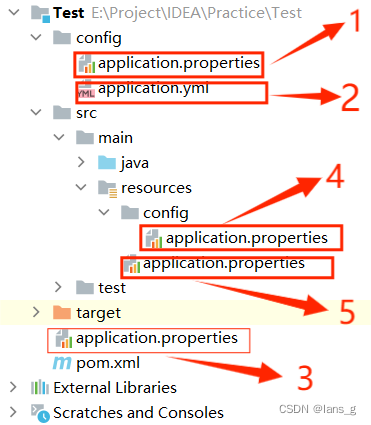
1、项目根目录下的config目录。【优先级最高】
2、项目根目录。
3、classpath下的config目录。
4、classpath目录(新建项目时application.properties默认所在位置)。【优先级最低】
配置文件加载顺序和优先级顺序相反,优先级低的先加载,因为如果有重复的配置,先加载的配置文件会被覆盖。
同一级目录下,如果是application.yml,application.properties配置文件同时存在,会以application.properties配置文件为准,也就是说先加载.yml文件后加载.properties文件。

优先级顺序:1->2->3->4->5。
文件加载顺序:5->4->3->2->1。
到此这篇关于SpringBoot加载多个配置文件实现dev、product多环境切换的文章就介绍到这了,更多相关SpringBoot加载多个配置文件内容请搜索脚本之家以前的文章或继续浏览下面的相关文章希望大家以后多多支持脚本之家!
