django+celery+RabbitMQ自定义多个消息队列的实现
作者:Hello_Mr_Zheng
本文主要介绍了django+celery+RabbitMQ自定义多个消息队列的实现,文中通过示例代码介绍的非常详细,对大家的学习或者工作具有一定的参考学习价值,需要的朋友们下面随着小编来一起学习学习吧
关于django celery的使用网上有很多文章,本文就不多做更多的说明。
本文使用版本
- python==3.8.15
- Django==3.2.4
- celery==5.2.7
celery.py
from __future__ import absolute_import, unicode_literals
import os
from celery import Celery
from kombu import Exchange, Queue

# set the default Django settings module for the 'celery' program.
os.environ.setdefault('DJANGO_SETTINGS_MODULE', 'zkcelery.settings')

app = Celery('zkcelery')

# Using a string here means the worker doesn't have to serialize
# the configuration object to child processes.
# - namespace='CELERY' means all celery-related configuration keys
#   should have a `CELERY_` prefix.
app.config_from_object('django.conf:settings', namespace='CELERY')

# Load task modules from all registered Django app configs.
app.autodiscover_tasks()

# 看了一篇文章说,如果使用redis做broker,exchange可以不配置;但如果使用rabbitMQ做broker,就必须要配置。
queue = (
    Queue('default', exchange=Exchange('default', type='direct'), routing_key='default'),
    Queue('q1', exchange=Exchange('e1', type='direct'), routing_key='r1'),
    Queue('q2', exchange=Exchange('e2', type='direct'), routing_key='r2'),
    Queue('q3', exchange=Exchange('e3', type='fanout'), routing_key='r3'),
)

# 一旦配置了route后,所有的任务名都必须要指定route,否则任务无法执行。
# 经过测试,route匹配是最长匹配规则。
route = {
    'apps.zhiding.tasks.add': {'queue': 'q1', 'routing_key': 'r1'},
    'apps.zhiding.tasks.multiply': {'queue': 'q2', 'routing_key': 'r2'},
    # 其它的任务名称,匹配这条路由
    # 如果以上队列的worker服务器坏了,这些任务会被全部放进这个队列里,该队列的worker将继续处理这些任务
    # 下面这条队列一定要配置,否则其它任务无法处理。
    '*': {'queue': 'default', 'routing_key': 'default'},
}
app.conf.update(CELERY_QUEUES=queue, CELERY_ROUTES=route)
tasks.py
from celery import shared_task
import time


@shared_task
def add(x, y):
    time.sleep(2)
    print('任务睡眠2秒后执行了')
    return x + y


@shared_task
def multiply(x, y):
    time.sleep(5)
    print('任务睡眠5秒后执行了')
    return x * y


@shared_task
def sub(x, y):
    time.sleep(4)
    print('任务睡眠4秒后执行了')
    return x - y
笔者也看了很多博文,在settings.py配置文件中写入CELERY_QUEUES和CELERY_ROUTES,上面的配置对应下来就是如下代码块:
CELERY_QUEUES = (
    Queue('default', exchange=Exchange('default', type='direct'), routing_key='default'),
    Queue('sq1', exchange=Exchange('sq1', type='direct'), routing_key='sq1'),
    Queue('sq2', exchange=Exchange('sq2', type='direct'), routing_key='sq2'),
    Queue('sq3', exchange=Exchange('sq3', type='fanout'), routing_key='sq3'),
)
CELERY_ROUTES = {
    'apps.zhiding.tasks.add': {'queue': 'sq1', 'routing_key': 'sq1'},
    'apps.zhiding.tasks.multiply': {'queue': 'sq2', 'routing_key': 'sq2'},
    '*': {'queue': 'default', 'routing_key': 'default'},
}
但是笔者在实际使用中发现后面这种方式配置始终未生效,不知道是不是笔者版本的不同,没有做更多的研究,如果你能找到问题的原因,欢迎评论交流。
启动worker
# 笔者使用的windows,启动时需要加上-P eventlet
celery -A zkcelery worker -l info -P eventlet
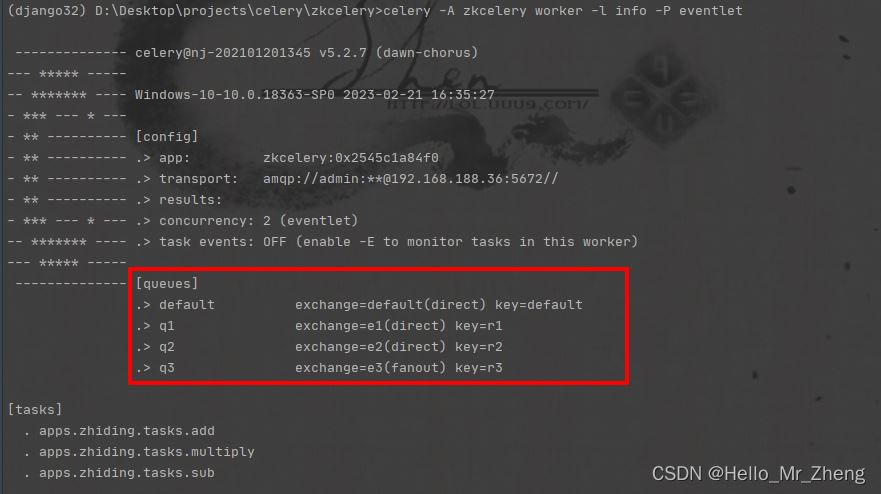
启动后队列中出现配置中的个队列

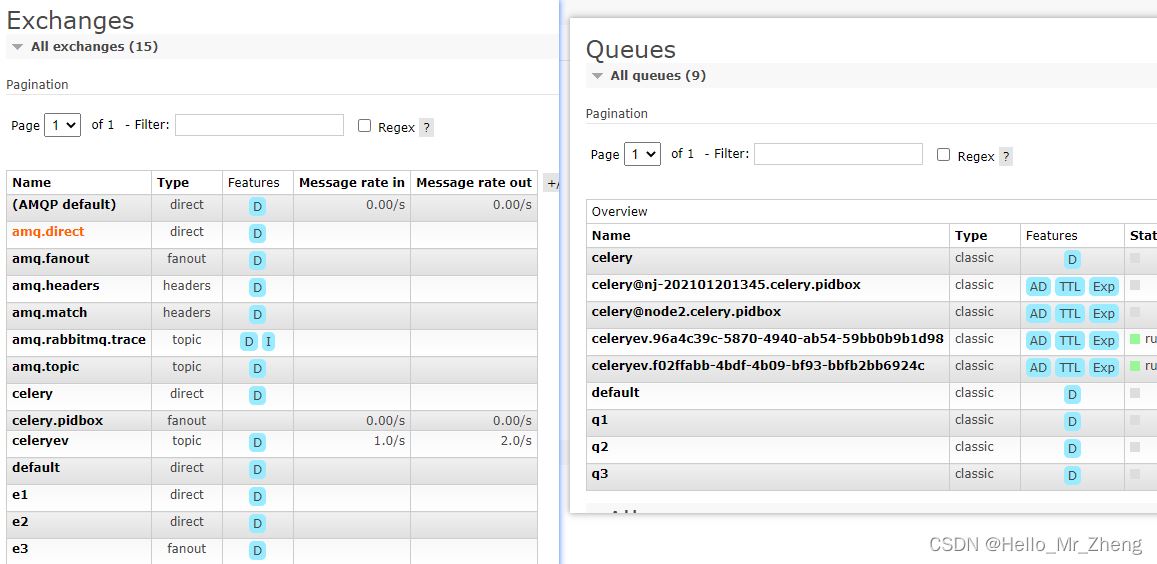
同时会在rabbitmq中创建(如果不存在)4个队列,交换机和相应的绑定关系(当然也可以直接通过rabbitmq管理端直接创建自己需要的队列、交换机和绑定,具体根据个人习惯或者视工作场景而定选择)

以队列q1示例:

暂时先关闭worker,便于观察消息队列中的消息。
向队列中发送几条消息,消息均进入到配置中指定的queue中

再次启动worker,队列中的消息立马被消费

如何做到消费指定的队列中的消息,只需要启动的时候加上参数Q
# -Q指定消费的队列
# -n 指定worker节点的名称,避免启动多个时的重名冲突
celery -A zkcelery worker -l info -Q q1 -n node1 -P eventlet
可以看到终端中queues只有q1了

q1中的消息被消费掉了,其他队列没有变化

也可以同时指定多个消费队列
celery -A zkcelery worker -l info -Q q2,default -n node2 -P eventlet

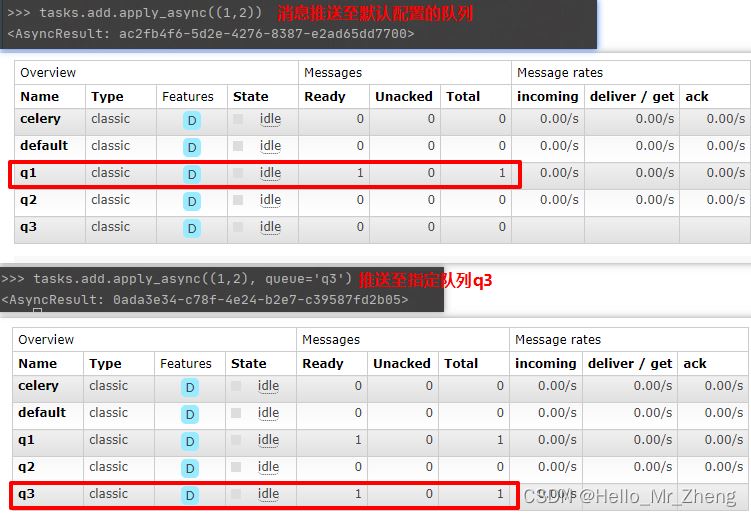
当然也可以在生产方指定推送的队列,举例如下:

到此这篇关于django+celery+RabbitMQ自定义多个消息队列的实现的文章就介绍到这了,更多相关django celery RabbitMQ消息队列内容请搜索脚本之家以前的文章或继续浏览下面的相关文章希望大家以后多多支持脚本之家!
