vue如何基于el-table实现多页多选及翻页回显过程
作者:努力的小球
近半年时间在接触vue写pc页面,文中内容即在实际的开发过程中遇到的实际问题。
1、问题交代:
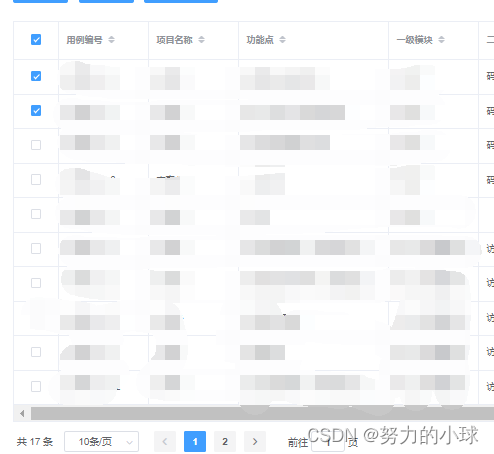
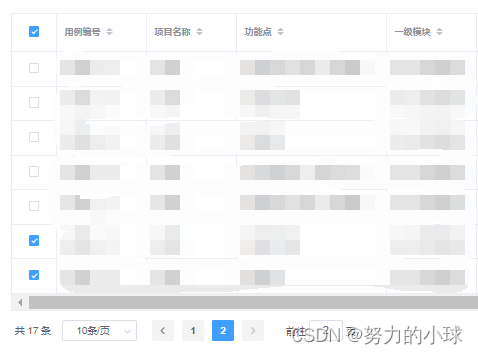
在pc版的列表页面中,假设当前在列表的第一页,想要在当前页面选择几行数据,跳转到其他页面选择几行数据,选择后的数据页面展示为已勾选状态,经过跳转页面之后,数据选择状态依然存在,且可以将已选择的数据的id传到后端;即标题所述的实现多页多选、翻页回显问题 。示例图片如下:
下面第一个图为第一页选择的数据信息:

下图为跳转到第二页选择数据的截图:

想达到的最终效果是这两个页面不管怎么跳转,都能显示跳转之前的选中状态。
2、实现的步骤
2.1 设置table标签
下面加粗字体是实现多页多选 翻页回显的必要设置,下面依次说明一下
<el-table size="small" :data="listData" ref="multipleTable" row-key="getRowKeys" @select="handleCheckBox" @select-all="handleSelectAll" highlight-current-row v-loading="loading" border element-loading-text="拼命加载中" style="width: 100%;">
<el-table-column align="center" type="selection" width="60"></el-table-column>
el-table 标签中设置信息解读:
- ref="multipleTable":ref是设置对这个el-table的引用,设置后可以在其他地方通过this.$refs.multipleTable 进行调用使用数据
- row-key="getRowKeys":指定数据的 Key,用来优化 Table 的渲染;在使用 reserve-selection 功能与显示树形数据时,该属性是必填的。类型为 String 时,支持多层访问:user.info.id,但不支持 user.info[0].id,此种情况请使用 Function
- @select="handleCheckBox":指定用户手动勾选数据行的 Checkbox 时触发的事件,这个名称要和下面method中方法名对应上
- @select-all="handleSelectAll":指定用户手动勾选全选 Checkbox 时触发的事件,这个名称要和下面method中方法名对应上
el-table-column标签中设置的信息解读:
- type="selection":将el-table的第一列设置成显示多选框
2.2 定义记录选择的数组
在export default 的data()中进行定义数组,只展示了需要添加的代码
export default {
  data() {
    return {
               multipleSelection: [],
2.3 定义手动单选 和手动全选的函数/方法
在export defalt的method中编写下面函数方法:
 //该方法是单选时的方法
 handleCheckBox(rows, row) {
   if (this.multipleSelection.find((item) => item == row.case_id)) {
      //下面这个filter方法就是删除的方法
      this.multipleSelection = this.multipleSelection.filter(
        (item) => item != row.case_id
      );
    } else {
      this.multipleSelection.push(row.case_id);
    },

 //该方法是当页全选的方法
 handleSelectAll(rows) {
    if (rows.length) {
      rows.forEach((row) => {
        if (!this.multipleSelection.find((item) => item == row.case_id)) {
          this.multipleSelection.push(row.case_id);
        }
      });
    } else {
      this.listData.forEach((row) => {
        this.multipleSelection = this.multipleSelection.filter(
          (item) => item != row.case_id
        );
      });
    }
  },

//下面的方法是进行设置行标识key的方法
getRowKeys(row) {
    return row.case_id
}
2.4 写控制回显部分代码
因为在实现分页的时候使用了分页组件,即每次翻页都会调用后端的list方法去查询这个页面的数据信息,所以回显的逻辑要方法每次调用后端数据的逻辑中,代码如下:
getdata(parameter) {
      this.loading = true
      /***
       * 调用后端接口
       */
      TestCaseList(parameter)
        .then(res => {
          this.loading = false
          if (res.success == false) {
            this.$message({
              type: 'info',
              message: res.msg
            })
          } else {
            this.listData = res.data
            // 分页赋值
            this.pageparm.currentPage = this.formInline.page
            this.pageparm.pageSize = this.formInline.limit
            this.pageparm.total = res.count
            //这里是回显的功能代码 当切换页面的时候 会重新调用list方法,在这个位置进行判断这个数据是否回显
            this.$nextTick(()=>{
            this.listData.forEach((item,index)=>{
              if(this.multipleSelection.findIndex(v=>v == item.case_id) >= 0){
                this.$refs.multipleTable.toggleRowSelection(
                    this.$refs.multipleTable.data[index],
                    true
                );
              }
            })
            console.log('这里是每次查询list接口之后的操作,看看是否回显');
            console.log("multipleSelection=", this.multipleSelection);
          })
          }
        })
        .catch(err => {
          this.loading = false
          this.$message.error('菜单加载失败,请稍后再试!')
        })
    },
具体功能实现讲解:
this.$nextTick(()=>{
            this.listData.forEach((item,index)=>{
              if(this.multipleSelection.findIndex(v=>v == item.case_id) >= 0){
                this.$refs.multipleTable.toggleRowSelection(
                    this.$refs.multipleTable.data[index],
                    true
                );
              }
            })
实现功能就是每次调用完后端的list接口,判断查出来的case_id是否有在multipleSelection数组中的,在数组中意味着要显示成已选中的状态,通过ref调用table数据 调用toggleRowSelection()方法实现,即上面加粗部分代码;
以上几个步骤将如何实现的过程已完全描述
总结
到此这篇关于vue如何基于el-table实现多页多选及翻页回显过程的文章就介绍到这了,更多相关vue el-table多页多选及翻页回显内容请搜索脚本之家以前的文章或继续浏览下面的相关文章希望大家以后多多支持脚本之家!
