带你熟练掌握Vue3之Pinia状态管理
作者:玄鱼殇
pinia是vue3官方的状态管理工具,当然vue2也可以用,vue2中的状态管理工具是vuex,vue3中不再使用vuex,推荐使用的是pinia,和vuex差不多,但比vuex更方便、更强、更好,下面这篇文章主要给大家介绍了关于Vue3之Pinia状态管理的相关资料,需要的朋友可以参考下
一、概念
1. Pinia => Pinia
Pinia(发音为/piːnjʌ/,如英语中的“peenya”)是最接近piña(西班牙语中的菠萝)的词
- Pinia开始于大概2019年,最初是作为一个实验为Vue重新设计状态管理,让它用起来像组合式API(Composition API)
- 从那时到现在,最初的设计原则依然是相同的,并且目前同时兼容Vue2、Vue3,也并不要求你使用Composition API
- Pinia本质上依然是一个状态管理的库,用于跨组件、页面进行状态共享(这点和Vuex、Redux一样)

2. Pinia和Vuex的对比
01 - 不是已经有Vuex了吗?为什么还要用Pinia
- Pinia 最初是为了探索 Vuex 的下一次迭代会是什么样子,结合了 Vuex 5 核心团队讨论中的许多想法
- 最终,团队意识到Pinia已经实现了Vuex5中大部分内容,所以最终决定用Pinia来替代Vuex
- 与 Vuex 相比,Pinia 提供了一个更简单的 API,具有更少的仪式,提供了 Composition-API 风格的 API
- 最重要的是,在与 TypeScript 一起使用时具有可靠的类型推断支持
02 - 和Vuex相比,Pinia有很多的优势
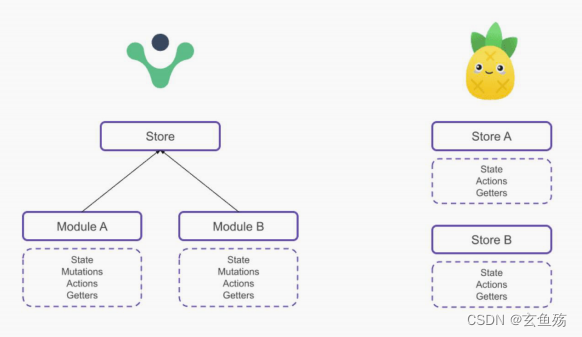
- mutations 不再存在
- 他们经常被认为是 非常 冗长
- 他们最初带来了 devtools 集成,但这不再是问题
- 更友好的TypeScript支持,Vuex之前对TS的支持很不友好
- 不再有modules的嵌套结构
- 可以灵活使用每一个store,它们是通过扁平化的方式来相互使用的
- 也不再有命名空间的概念,不需要记住它们的复杂关系
- Pinia的store中的 getters、actions 可以使用this,this代表当前sotre对象

二、使用Pinia
1. 安装
npm install pinia
2. 创建Pinia
创建stores文件夹,并在其中创建个index.js
// 1. 导入
import { createPinia } from 'pinia';

// 2. 创建
const pinia = createPinia();

// 3. 导出
export default pinia;
3. 在main.js中引入
import { createApp } from 'vue';
import App from './App.vue';
// 1. 导入
import pinia from './stores';
// 2. use一下
createApp(App).use(pinia).mount('#app');
三、Store
1. 概念
Store :
- 一个 Store (如 Pinia)是一个实体,它会持有为绑定到你组件树的状态和业务逻辑,也就是保存了全局的状态
- 它有点像始终存在,并且每个人都可以读取和写入的组件
- 你可以在你的应用程序中定义任意数量的Store来管理你的状态
Store有三个核心概念 :
- state、getters、actions
- 等同于组件的data、computed、methods
- 一旦 store 被实例化,可以直接在 store 上面访问 state、getters 和 actions 中定义的任何属性
2. 创建
定义一个Store :
- Store 是使用 defineStore() 定义
- 并且它需要一个唯一名称,作为第一个参数传递
在stores文件夹创建 counter.js 文件
// 1, 导入
import { defineStore } from 'pinia';
// 2. 创建一个store
/**
 * 第一个参数 : 唯一的名称
 * 第二个参数 : 传入配置
 * 返回值 : 返回一个函数,调用这个函数,即可拿到当前store
 */
const userCounterStore = defineStore('counterStore', {
  state: () => ({
    count: 66
  })
});

export default userCounterStore;
3. 使用
<template>
  <div class="app">App 页面</div>
  <h2>1. counterStore : {{ counterStore.count }}</h2>
  <h2>2. toRefs : {{ aCount }}</h2>
  <h2>3. storeToRefs : {{ bCount }}</h2>

  <button @click="changCount">改变count</button>
</template>

<script setup>
import { toRefs } from 'vue';
import { storeToRefs } from 'pinia';
// 1. 导入该函数
import userCounterStore from '@/stores/module/counter';

// 2. 调用,获得store
const counterStore = userCounterStore();

// 3. 拿到state值
/**
 * 注意 : 直接解构可以拿到值,但并不是响应式的了
 * 1. 使用 toRefs
 * 2. 使用pinia提供的 storeToRefs
 */
// toRefs
const { count: aCount } = toRefs(counterStore);
// storeToRefs
const { count: bCount } = storeToRefs(counterStore);

// 监听点击
const changCount = () => {
  // 可以直接操作!!!
  counterStore.count++;
};
</script>
4. 效果

四、核心概念State
1. 定义State
// 1, 导入
import { defineStore } from 'pinia';
// 2. 创建一个store
/**
 * 第一个参数 : 唯一的名称
 * 第二个参数 : 传入配置
 * 返回值 : 返回一个函数,调用这个函数,即可拿到当前store
 */
const userCounterStore = defineStore('counterStore', {
  state: () => ({
    count: 66,
    name: 'coder',
    age: 19
  })
});

export default userCounterStore;
2. 读取写入State
默认情况下,可以通过 store 实例访问状态来直接读取和写入状态
<script setup>
import Home from './views/Home.vue';
// 1. 导入该函数
import { toRefs } from 'vue';
import { storeToRefs } from 'pinia';
import userCounterStore from '@/stores/module/counter';

// 2. 调用,获得store
const counterStore = userCounterStore();
// 3. 拿到state值
const { count } = storeToRefs(counterStore);

// 监听点击
const changCount = () => {
  // 1. 读取
  console.log(counterStore.count);
  // 2. 写入
  counterStore.count++;
};
</script>
3. 重置State
可以通过调用 store 上的 $reset() 方法将状态 重置 到其初始值
// 重置
const resetState = () => {
  // 回到初始值
  counterStore.$reset();
};
4. 改变State
除了直接用 store.counter++ 修改 store,还可以调用 $patch 方法
允许同时应用多个更改
// 监听点击
const changCount = () => {
  // 一起更改数据
  counterStore.$patch({
    count: 99,
    name: 'star',
    // 如果输入新增的属性,没有用哒!
    buy: ref('abvc')
  });
  console.log(counterStore);
};
5. 替换State
可以通过将其 $state 属性设置为新对象来替换 Store 的整个状态

五、核心概念Getters
1. 基本使用
代码
const userCounterStore = defineStore('counterStore', {
  state: () => ({
    count: 66,
    name: 'coder',
    age: 19
  }),
  getters: {
    // 1. 定义getterts
    doubleCount(state) {
      // 2. 通过state参数拿到count
      console.log(state.count);
      // 3. 通过this拿到参数
      console.log(this.count);
    }
  }
});
使用
<template>
  <div>home</div>
  <h2>count : {{ counterStore.count }}</h2>
  <hr />
  <h2>count : {{ counterStore.doubleCount }}</h2>

  <button @click="changCount">改变count</button>
</template>

<script setup>
import { toRefs } from 'vue';
import userCounterStore from '@/stores/module/counter';
// 1. 获取store
const counterStore = userCounterStore();
// 2. 解构,变成响应式
const { doubleCount } = toRefs(counterStore);
console.log(doubleCount);

// 监听点击
const changCount = () => {
  // 3. 改变store
  counterStore.count++;
  // 4. 输出
  console.log(doubleCount.value);
};
</script>
2. 在getter中使用其他的getter
getters: {
  doubleCount(state) {
    return this.count * 2;
  },
  othersGetter() {
    // 通过this来拿
    return this.doubleCount;
  }
}
3. getters支持返回一个函数
可以用来传递参数到getters
代码
getters: {
  doubleCount(state) {
    return this.count * 2;
  },
  formatName() {
    // 返回一个函数,可以传递参数进来
    return (lastName) => {
      return this.name + lastName;
    };
  }
}
使用
<template>
  <h2>{{ counterStore.formatName('123') }}</h2>
  <button @click="changCount">改变count</button>
</template>

<script setup>
import { toRefs } from 'vue';
import userCounterStore from '@/stores/module/counter';
// 1. 获取store
const counterStore = userCounterStore();
// 2. 解构,变成响应式
const { formatName } = toRefs(counterStore);

const changCount = () => {
  // 3. 使用函数
  console.log(formatName.value('444'));
  // 也可以直接使用,看情况而定
  counterStore.formatName('123')
};
</script>
4. getters使用别的store中的数据
导入其他的store,使用即可,很方便
userOtherStore(){
  // 1. 导入其他soter
  const otherStore = userOtherStore()
  // 2. 拿到数据 ....
  otherStore.getters()
}
六、核心概念Actions
actions => 非常适合定义业务逻辑
1. 基本使用
代码
const userCounterStore = defineStore('counterStore', {
  state: () => ({
    count: 66,
    name: 'coder',
    age: 19
  }),
  actions: {
    increment() {
      this.count++;
    },
    // 这里的参数指调用时传递过来的参数
    incrementNum(num) {
      this.count += num;
    }
  }
});
使用
<script setup>
import userCounterStore from '@/stores/module/counter';
// 1. 获取store
const counterStore = userCounterStore();
// 2. 解构
const { increment, incrementNum } = counterStore;
// 3. 调用
increment();
incrementNum(33);
</script>
2. 异步操作
代码
const userCounterStore = defineStore('counterStore', {
  state: () => ({
    arrList: []
  }),
  actions: {
    async fetchDataList() {
      // 1. 请求
      const res = await fetch('http:xxxxx');
      const data = await res.json();
      this.arrList = data.list;
      // 2. 返回值,相当于 return Promise.resolve(data)
      return data;
    }
  }
});
使用
<script setup>
import userCounterStore from '@/stores/module/counter';
// 1. 获取store
const counterStore = userCounterStore();
// 2. 解构
const { fetchDataList } = counterStore;
// 3. 调用
fetchDataList().then((res) => {
  // 因为返回的时promise,所以可以在then中拿到数据
  console.log(res);
});
</script>
总结
到此这篇关于Vue3之Pinia状态管理的文章就介绍到这了,更多相关Vue3 Pinia状态管理内容请搜索脚本之家以前的文章或继续浏览下面的相关文章希望大家以后多多支持脚本之家!
