vue父子组件进行通信方式原来是这样的
作者:卖菜的小白
这篇文章主要为大家详细介绍了vue父子组件进行通信方式,文中示例代码介绍的非常详细,具有一定的参考价值,感兴趣的小伙伴们可以参考一下,希望能够给你带来帮助
在vue中如何实现父子组件通信,本篇博客将会详细介绍父子组件通信的流程。

如图所示,父组件向子组件传递数据,可以通过props,子组件向父组件传递数据可以通过触发事件来进行。
一、props
父组件向子组件传递的数据,通过props进行传递,我们可以把props理解为属性。props传递存在两种格式,一种是数组格式,另一种是对象类型格式。其中第二种对象类型可以设置是否为必须数据,以及是否存在默认值数据。
第一种用法:数组
//父组件
 <HelloWorld :title="title"></HelloWorld>
//子组件
  props: ["title"],
第二种用法:对象
//父组件:
<HelloWorld :title="title"></HelloWorld>
//子组件:
  props: {
    title:{
      type:String,
      required:true,
      default() {
        return "我是title"
      }
    }
  },
//上面default为什么是一个函数?
因为是一个组件,组件在其他组件都能使用,并且如果default是一个key;value形式,并且value是一个引用
类型的值,则如果要更改props的值,则其他组件的值也会更改。
type属性的类型有哪些?
type属性的类型有:String,Number,Boolean,Array,Object,Date, Function,Symbol。
三、对象类型的其他写法
props:{
	messageinfo:String,
	propsA:Number,
	propsC:{
		type:String,
		required:true
	},
	propsE:{
		type:Object,
		default(){
			return {message:"hello"}
		}
	},
	//自定义验证函数
	title:{
      validator(value) {
        console.log("hhh")
        return ["hello","world"].includes(value)
      }
    }
}
二、细节三props大小写命名
在props名使用驼峰命名,则可以使用-连接
    //父组件
    <HelloWorld :mess-age="title"></HelloWorld>
    //子组件
    props: {
    messAge:{
      type:String,
    }
  },
三、非props的attributes属性
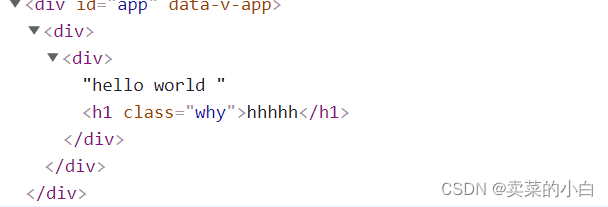
如果在父组件中设置attributes,但是在子组件中的props不存在该属性,则如果子组件存在根节点,则就会该属性就会继承到根节点上。

如果我们不希望根节点继承,可以使用inhertAttrs:false,这样就可以继承到非根节点上。
<template>
  <div>{{ messAge }}
    <h1 :class="$attrs.class">hhhhh</h1>
  </div>
</template>

如果要是存在多个根节点,则就会显示warning,表示不能自动继承,此时我们可以使用$attrs.属性名来实现继承属性。

<template>
  <h1>{{ messAge }}</h1>
  <h1>哈哈哈</h1>
  <h1 :class="$attrs.class">呵呵呵</h1>
</template>

四、子组件传递给父组件
1、当子组件有一些事情发生的时候,比如在组件中发生点击,父组件需要切换内容。2
2、子组件有一些内容想要传递给父组件。
3、子组件通过$emit()触发事件,并且在emits中进行注册事件。
4、注册的事件可以是数组类型的,也可以是对象类型。
五、简单例子
数组格式
//子组件
<template>
  <button @click="increment">+1</button>
  <button @click="decrement">-1</button>
</template>
<script>
export default {
  emits:["add", "sub"],
  data() {
    return {
    }
  },
  methods: {
    increment: function () {
      this.$emit("add")
    },
    decrement: function () {
      this.$emit("sub")
    },
  },
};
</script>
<style scoped></style>
//父组件
<template>
  <h1>当前的数字是:{{counter}}</h1>
  <HelloWorld @add="addOne" @sub="subOne"></HelloWorld>
</template>
<script>
import HelloWorld from "./components/HelloWorld.vue"
export default {
  components: { HelloWorld },
  data() {
    return {
      counter: 0
    }
  },
  methods:{
    addOne() {
      this.counter++
    },
    subOne() {
      this.counter--
    }
  }
}
</script>
<style scoped></style>
数组格式:如果我们想要设置自定义事件,可以使用emits:["add", "sub"],数组格式。
对象格式:主要是针对需要向父组件传递参数的例子.
//父组件
<template>
  <h1>当前的数字是:{{counter}}</h1>
  <HelloWorld @add="addOne" @sub="subOne" @addN="addNumbers"></HelloWorld>
</template>
<script>
import HelloWorld from "./components/HelloWorld.vue"
export default {
  components: { HelloWorld },
  data() {
    return {
      counter: 0,
    }
  },
  methods:{
    addOne() {
      this.counter++
    },
    subOne() {
      this.counter--
    },
    addNumbers(value) {
      this.counter += parseInt(value)
    }
  }
}
</script>
<style scoped></style>
//子组件
<template>
  <button @click="increment">+1</button>
  <button @click="decrement">-1</button>
  <input type="text" v-model="num" />
  <button @click="incrementN">+N</button>
</template>
<script>
export default {
  emits: {
    add:null,
    sub:null,
    addN:(dispatch) => {
      if(dispatch > 10) {
        return true
      }
      return false
    }
  },
  data() {
    return {
      num: 0,
    };
  },
  methods: {
    increment: function () {
      this.$emit("add");
    },
    decrement: function () {
      this.$emit("sub");
    },
    incrementN: function () {
      this.$emit("addN", this.num);
    },
  },
};
</script>
<style scoped></style>
这里采用对象的格式:可以进行传入参数的判断。如果符合则返回true,如果不符合则返回false,但是仍可以执行,只是在控制台出现warning.
emits: {
    add:null,
    sub:null,
    addN:(dispatch) => {
      if(dispatch > 10) {
        return true
      }
      return false
    }
  }
总结
本篇文章就到这里了,希望能够给你带来帮助,也希望您能够多多关注脚本之家的更多内容!
