微信小程序实现左右联动
作者:DonJiger
这篇文章主要为大家详细介绍了微信小程序实现左右联动,文中示例代码介绍的非常详细,具有一定的参考价值,感兴趣的小伙伴们可以参考一下
本文实例为大家分享了微信小程序实现左右联动的具体代码,供大家参考,具体内容如下
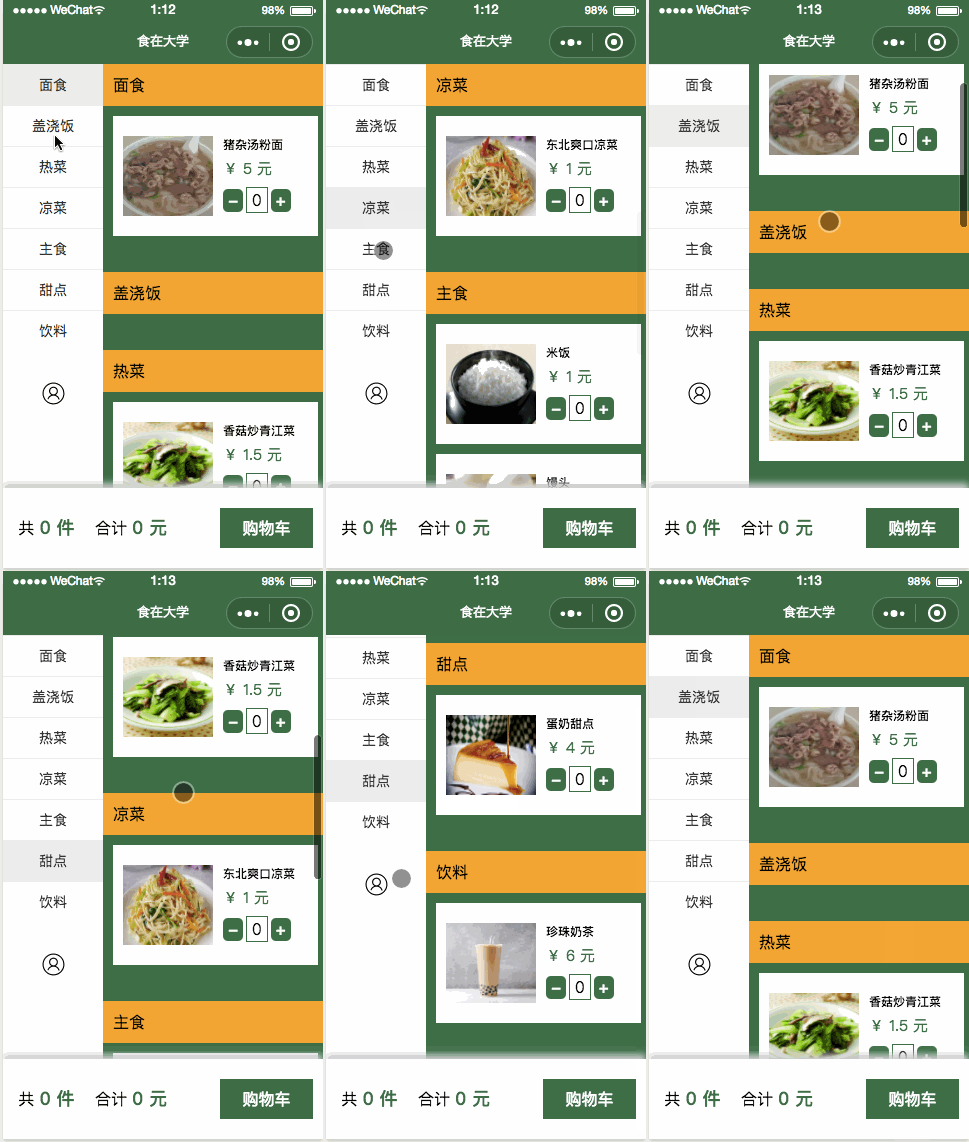
最近学校课程系统分析项目使用了微信小程序来进行搭建,在选择了点餐项目后,对主页进行实现时,想要实现像麦当劳点餐一样,左边表示类别,右边表示菜品,通过点击左边的类,右边会滚动到对应的类,滚动右边的菜品,左边当前滚动到的菜品类别也回高亮显示。那么首先先展示一下成果吧!

虽然这个功能很小,但我觉得一旦搞清楚scroll-view的原理就很有用处。
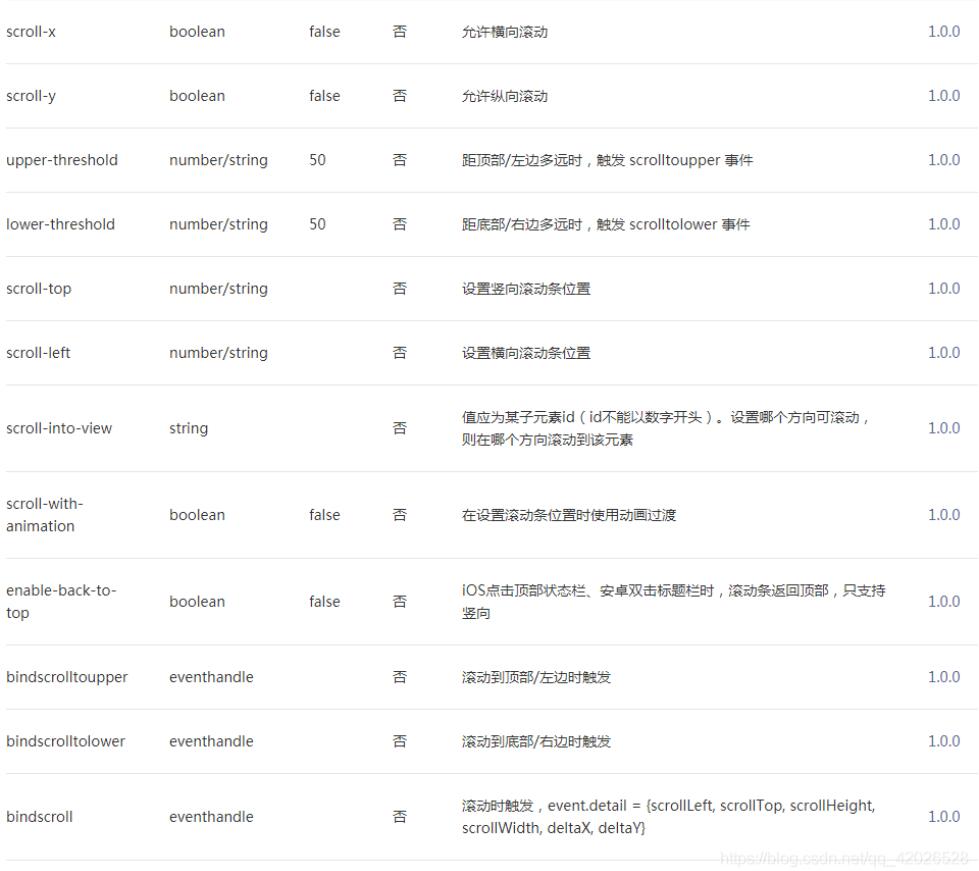
首先查看微信小程序的官方文档:scroll-view

下面来按照我自己的理解介绍我所使用到的属性:
- scroll-y: 设置滚动的方向,x就是横着,y就是竖着,属性的类型是boolean值
- scroll-top:就是说scroll-top的值是距离顶部的值,你将它写在哪个scroll-view中,scroll-view就距离顶部多远,不过我们可以设置变量值,在js中按照条件更改它,这也是实现左右联动的关键步骤。
- scroll-into-view: scrol-into-view就是一个id值,我们实现左右联动是竖直方向上的滚动,所以设置scroll-into-view就是说当前scroll-into-view的值是多少,那么当前所在的scroll-view就会滚动到哪个id。
- style=‘height:这里输入高度',你设置的要滚动的组件必须有个高度,否则就不会进行滚动,这也很好理解,你不设置一下他框的高度,那scroll-view也不知道从哪里开始滑呀是不是。有时候需要在页面中央(只占部分高度)设置一个滑块,有时候需要在整个窗口高度设置,所以高度也是必须的一个属性。
- scroll-with-animation:是在设置滚动条位置进行动画过渡,我发现删除该属性也可以正常使用,可能在我写的页面暂时没有使用到吧,之后还需在进行了解
- bindscroll:绑定一个函数,由于是滚动,没有点击触发,故有一个绑定的函数,用于在滑动时执行函数内容
- 好的既然搞清楚组件的属性,那么我们开始实现吧,我的思路是左右各设置一个滑块,两边都可以滑,先实现左边联动右边,左边的功能是点击类右边就可以进行跳转
<scroll-view class='aside' scroll-y='true' style='height:{{asideheight}}px' scroll-with-animation="true" scroll-top='{{itemLeftToTop}}'  >

    <view  wx:for="{{menus}}" wx:key="id"  data-id="{{item.id}}" bindtap='tabMenu' class="{{item.id === currentLeftSelected ? 'menu active' : 'menu'}}">

    <view id="{{item.id}}">{{item.name}}</view>
    </view>

    <view class="option" >
    <button id='user_btn' bindtap='getin' >个</button>
    <image id='user_img' src='../../images/index/user_option.png'></image>
    </view>

  </scroll-view>
  <!--每一类菜品的具体信息,可进行按钮添加每个菜品的数量-->

  <scroll-view class="item-content" scroll-y='true' scroll-into-view="{{itemScrollId}}" scroll-with-animation='true' style='height:{{asideheight}}px'  bindscroll="right" >
    <view wx:for="{{menus}}" wx:for-index="parentIndex" wx:key="id" id="{{item.id}}" >
    <view class="item_title">{{item.name}}</view>
    <view class="{{orderCount.num === 0 ? 'box' : 'box active'}}">
      <view class="item" wx:for="{{item.categroy}}" wx:key="categroyid" data-parentIndex='{{parentIndex}}' data-index='{{index}}'>
        <image  src="{{item.url}}"></image>
        <text class="title">{{item.categroy_name}}</text>
        <text class="price">¥ {{item.price}} 元</text>
        <view class="opera">
          <text class="btn_price " bindtap='del' data-id="{{item.id}}"  data-parentIndex='{{parentIndex}}' data-index='{{index}}'>-</text>
          <text class="num">{{item.num}}</text>
          <text class="btn_price" bindtap="add" data-id="{{item.id}}"  data-parentIndex='{{parentIndex}}' data-index="{{index}}">+</text>
        </view>
      </view>
    </view>

    </view>
</scroll-view>
可以看到高度我是引用了一个变量,其在js中的实现如下:
wx.getSystemInfo({
      success: function (res) {
        var asideheight = res.windowHeight
        var asideheight1=0;
        that.setData({
          asideheight: asideheight,
          asideheight1:asideheight+80
        })
      },
      fail: () => { console.log("无法获取显示器高度,请检查网络连接") }
    });
并且在函数开头设置好左右每一小格的高度
const RIGHT_BAR_HEIGHT = 41;
// 右侧每个子类的高度(固定)
const RIGHT_ITEM_HEIGHT = 122;
// 左侧每个类的高度(固定)
const LEFT_ITEM_HEIGHT = 41;
左边的实现较为简单,设置两个个data,currentLeftSelected和itemScrollId当前点击的类的ID值赋给这两个,前者实现点击时左边类被选定的状态,而右边的值赋给 itemScrollId,然后再将这个值赋给前端右半边scroll-view的scroll-into-view,从而实现左边点击右边也跳转。
tabMenu: function (e) {
    this.setData({
      currentLeftSelected: e.target.id || e.target.dataset.id,
      itemScrollId: e.target.id || e.target.dataset.id
    });
    console.log(e);
  },
右半边的思路就是你需要算出右边每一个菜品距离顶部的高度,保存至一个数组里,然后滑动时获取当前滑动的高度,然后在bindscroll里绑定的函数里进行比较,对应的是哪个高度的范围就设置左边的currentLeftSelected为那个类的id。
get_eachItemToTop: function () {
    var obj = {};
    var totop = 0;
    var menus_ex = {};
    var that = this;
    menus_ex= that.data.menus;
    console.log(menus_ex);
    for(let i=1;i<menus_ex.length;i++){
      totop += (RIGHT_BAR_HEIGHT + menus_ex[i - 1].categroy.length * RIGHT_ITEM_HEIGHT);
      obj[menus_ex[i] ? menus_ex[i].id : 'last'] = totop;
    }
    return obj;
  },

  right: function (e) {
      for (let i = 0; i < this.data.menus.length; i++) {
       let left = this.data.eachrightScrollToTop[this.data.menus[i].id]
       let right = this.data.eachrightScrollToTop[this.data.menus[i + 1] ? this.data.menus[i + 1].id : 'last']
       if (e.detail.scrollTop < right && e.detail.scrollTop >= left) {
       this.setData({
         currentLeftSelected: this.data.menus[i].id,
         itemLeftToTop: LEFT_ITEM_HEIGHT * i
            })
          }
        }

    },
这样左右联动就基本实现了。
以上就是本文的全部内容,希望对大家的学习有所帮助,也希望大家多多支持脚本之家。
