
SpringBoot如何监控Redis中某个Key的变化(自定义监听器)
作者:你是小KS
SpringBoot 监控Redis中某个Key的变化
1.声明
当前内容主要为本人学习和基本测试,主要为监控redis中的某个key的变化(感觉网上的都不好,所以自己看Spring源码直接写一个监听器)
个人参考:
- Redis官方文档
- Spring-data-Redis源码
2.基本理念
网上的demo的缺点
- 使用继承KeyExpirationEventMessageListener只能监听当前key消失的事件
- 使用KeyspaceEventMessageListener只能监听所有的key事件
总体来说,不能监听某个特定的key的变化(某个特定的redis数据库),具有缺陷
直接分析获取可以操作的步骤
查看KeyspaceEventMessageListener的源码解决问题

基本思想
- 创建自己的主题(用来监听某个特定的key)
- 创建监听器实现MessageListener
- 注入自己的配置信息
查看其中的方法(init方法)
public void init() {
		if (StringUtils.hasText(keyspaceNotificationsConfigParameter)) {
			RedisConnection connection = listenerContainer.getConnectionFactory().getConnection();
			try {
				Properties config = connection.getConfig("notify-keyspace-events");
				if (!StringUtils.hasText(config.getProperty("notify-keyspace-events"))) {
					connection.setConfig("notify-keyspace-events", keyspaceNotificationsConfigParameter);
				}
			} finally {
				connection.close();
			}
		}
		doRegister(listenerContainer);
	}
	/**
	 * Register instance within the container.
	 *
	 * @param container never {@literal null}.
	 */
	protected void doRegister(RedisMessageListenerContainer container) {
		listenerContainer.addMessageListener(this, TOPIC_ALL_KEYEVENTS);
	}
主要操作如下
- 向redis中写入配置notify-keyspace-events并设置为EA
- 向RedisMessageListenerContainer中添加本身这个监听器并指定监听主题
所以本人缺少的就是这个主题表达式和监听的notify-keyspace-events配置
直接来到redis的官方文档找到如下内容
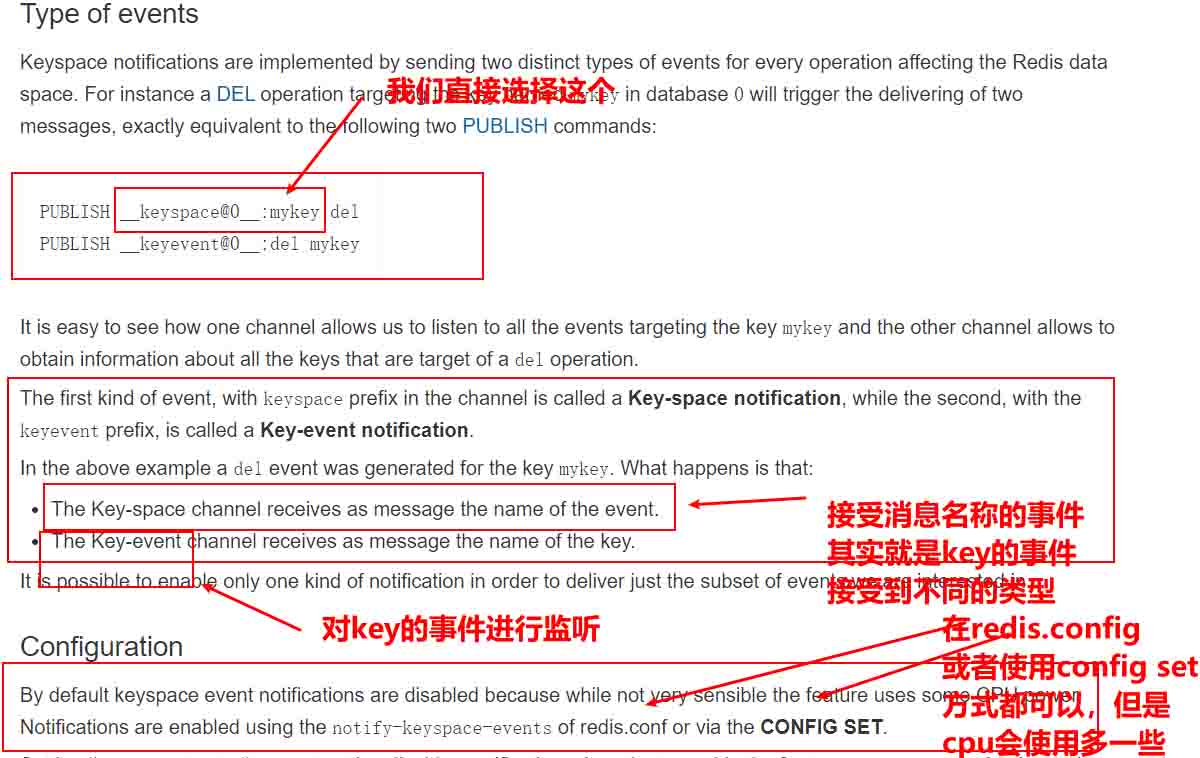
所以直接选择的是:__keyspace@0__:myKey,使用的模式为KEA
所有的工作全部完毕后开始实现监听
3.实现和创建监听
创建监听类:RedisKeyChangeListener
本类中主要监听redis中数据库0的myKey这个key
import java.nio.charset.Charset;
import java.util.Properties;
import org.springframework.data.redis.connection.Message;
import org.springframework.data.redis.connection.MessageListener;
import org.springframework.data.redis.connection.RedisConnection;
import org.springframework.data.redis.listener.KeyspaceEventMessageListener;
import org.springframework.data.redis.listener.PatternTopic;
import org.springframework.data.redis.listener.RedisMessageListenerContainer;
import org.springframework.data.redis.listener.Topic;
import org.springframework.util.StringUtils;
/**
 *
 * @author hy
 * @createTime 2021-05-01 08:53:19
 * @description 期望是可以监听某个key的变化,而不是失效
 *
 */
public class RedisKeyChangeListener implements MessageListener/* extends KeyspaceEventMessageListener */ {
	private final String listenerKeyName; // 监听的key的名称
	private static final Topic TOPIC_ALL_KEYEVENTS = new PatternTopic("__keyevent@*"); //表示只监听所有的key
	private static final Topic TOPIC_KEYEVENTS_SET = new PatternTopic("__keyevent@0__:set"); //表示只监听所有的key
	private static final Topic TOPIC_KEYNAMESPACE_NAME = new PatternTopic("__keyspace@0__:myKey"); // 不生效
	// 监控
	//private static final Topic TOPIC_KEYEVENTS_NAME_SET_USELESS = new PatternTopic("__keyevent@0__:set myKey");
	private String keyspaceNotificationsConfigParameter = "KEA";
	public RedisKeyChangeListener(RedisMessageListenerContainer listenerContainer, String listenerKeyName) {
		this.listenerKeyName = listenerKeyName;
		initAndSetRedisConfig(listenerContainer);
	}
	public void initAndSetRedisConfig(RedisMessageListenerContainer listenerContainer) {
		if (StringUtils.hasText(keyspaceNotificationsConfigParameter)) {
			RedisConnection connection = listenerContainer.getConnectionFactory().getConnection();
			try {
				Properties config = connection.getConfig("notify-keyspace-events");
				if (!StringUtils.hasText(config.getProperty("notify-keyspace-events"))) {
					connection.setConfig("notify-keyspace-events", keyspaceNotificationsConfigParameter);
				}
			} finally {
				connection.close();
			}
		}
		// 注册消息监听
		listenerContainer.addMessageListener(this, TOPIC_KEYNAMESPACE_NAME);
	}
	@Override
	public void onMessage(Message message, byte[] pattern) {
		System.out.println("key发生变化===》" + message);
		byte[] body = message.getBody();
		String string = new String(body, Charset.forName("utf-8"));
		System.out.println(string);
	}
}
其实就改了几个地方…
4.基本demo的其他配置
1.RedisConfig配置类
@Configuration
@PropertySource(value = "redis.properties")
@ConditionalOnClass({ RedisConnectionFactory.class, RedisTemplate.class })
public class RedisConfig {
	@Autowired
	RedisProperties redisProperties;
	/**
	 *
	 * @author hy
	 * @createTime 2021-05-01 08:40:59
	 * @description 基本的redisPoolConfig
	 * @return
	 *
	 */
	private JedisPoolConfig jedisPoolConfig() {
		JedisPoolConfig config = new JedisPoolConfig();
		config.setMaxIdle(redisProperties.getMaxIdle());
		config.setMaxTotal(redisProperties.getMaxTotal());
		config.setMaxWaitMillis(redisProperties.getMaxWaitMillis());
		config.setTestOnBorrow(redisProperties.getTestOnBorrow());
		return config;
	}
	/**
	 * @description 创建redis连接工厂
	 */
	@SuppressWarnings("deprecation")
	private JedisConnectionFactory jedisConnectionFactory() {
		JedisConnectionFactory factory = new JedisConnectionFactory(
				new JedisShardInfo(redisProperties.getHost(), redisProperties.getPort()));
		factory.setPassword(redisProperties.getPassword());
		factory.setTimeout(redisProperties.getTimeout());
		factory.setPoolConfig(jedisPoolConfig());
		factory.setUsePool(redisProperties.getUsePool());
		factory.setDatabase(redisProperties.getDatabase());
		return factory;
	}
	/**
	 * @description 创建RedisTemplate 的操作类
	 */
	@Bean
	public StringRedisTemplate getRedisTemplate() {
		StringRedisTemplate redisTemplate = new StringRedisTemplate();
		redisTemplate.setConnectionFactory(jedisConnectionFactory());
		redisTemplate.setEnableTransactionSupport(true);
		return redisTemplate;
	}

	@Bean
	public RedisMessageListenerContainer redisMessageListenerContainer() throws Exception {
		RedisMessageListenerContainer container = new RedisMessageListenerContainer();
		container.setConnectionFactory(jedisConnectionFactory());
		return container;
	}
	// 创建基本的key监听器
	/*  */
	@Bean
	public RedisKeyChangeListener redisKeyChangeListener() throws Exception {
		RedisKeyChangeListener listener = new RedisKeyChangeListener(redisMessageListenerContainer(),"");
		return listener;
	}
}
其中最重要的就是RedisMessageListenerContainer 和RedisKeyChangeListener
2.另外的RedisProperties类,加载redis.properties文件成为对象的
/**
 *
 * @author hy
 * @createTime 2021-05-01 08:38:26
 * @description 基本的redis的配置类
 *
 */
@ConfigurationProperties(prefix = "redis")
public class RedisProperties {
	private String host;
	private Integer port;
	private Integer database;
	private Integer timeout;
	private String password;
	private Boolean usePool;
	private Integer maxTotal;
	private Integer maxIdle;
	private Long maxWaitMillis;
	private Boolean testOnBorrow;
	private Boolean testWhileIdle;
	private Integer timeBetweenEvictionRunsMillis;
	private Integer numTestsPerEvictionRun;
	// 省略get\set方法
}
省略其他代码
5.基本测试
创建一个key,并修改发现变化
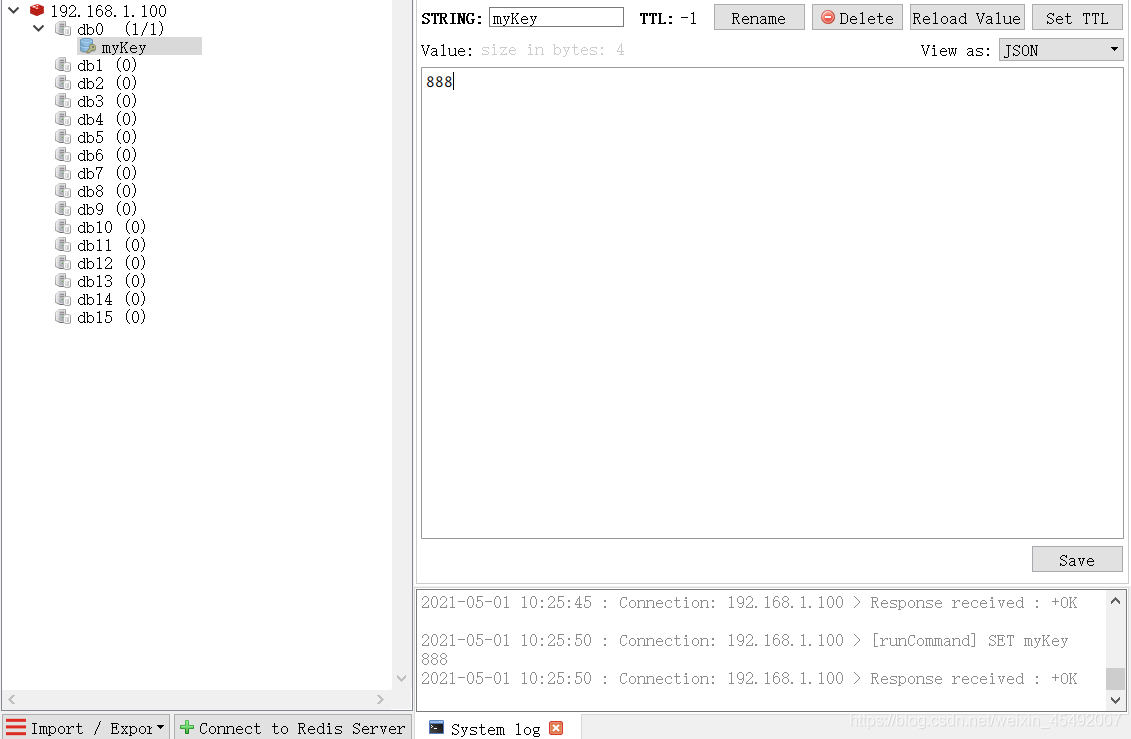
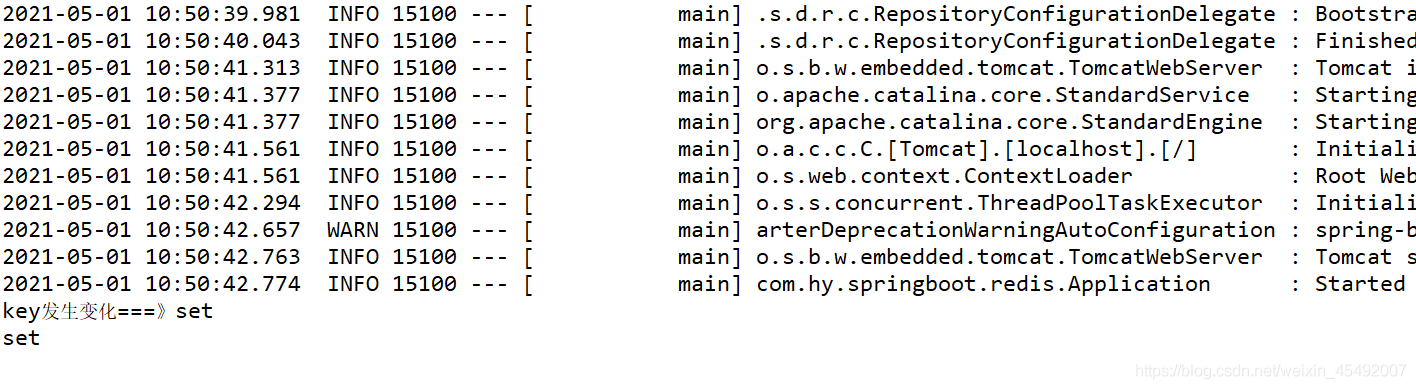
可以发现返回的是这个key执行的方法(set),如果使用的是keyevent方式那么返回的就是这个key的名称
6.小结一下
1.监听redis中的key的变化主要利用redis的机制来实现(本身就是发布/订阅)
2.默认情况下是不开启的,原因有点耗cpu
3.实现的时候需要查看redis官方文档和SpringBoot的源码来解决实际的问题
SpringBoot自定义监听器
原理
Listener按照监听的对象的不同可以划分为:
- 监听ServletContext的事件监听器,分别为:ServletContextListener、ServletContextAttributeListener。Application级别,整个应用只存在一个,可以进行全局配置。
- 监听HttpSeesion的事件监听器,分别为:HttpSessionListener、HttpSessionAttributeListener。Session级别,针对每一个对象,如统计会话总数。
- 监听ServletRequest的事件监听器,分别为:ServletRequestListener、ServletRequestAttributeListener。Request级别,针对每一个客户请求。
示例
第一步:创建项目,添加依赖
<dependency>
    <groupId>org.springframework.boot</groupId>
    <artifactId>spring-boot-starter-web</artifactId>
</dependency>
<dependency>
    <groupId>org.springframework.boot</groupId>
    <artifactId>spring-boot-starter-tomcat</artifactId>
    <scope>provided</scope>
</dependency>
<dependency>
    <groupId>javax.servlet</groupId>
    <artifactId>jstl</artifactId>
    <version>1.2</version>
    <scope>compile</scope>
</dependency>
<dependency>
    <groupId>org.apache.tomcat.embed</groupId>
    <artifactId>tomcat-embed-jasper</artifactId>
    <scope>compile</scope>
</dependency>
<dependency>
    <groupId>org.eclipse.jdt.core.compiler</groupId>
    <artifactId>ecj</artifactId>
    <version>4.6.1</version>
</dependency>
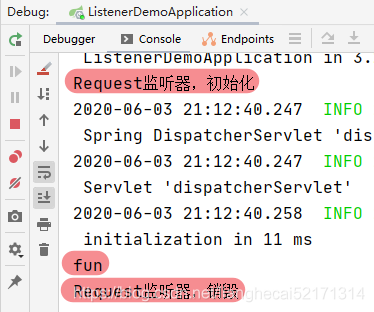
第二步:自定义监听器
@WebListener
public class MyServletRequestListener implements ServletRequestListener {
    @Override
    public void requestDestroyed(ServletRequestEvent sre) {
        System.out.println("Request监听器,销毁");
    }
    @Override
    public void requestInitialized(ServletRequestEvent sre) {
        System.out.println("Request监听器,初始化");
    }
}
第三步:定义Controller
@RestController
public class DemoController {
    @RequestMapping("/fun")
    public void fun(){
        System.out.println("fun");
    }
}
第四步:在程序执行入口类上面添加注解
@ServletComponentScan
部署项目,运行查看效果:
以上为个人经验,希望能给大家一个参考,也希望大家多多支持脚本之家。
您可能感兴趣的文章:
- springboot+redis过期事件监听实现过程解析
- Spring Boot监听Redis Key失效事件实现定时任务的示例
- spring boot+redis 监听过期Key的操作方法
- SpringBoot如何整合redis实现过期key监听事件
- SpringBoot中使用Redis Stream实现消息监听示例
- SpringBoot如何监听redis Key变化事件案例详解
- springboot整合redis过期key监听实现订单过期的项目实践
- SpringBoot监听Redis key失效事件的实现代码
- 如何监听Redis中Key值的变化(SpringBoot整合)
- SpringBoot使用Redis单机版过期键监听事件的实现示例