Spring-AOP @AspectJ进阶之如何绑定代理对象
作者:小小工匠
概述
使用this()或target()可绑定被代理对象实例,在通过类实例名绑定对象时,还依然具有原来连接点匹配的功能,只不过类名是通过增强方法中同名入参的类型间接决定罢了。
这里我们通过this()来了解对象绑定的用法:
实例
代码已托管到Github—> https://github.com/yangshangwei/SpringMaster

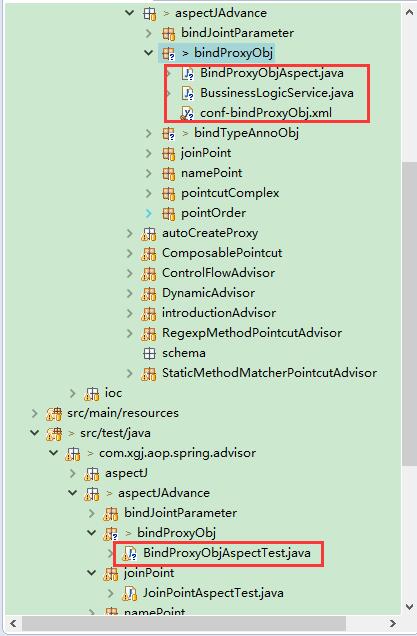
业务类
package com.xgj.aop.spring.advisor.aspectJAdvance.bindProxyObj;
import org.springframework.stereotype.Component;
/**
 *
 *
 * @ClassName: BussinessLogicService
 *
 * @Description: @Component标注的bean
 *
 * @author: Mr.Yang
 *
 * @date: 2017年9月12日 下午12:11:28
 */
@Component
public class BussinessLogicService {
	public void doLogic() {
		System.out.println("BussinessLogicService doLogic executed ");
	}
}
切面
package com.xgj.aop.spring.advisor.aspectJAdvance.bindProxyObj;
import org.aspectj.lang.annotation.Aspect;
import org.aspectj.lang.annotation.Before;
/**
 *
 *
 * @ClassName: BindProxyObjAspect
 *
 * @Description: 绑定代理对象
 *               使用this()或target()可绑定被代理对象实例,在通过类实例名绑定对象时,还依然具有原来连接点匹配的功能,
 *               只不过类名是通过增强方法中同名入参的类型间接决定罢了
 *
 * @author: Mr.Yang
 *
 * @date: 2017年9月12日 下午12:04:44
 */
@Aspect
public class BindProxyObjAspect {
	// (1)处通过②处查找出waiter对应的类型为BussinessLogicService,因而切点表达式
	// 为this(bussinessLogicService),当增强方法织入目标连接点时,增强方法通过bussinessLogicService
	// 入参可以引用到代理对象的实例。
	@Before("this(bussinessLogicService)")
	public void bindProxyObj(BussinessLogicService bussinessLogicService) { // (2)
		System.out.println("----bindProxyObj()----");
		System.out.println(bussinessLogicService.getClass().getName());
		System.out.println("----bindProxyObj()----");
	}
}
①处的切点表达式首先按类变量名查找②处增强方法的入参列表,进而获取类变量名对应的类为
com.xgj.aop.spring.advisor.aspectJAdvance.bindProxyObj.BussinessLogicService
这样就知道了切点的定义为
this(com.xgj.aop.spring.advisor.aspectJAdvance.bindProxyObj.BussinessLogicService)
即所有代理对象为BussinessLogicService类的所有方法匹配该切点。
②处的增强方法通过bussinessLogicService入参绑定目标对象。
可见BussinessLogicService的所有方法匹配①处的切点
配置文件
<?xml version="1.0" encoding="UTF-8"?>
<beans xmlns="http://www.springframework.org/schema/beans"
	xmlns:aop="http://www.springframework.org/schema/aop"
	xmlns:xsi="http://www.w3.org/2001/XMLSchema-instance"
	xmlns:context="http://www.springframework.org/schema/context"
	xsi:schemaLocation="http://www.springframework.org/schema/beans
		http://www.springframework.org/schema/beans/spring-beans.xsd
		http://www.springframework.org/schema/aop
		http://www.springframework.org/schema/aop/spring-aop.xsd
		http://www.springframework.org/schema/context
       	http://www.springframework.org/schema/context/spring-context.xsd">
<!-- (1)声明Context命名空间以及Schema文件   (2)扫描类包以及应用注解定义的bean -->
<context:component-scan base-package="com.xgj.aop.spring.advisor.aspectJAdvance.bindProxyObj"/>
<!-- 基于@AspectJ切面的驱动器 -->
<aop:aspectj-autoproxy proxy-target-class="true"/>

<!-- 使用了@AspectJ注解的切面类 -->
<bean class="com.xgj.aop.spring.advisor.aspectJAdvance.bindProxyObj.BindProxyObjAspect"/>
</beans>
测试类
package com.xgj.aop.spring.advisor.aspectJAdvance.bindProxyObj;
import org.junit.Test;
import org.springframework.context.ApplicationContext;
import org.springframework.context.support.ClassPathXmlApplicationContext;
public class BindProxyObjAspectTest {
 @Test
 public void test() {
  ApplicationContext ctx = new ClassPathXmlApplicationContext(
    "classpath:com/xgj/aop/spring/advisor/aspectJAdvance/bindProxyObj/conf-bindProxyObj.xml");
  BussinessLogicService bussinessLogicService = ctx.getBean(
    "bussinessLogicService", BussinessLogicService.class);
  bussinessLogicService.doLogic();
 }
}
运行结果
2017-09-12 13:54:41,463 INFO [main] (AbstractApplicationContext.java:583) - Refreshing org.springframework.context.support.ClassPathXmlApplicationContext@292898f5: startup date [Tue Sep 12 13:54:41 BOT 2017]; root of context hierarchy
2017-09-12 13:54:41,557 INFO [main] (XmlBeanDefinitionReader.java:317) - Loading XML bean definitions from class path resource [com/xgj/aop/spring/advisor/aspectJAdvance/bindProxyObj/conf-bindProxyObj.xml]
----bindProxyObj()----
com.xgj.aop.spring.advisor.aspectJAdvance.bindProxyObj.BussinessLogicService$$EnhancerBySpringCGLIB$$472f5f0d
----bindProxyObj()----
BussinessLogicService doLogic executed
按相似的方法使用target()进行绑定。
以上为个人经验,希望能给大家一个参考,也希望大家多多支持脚本之家。
