
Python opencv操作深入详解
作者:佐倉
这篇文章主要介绍了Python opencv操作深入详解,文中整理的比较详细,有感兴趣的同学可以学习下
直接读取图片
def display_img(file="p.jpeg"):
  img = cv.imread(file)
  print (img.shape)
  cv.imshow('image',img)
  cv.waitKey(0)
  cv.destroyAllWindows()
读取灰度图片
def display_gray_img(file="p.jpeg"):
  img = cv.imread(file,cv.IMREAD_GRAYSCALE)
  print (img.shape)
  cv.imshow('image',img)
  cv.waitKey(0)
  cv.destroyAllWindows()
  cv.imwrite("gray_img.png",img)
读取视频
def display_video(file="sj.mp4"):
  v = cv.VideoCapture(file)
  if v.isOpened():
    open,frame = v.read()
  else:
    open=False

  while open:
    ret,frame = v.read()
    if frame is None:
      break

    if ret == True:
      gray = cv.cvtColor(frame,cv.COLOR_BGR2GRAY)
      cv.imshow("result",gray)
      if cv.waitKey(10) & 0xFF == 27:
        break
  v.release()
  v.waitKey(0)
  v.destroyAllWindows()
截取图片
def get_frame_img(file="p.jpeg"):
  img = cv.imread(file)
  print (img.shape)
  cat = img[0:200,0:200]
  cv.imshow('get_frame_img',cat)
  cv.waitKey(0)
  cv.destroyAllWindows()
提取rgb通道
def extrats_rgb_img(file="p.jpeg"):
  img = cv.imread(file)
  b,g,r = cv.split(img)
  print (b.shape,g.shape,r.shape)
  new_img = cv.merge((b,g,r))
  print (new_img.shape)

  copy_img_r = img.copy()
  copy_img_r[:,:,0]=0
  copy_img_r[:,:,1]=0
  cv.imshow("r_img",copy_img_r)

  copy_img_g = img.copy()
  copy_img_g[:,:,0]=0
  copy_img_g[:,:,2]=0
  cv.imshow("g_img",copy_img_g)

  copy_img_b = img.copy()
  copy_img_b[:,:,1]=0
  copy_img_b[:,:,2]=0
  cv.imshow("b_img",copy_img_b)
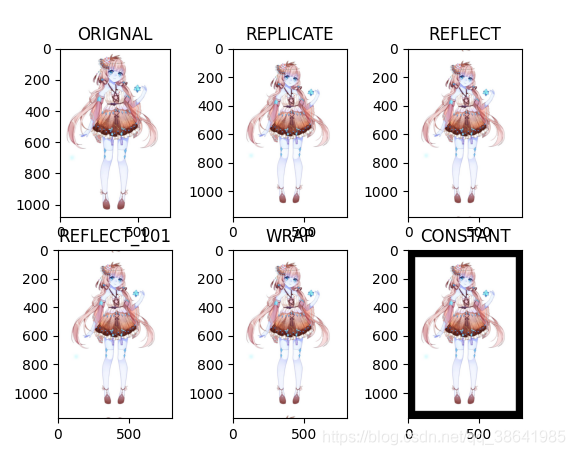
边界填充
def border_fill_img(file="p.jpeg"):
  border_type = [
    cv.BORDER_REPLICATE,#复制法,复制边缘
    cv.BORDER_REFLECT, #反射法,对感兴趣的图像中的像素在两边进行复制
    cv.BORDER_REFLECT_101,#反射法,以边缘像素为轴,对称
    cv.BORDER_WRAP,#外包装法
    cv.BORDER_CONSTANT#常量法,常量填充
    ]
  border_title = [
    "REPLICATE",
    "REFLECT",
    "REFLECT_101",
    "WRAP",
    "CONSTANT"
    ]
  img = cv.imread(file)
  top_size,bottom_size,left_size,right_size = (50,50,50,50)
  plt.subplot(231)
  plt.imshow(img,"gray")#原始图像
  plt.title("ORIGNAL")

  for i in range(len(border_type)):
    result = cv.copyMakeBorder(img,top_size,bottom_size,left_size,right_size,border_type[i])
    plt.subplot(232+i)
    plt.imshow(result,"gray")
    plt.title(border_title[i])

  plt.show()
图像融合,变换
def img_compose(file1="tu.jpeg",file2="gui.jpeg"):
  img_1 = cv.imread(file1)
  img_2 = cv.imread(file2)
  print (img_1.shape)
  print (img_2.shape)
  img_1= cv.resize(img_1,(500,500))
  img_2= cv.resize(img_2,(500,500))
  print (img_1.shape)
  print (img_2.shape)
  res = cv.addWeighted(img_1,0.4,img_2,0.6,0)
  plt.imshow(res)
  plt.show()


  res = cv.resize(img_1,(0,0),fx=3,fy=1)
  plt.imshow(res)
  plt.show()

  res = cv.resize(img_2,(0,0),fx=1,fy=3)
  plt.imshow(res)
  plt.show()
二值化处理
def Binarization(filepath):
  img = cv2.imread(filepath,0)
  limit = 120
  ret,thresh=cv2.threshold(img,limit,255,cv2.THRESH_BINARY_INV)
  plt.imshow(thresh,'gray')
  plt.show()
  return thresh
Binarization('t1.jpg')
到此这篇关于Python opencv操作深入详解的文章就介绍到这了,更多相关Python opencv操作内容请搜索脚本之家以前的文章或继续浏览下面的相关文章希望大家以后多多支持脚本之家!