opencv函数threshold、adaptiveThreshold、Otsu二值化的实现
作者:假小牙
这篇文章主要介绍了opencv函数threshold、adaptiveThreshold、Otsu二值化的实现,文中通过示例代码介绍的非常详细,对大家的学习或者工作具有一定的参考学习价值,需要的朋友们下面随着小编来一起学习学习吧
threshold:固定阈值二值化,
ret, dst = cv2.threshold(src, thresh, maxval, type)
- src: 输入图,只能输入单通道图像,通常来说为灰度图
- dst: 输出图
- thresh: 阈值
- maxval: 当像素值超过了阈值(或者小于阈值,根据type来决定),所赋予的值
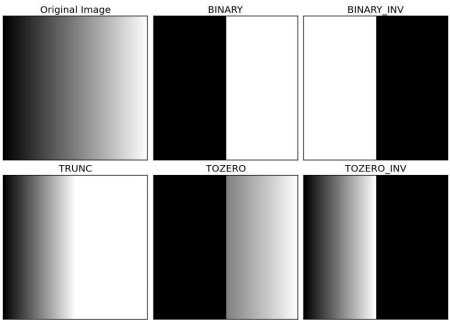
- type:二值化操作的类型,包含以下5种类型: cv2.THRESH_BINARY; cv2.THRESH_BINARY_INV; cv2.THRESH_TRUNC; cv2.THRESH_TOZERO;cv2.THRESH_TOZERO_INV
官方文档的示例代码:
import cv2
import numpy as np
from matplotlib import pyplot as plt
img = cv2.imread('gradient.png',0)
ret,thresh1 = cv2.threshold(img,127,255,cv2.THRESH_BINARY)
ret,thresh2 = cv2.threshold(img,127,255,cv2.THRESH_BINARY_INV)
ret,thresh3 = cv2.threshold(img,127,255,cv2.THRESH_TRUNC)
ret,thresh4 = cv2.threshold(img,127,255,cv2.THRESH_TOZERO)
ret,thresh5 = cv2.threshold(img,127,255,cv2.THRESH_TOZERO_INV)
titles = ['Original Image','BINARY','BINARY_INV','TRUNC','TOZERO','TOZERO_INV']
images = [img, thresh1, thresh2, thresh3, thresh4, thresh5]
for i in xrange(6):
  plt.subplot(2,3,i+1),plt.imshow(images[i],'gray')
  plt.title(titles[i])
  plt.xticks([]),plt.yticks([])
plt.show()
结果为:

adaptiveThreshold:自适应阈值二值化
自适应阈值二值化函数根据图片一小块区域的值来计算对应区域的阈值,从而得到也许更为合适的图片。
dst = cv2.adaptiveThreshold(src, maxval, thresh_type, type, Block Size, C)
- src: 输入图,只能输入单通道图像,通常来说为灰度图
- dst: 输出图
- maxval: 当像素值超过了阈值(或者小于阈值,根据type来决定),所赋予的值
- thresh_type: 阈值的计算方法,包含以下2种类型:cv2.ADAPTIVE_THRESH_MEAN_C; cv2.ADAPTIVE_THRESH_GAUSSIAN_C.
- type:二值化操作的类型,与固定阈值函数相同,包含以下5种类型: cv2.THRESH_BINARY; cv2.THRESH_BINARY_INV; cv2.THRESH_TRUNC; cv2.THRESH_TOZERO;cv2.THRESH_TOZERO_INV.
- Block Size: 图片中分块的大小
- C :阈值计算方法中的常数项
官方文档的示例代码:
import cv2
import numpy as np
from matplotlib import pyplot as plt
img = cv2.imread('sudoku.png',0)
img = cv2.medianBlur(img,5)
ret,th1 = cv2.threshold(img,127,255,cv2.THRESH_BINARY)
th2 = cv2.adaptiveThreshold(img,255,cv2.ADAPTIVE_THRESH_MEAN_C,\
      cv2.THRESH_BINARY,11,2)
th3 = cv2.adaptiveThreshold(img,255,cv2.ADAPTIVE_THRESH_GAUSSIAN_C,\
      cv2.THRESH_BINARY,11,2)
titles = ['Original Image', 'Global Thresholding (v = 127)',
      'Adaptive Mean Thresholding', 'Adaptive Gaussian Thresholding']
images = [img, th1, th2, th3]
for i in xrange(4):
  plt.subplot(2,2,i+1),plt.imshow(images[i],'gray')
  plt.title(titles[i])
  plt.xticks([]),plt.yticks([])
plt.show()
结果为:

Otsu's Binarization: 基于直方图的二值化
Otsu's Binarization是一种基于直方图的二值化方法,它需要和threshold函数配合使用。
Otsu过程:
1. 计算图像直方图;
2. 设定一阈值,把直方图强度大于阈值的像素分成一组,把小于阈值的像素分成另外一组;
3. 分别计算两组内的偏移数,并把偏移数相加;
4. 把0~255依照顺序多为阈值,重复1-3的步骤,直到得到最小偏移数,其所对应的值即为结果阈值。
官方文档的示例代码:
import cv2
import numpy as np
from matplotlib import pyplot as plt
img = cv2.imread('noisy2.png',0)
# global thresholding
ret1,th1 = cv2.threshold(img,127,255,cv2.THRESH_BINARY)
# Otsu's thresholding
ret2,th2 = cv2.threshold(img,0,255,cv2.THRESH_BINARY+cv2.THRESH_OTSU)
# Otsu's thresholding after Gaussian filtering
blur = cv2.GaussianBlur(img,(5,5),0)
ret3,th3 = cv2.threshold(blur,0,255,cv2.THRESH_BINARY+cv2.THRESH_OTSU)
# plot all the images and their histograms
images = [img, 0, th1,
     img, 0, th2,
     blur, 0, th3]
titles = ['Original Noisy Image','Histogram','Global Thresholding (v=127)',
     'Original Noisy Image','Histogram',"Otsu's Thresholding",
     'Gaussian filtered Image','Histogram',"Otsu's Thresholding"]
for i in xrange(3):
  plt.subplot(3,3,i*3+1),plt.imshow(images[i*3],'gray')
  plt.title(titles[i*3]), plt.xticks([]), plt.yticks([])
  plt.subplot(3,3,i*3+2),plt.hist(images[i*3].ravel(),256)
  plt.title(titles[i*3+1]), plt.xticks([]), plt.yticks([])
  plt.subplot(3,3,i*3+3),plt.imshow(images[i*3+2],'gray')
  plt.title(titles[i*3+2]), plt.xticks([]), plt.yticks([])
plt.show()
结果为:

参考文献:http://docs.opencv.org/3.2.0/d7/d4d/tutorial_py_thresholding.html
到此这篇关于opencv函数threshold、adaptiveThreshold、Otsu二值化的实现的文章就介绍到这了,更多相关opencv threshold、adaptiveThreshold、Otsu内容请搜索脚本之家以前的文章或继续浏览下面的相关文章希望大家以后多多支持脚本之家!
