从零开始学springboot整合feign跨服务调用的方法
作者:CTO技术
介绍
微服务横行的互联网世界, 跨服务调用显得很平凡, 我们除了采用传统的http方式接口调用, 有没有更为优雅方便的方法呢?
答案是肯定的,feign就提供了轻便的方式!
如果你的服务都注册了注册中心,比如nacos, 那么调用会显得很轻松, 只需一个注解, 带上需要调用的服务名即可,**feign + nacos**会帮你做剩余的事.
如果没有注册中心, 也无需担心, feign一样可以以传统的
ip:port
方式进行调用~
下面,我们来实践下吧
springboot整合feign
引入依赖, 这里注意, spring-cloud.version记得要和spring-boot版本匹配, 我这里spring-boot版本是2.1.3, 所以spring-cloud选择Greenwich.SR2版本.
大致的版本对应关系如下

更详细的请去https://start.spring.io/actuator/info
查询!
<properties>
  <spring-cloud.version>Greenwich.SR2</spring-cloud.version>
</properties>

<dependencyManagement>
  <dependencies>
   <!--SpringCloud依赖 -->
   <dependency>
    <groupId>org.springframework.cloud</groupId>
    <artifactId>spring-cloud-dependencies</artifactId>
    <version>${spring-cloud.version}</version>
    <type>pom</type>
    <scope>import</scope>
   </dependency>
  </dependencies>
 </dependencyManagement>

 <dependencies>
  <!--openfeign跨服务调用-->
  <dependency>
   <groupId>org.springframework.cloud</groupId>
   <artifactId>spring-cloud-starter-openfeign</artifactId>
  </dependency>
  <!--openfeign底层使用ApacheHttpClient调用-->
  <dependency>
   <groupId>io.github.openfeign</groupId>
   <artifactId>feign-httpclient</artifactId>
  </dependency>
 </dependencies>
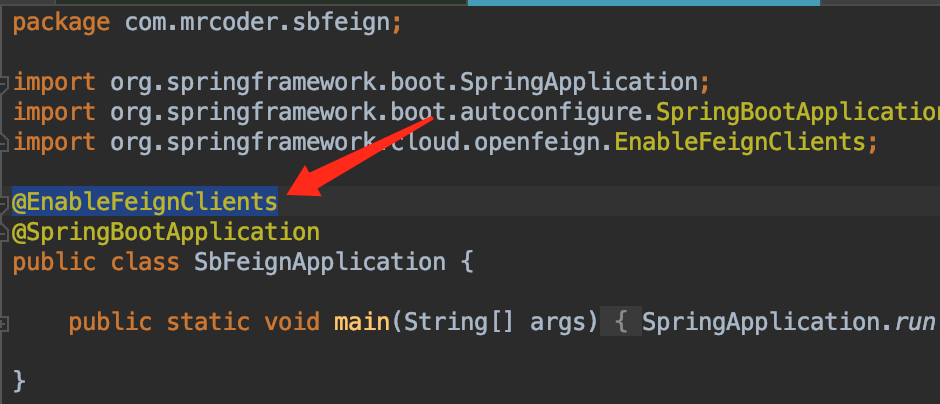
然后我们去项目的启动类上加上注解
@EnableFeignClients

最后, 加上Feign的配置
application.properties
server.port=9999
#******************openfeign配置,参数采用的是默认的配置,可根据实际情况调整***********************
#启用ApacheHttpClient。默认就是true,使用HttpClientConnectionManager管理连接复用
feign.httpclient.enabled=true
#连接池的最大连接数,默认200
feign.httpclient.max-connections=200
#每个路由(服务器)分配的组最大连接数,默认50
feign.httpclient.max-connections-per-route=50
#连接最大存活时间,默认900秒
feign.httpclient.time-to-live=900
#连接最大存活时间单位秒
feign.httpclient.time-to-live-unit=seconds
#FeignAcceptGzipEncodingInterceptor拦截器被激活,会在header中添加Accept-Encoding:gzip,deflate,表明服务端在返回值时可以使用如下两个方式压缩返回结果
feign.compression.response.enabled=true
#FeignContentGzipEncodingInterceptor拦截器被激活,会在header中添加Content-Encoding:gzip,deflate,表明body中的参数是使用这两个方式的压缩
feign.compression.request.enabled=true
#content-length大于2048就进行请求参数的gzip压缩
feign.compression.request.minRequestSize=2048

#开启断路器
feign.hystrix.enabled=true
#断路器的隔离策略,默认就是线程池,SEMAPHORE模式下,就是主线程调用的远程的服务,即同步的
hystrix.command.default.execution.isolation.strategy=THREAD
#断路器超时设置
hystrix.command.default.execution.timeout.enabled=true
#总体请求在45秒还是无法得到响应,建议触发熔断(ribbon每个请求读取15秒超时,两个实例重试就是30秒,openfeign外层默认会进行一次调用,4次重试)
hystrix.command.default.execution.isolation.thread.timeoutInMilliseconds=45000
#断路器的线程池存在一个问题,在队列满了以后,不会再去创建新的线程直到maximumSize
#核心线程池大小
hystrix.threadpool.default.coreSize=10
#最大线程池大小
hystrix.threadpool.default.maximumSize=10
#超过这个空闲时间,多于coreSize数量的线程会被回收,1分钟
hystrix.threadpool.default.keepAliveTimeMinutes=1
#队列的大小,默认为-1,即没有队列
hystrix.threadpool.default.maxQueueSize=200
#队列任务达到此阈值后,就开始拒绝;实际使用此参数进行队列是否满的判断
hystrix.threadpool.default.queueSizeRejectionThreshold=180

#负载均衡配置
#读取超时15秒,与原RestTemplate保持一致
ribbon.ReadTimeout=15000
#连接超时15秒,与原RestTemplate保持一致
ribbon.ConnectTimeout=15000
##每台服务器最多重试次数,但是首次调用不包括在内
ribbon.MaxAutoRetries=0
##最多重试多少台服务器,与实际实例数保持一致(不包括首台)
ribbon.MaxAutoRetriesNextServer=1
#是否所有操作都重试,
# false:get请求中,连接超时,读取超时都会重试,其他请求(put,post)连接超时重试,读取超时不重试。
# true:get请求中,连接超时,读取超时都会重试,其他请求(put,post)连接超时重试,读取超时重试。
#对于请求(put,post)要做好接口的幂等性
ribbon.OkToRetryOnAllOperations=true
spring-boot整合feign完成, 接下来我们编写测试代码
测试代码
两个服务
- sb-alibaba-nacos (被调用方服务, 127.0.0.1:8081), 提供 getInfoById接口
- sb-feign (调用方服务, 127.0.0.1:9999), 提供 getInfoById 测试接口
sb-alibaba-nacos提供的测试接口
@GetMapping(value = "getInfoById")
 public String getInfoById(@RequestParam(value = "id") Long Id) {
  return "example-service return :" + Id;
 }
sb-feign相关代码
我们新建个包 feign,用来放所有涉及跨服务调用的类

ExampleControllerFeignClient.java:
package com.mrcoder.sbfeign.feign;

import feign.hystrix.FallbackFactory;
import org.slf4j.Logger;
import org.slf4j.LoggerFactory;
import org.springframework.cloud.openfeign.FeignClient;
import org.springframework.stereotype.Component;
import org.springframework.web.bind.annotation.GetMapping;
import org.springframework.web.bind.annotation.RequestParam;

@FeignClient(name = "sb-alibaba-nacos", url = "http://127.0.0.1:8081/", fallbackFactory = ExampleControllerFeignClient.ExampleControllerFeignClientFallbackFactory.class)
public interface ExampleControllerFeignClient {

 @GetMapping(value = "getInfoById")
 String getInfoById(@RequestParam(value = "id") Long Id);

 /**
  * 服务降级内部类
  */
 @Component
 class ExampleControllerFeignClientFallbackFactory implements FallbackFactory<ExampleControllerFeignClient> {

  private Logger logger = LoggerFactory.getLogger(ExampleControllerFeignClientFallbackFactory.class);

  @Override
  public ExampleControllerFeignClient create(Throwable cause) {
   return new ExampleControllerFeignClient() {
    @Override
    public String getInfoById(Long signingLogId) {
     logger.error("跨服务调用失败, 原因是:" + cause.getMessage());
     return "失败, 原因是:" + cause.getMessage();
    }
   };
  }
 }
}
关键代码就是
@FeignClient(name = "sb-alibaba-nacos", url = "http://127.0.0.1:8081/", fallbackFactory = ExampleControllerFeignClient.ExampleControllerFeignClientFallbackFactory.class)
- name 就是被调用方的服务名称 (
这里如果你没有配置服务注册中心的化,其实可以随便写) - url 就是被调用方的地址(
如果配置了服务注册中心, 可以不写!, 不过两个服务必须都注册!,这样才能找到!) - fallbackFactory 就是调用失败时指定的处理类
最后, 我们写个测试方法
package com.mrcoder.sbfeign.controller;

import com.mrcoder.sbfeign.feign.ExampleControllerFeignClient;
import org.springframework.beans.factory.annotation.Autowired;
import org.springframework.web.bind.annotation.*;

@CrossOrigin
@RestController
public class TestController {

 @Autowired
 private ExampleControllerFeignClient exampleControllerFeignClient;

 @RequestMapping(value = "getInfoById", method = RequestMethod.GET)
 public String test(@RequestParam(value = "id") Long Id) {
  return exampleControllerFeignClient.getInfoById(Id);
 }
}
开启两个服务sb-alibaba-nacos, sb-feign
而后访问sb-feign的测试方法
http://localhost:9999/getInfoById?id=22
出现
sb-alibaba-nacos return :22
跨服务调用成功~
到此这篇关于从零开始学springboot整合feign跨服务调用的文章就介绍到这了,更多相关springboot整合feign跨服务调用内容请搜索脚本之家以前的文章或继续浏览下面的相关文章希望大家以后多多支持脚本之家!
