java实现异步导出数据
作者:梅小辫
这篇文章主要为大家详细介绍了java实现异步导出数据,文中示例代码介绍的非常详细,具有一定的参考价值,感兴趣的小伙伴们可以参考一下
问题概述:
使用java作为后台语言,用poi导出数据时无法异步导出,当数据量稍微大点,就会出现页面傻瓜式等待 (点击导出后,页面无任何反应和提示,还以为此功能无效。然则几秒后浏览器才响应。)这样体验非常 不好。
解决办法:
很简单,将下载数据分离为一个单独方法。在触发导出后,先获取并封装数据(数据量大的话这个过程正好给页面做一个等待框,提示正在下载数据),完成后给前台返回一个状态,当前台收到返回正确返回状态后再关闭等待框并调用下载方法。
demo:
1、获取并封装数据
@RequestMapping("exportExcel") //用户数据导出
 public void exportExcel(HttpServletRequest request, HttpServletResponse response) {
 Map<String,Object> map = new HashMap<String,Object>();
 try{
  EquipmentAccident search=(EquipmentAccident)
  request.getSession().getAttribute("equipmentAccident1"); //获取保存在session中的查询条件
  if(search !=null ){
  if(Str.isNotNull(search.getName())){ //名称
  map.put("name", search.getName());
  }
  if(Str.isNotNull(search.getRemark())){ //备注
  map.put("remark", search.getRemark());
  }
  }

  List<User> list=userService.selectExcel(map); //查询数据

  XSSFWorkbook wb = new XSSFWorkbook(); // 声明一个工作薄
   XSSFSheet sheet = wb.createSheet("用户信息"); // 生成一个表格

   Integer columnIndex = 0;
   sheet.setColumnWidth(columnIndex++, 3 * 512); // 设置表格第一列宽度为3个字节
   sheet.setColumnWidth(columnIndex++, 10 * 512); //名称
   sheet.setColumnWidth(columnIndex++, 10 * 512); //年龄
   sheet.setColumnWidth(columnIndex++, 10 * 512); //备注

   // 生成一个样式
   XSSFCellStyle style1 = wb.createCellStyle();
   // 设置这些样式
   style1.setFillForegroundColor(IndexedColors.GREY_25_PERCENT.getIndex());

   // 生成一个字体
   XSSFFont font1 = wb.createFont();
   font1.setFontHeightInPoints((short) 11);
   font1.setFontName("黑体"); // 字体
   // 把字体应用到当前的样式
   style1.setFont(font1);

   //在sheet里增加合并单元格
   CellRangeAddress cra = new CellRangeAddress(0, 0, 0, 7);
   sheet.addMergedRegion(cra);

   int rowInt = 0; //列号
   XSSFRow row = sheet.createRow(rowInt++);

   XSSFCell cell = row.createCell(0);
   cell.setCellStyle(style1);
   cell.setCellValue("用户信息");

   int cellInt = 0;
   row = sheet.createRow(rowInt++);

   cell = row.createCell(cellInt++);
   cell.setCellStyle(style1);
   cell.setCellValue("序号");

   cell = row.createCell(cellInt++);
   cell.setCellStyle(style1);
   cell.setCellValue("名称");

   cell = row.createCell(cellInt++);
   cell.setCellStyle(style1);
   cell.setCellValue("年龄");

   cell = row.createCell(cellInt++);
   cell.setCellStyle(style1);
   cell.setCellValue("备注");

   int index = 0;
   if(list!=null && !list.isEmpty()){
    for(User obj:list){
    index++;
    cellInt = 0;
     row = sheet.createRow(rowInt++);

     cell = row.createCell(cellInt++);
     cell.setCellValue(index);

     cell = row.createCell(cellInt++);
     cell.setCellValue(obj.getName());

     cell = row.createCell(cellInt++);
     cell.setCellValue(obj.getAge());

     cell = row.createCell(cellInt++);
     cell.setCellValue(obj.getRemark());
    }
   }
   //反馈给前台状态
  response.getWriter().append("ok");
  //XSSFWorkbook对象保持到session里,供下载使用
  request.getSession().setAttribute("XSSFWorkbook",wb);
 } catch (Exception e) {
  e.printStackTrace();
 }
}
2、分离出来的下载方法
 /**
 * @param fileName 下载文件名称
 * @param request 请求对象
 * @param response 响应对象
 * 2020-11-10 新增
*/
 @RequestMapping("downloadExcel")
 public void downloadExcel(String fileName,HttpServletRequest request,HttpServletResponse response) {
 if(Str.isNotNull(fileName)){
 User loginUser = (User) request.getSession().getAttribute("loginUser");
 //检验下载路径并返回url
 String url = FileTool.getdownLoadUrl(loginUser, fileName, request);
 //从url里截取出文件全名
 fileName = url.substring(url.lastIndexOf("/")+1);
 //创建文件输出流
 FileOutputStream fileOut = null;
 try {
  fileOut = new FileOutputStream(url);
  //获取保存在session中的待下载数据
  XSSFWorkbook wb = (XSSFWorkbook) request.getSession().getAttribute("XSSFWorkbook");
  wb.write(fileOut);
 } catch (FileNotFoundException e) {
  e.printStackTrace();
 }catch (IOException e) {
  e.printStackTrace();
 }

 finally{
    if(fileOut != null){
     try {
      fileOut.close();
     } catch (IOException e) {
      e.printStackTrace();
     }
    }
   }

 try {
   System.out.println("------------开始下载文件---------------");
   File file = new File(url);
    // 以流的形式下载文件。
    InputStream fis = new BufferedInputStream(new FileInputStream(url));
    byte[] buffer = new byte[fis.available()];
    fis.read(buffer);
    fis.close();
    // 清空response
    response.reset();
    // 设置response的Header
    response.addHeader("Content-Disposition", "attachment;filename=" + new
    String(fileName.getBytes("UTF-8"),
    "ISO8859-1"));
    response.addHeader("Content-Length", "" + file.length());
    OutputStream toClient = new BufferedOutputStream(response.getOutputStream());
    response.setContentType("application/octet-stream");
    toClient.write(buffer);
    toClient.flush();
    toClient.close();
    //清除session里的数据
    request.getSession().removeAttribute("XSSFWorkbook");
   } catch (IOException ex) {
    ex.printStackTrace();
   }
 }
}
3、前台调用导出数据
 //导出请求
 function exportExcel(){
 var load = saveLoad("导出中,请稍后...",1); //打开一个等待框
 $.ajax({
   type: "post",
   url: "exportExcel",
   dataType:"text",
   error: function(request) {
    closeSaveLoad(load,1);
    return false;
   },
   success: function(msg) {
    if(msg=='ok'){
    closeSaveLoad(load,1); //关闭等待框
    //下载请求地址
    window.location.href="downloadExcel?fileName=用户信息" rel="external nofollow" ;
    }else{
    closeSaveLoad(load,1); //关闭等待框
    layer.msg("导出失败,刷新页面重试",{icon:2});
    return false;
    }
   }
  });
 }
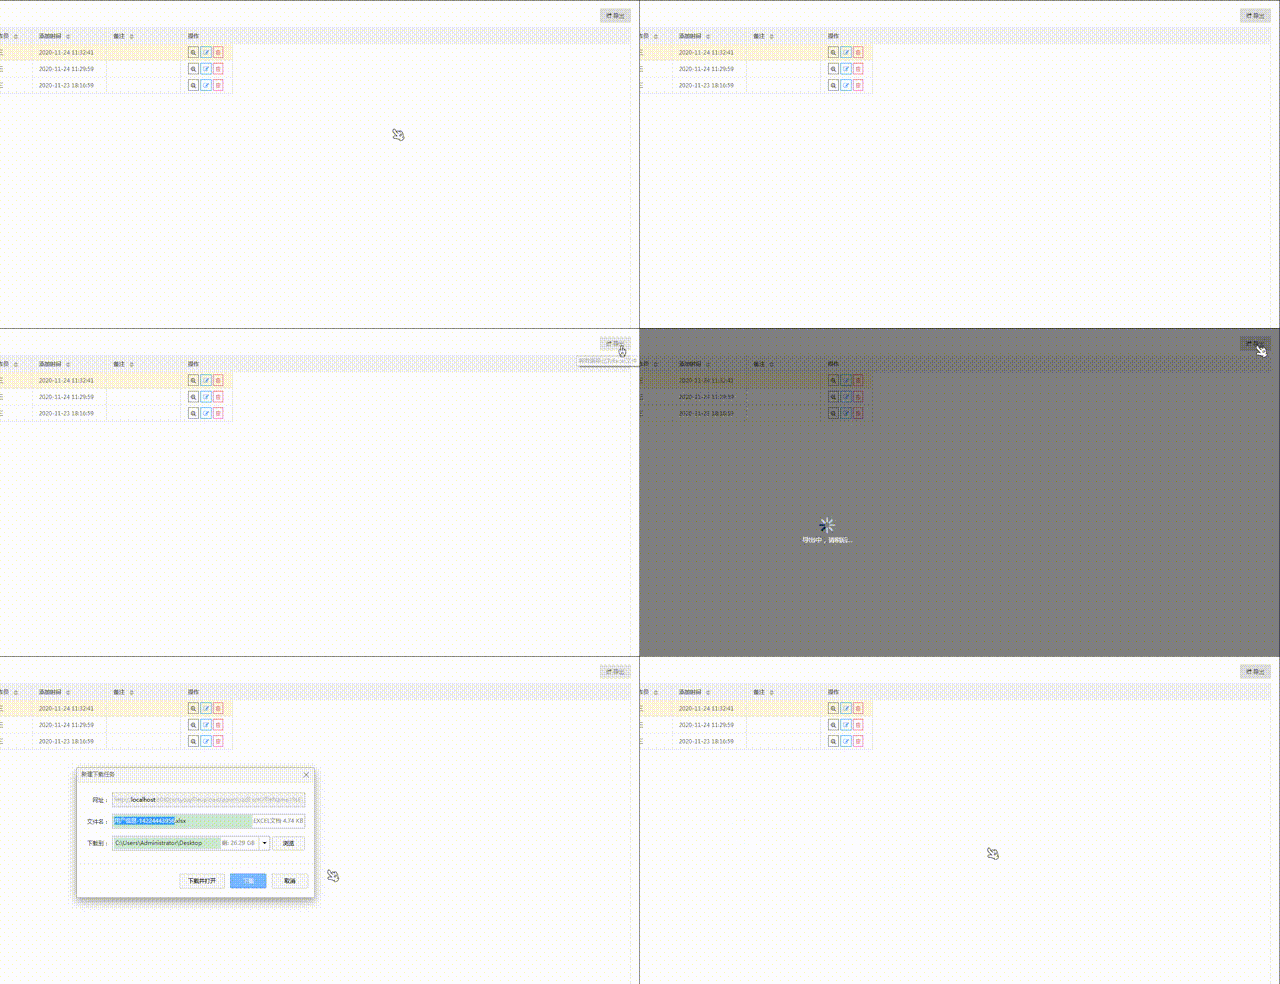
效果如下:

总结:
以前是将封装数据和下载数据放一个方法里面,导致下载需要等待很久,而等待的时候,无法提示用户后台正在处理数据。将数据和下载分开后就可以达到等待时提示,加载完下载。
以上就是本文的全部内容,希望对大家的学习有所帮助,也希望大家多多支持脚本之家。
