js实现微信聊天界面
作者:星辰落海
这篇文章主要为大家详细介绍了js实现微信聊天界面,文中示例代码介绍的非常详细,具有一定的参考价值,感兴趣的小伙伴们可以参考一下
本文实例为大家分享了js实现微信聊天界面的具体代码,供大家参考,具体内容如下
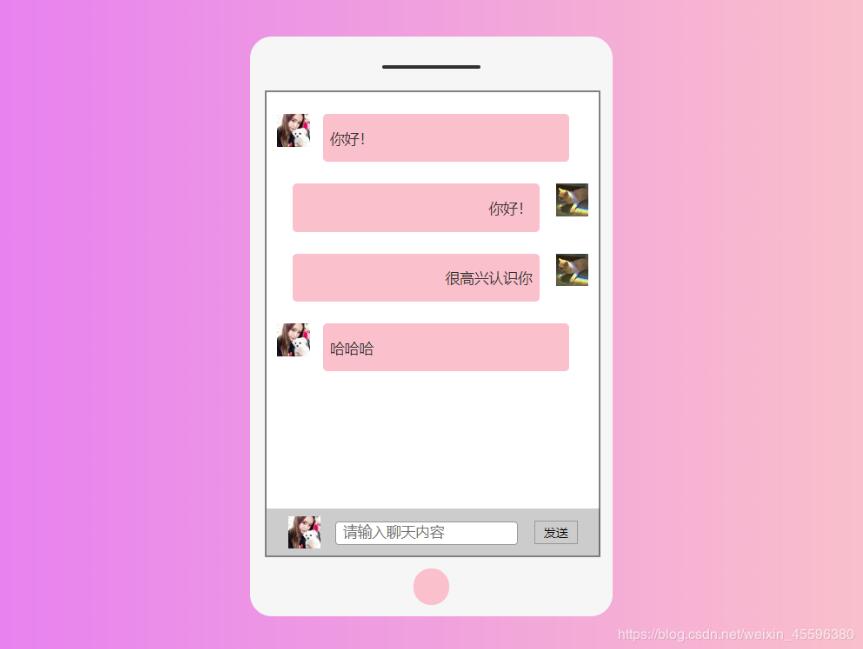
效果如图:


代码部分
<!DOCTYPE html>
<html lang="en">
<head>
  <meta charset="UTF-8">
  <title>模拟微信聊天</title>
  <link rel="stylesheet" href="../css/模拟微信聊天.css" rel="external nofollow" >
</head>
<body>
  <div class="box">
    <div class="phone">
      <div class="header"></div>
      <div class="content">
        <ul class="list">
        </ul>
        <div class="content-bottom">
          <img src="../image/one.jpeg" width="45px" height="45px" id="pic">
          <input type="text" placeholder="请输入聊天内容" class="myInput">
          <input type="button" value="发送" class="out">
        </div>
      </div>
      <div class="footer"></div>
    </div>
  </div>
</body>
<script src="../js/模拟微信聊天.js"></script>
</html>
*{
  margin:0;
  padding:0;
}
body{
  margin:0;
  padding:0;
}
.box{
  margin:100px auto;
  height:900px;
  width:1200px;
  background:linear-gradient(to right,violet,pink);
}
.phone{
  top:50px;
  position:relative;
  width:500px;
  height:800px;
  background:#f6f6f6;
  left:50%;
  margin-left:-250px;
  border-radius: 30px;
}
.phone .header{
  position: absolute;
  width:135px;
  height:5px;
  background:rgba(0,0,0,0.8);
  -webkit-border-radius: 80px;
  -moz-border-radius: 80px;
  border-radius: 80px;
  left:50%;
  margin-left:-67.5px;
  top:40px;
}
.phone .content{
  position: absolute;
  top:75px;
  width:460px;
  height: 640px;
  background: #fff;
  left:50%;
  margin-left:-230px;
  border-radius: 1px;
  border:2px solid gray;
}
.phone .footer{
  position: absolute;
  width:50px;
  height:50px;
  background:pink;
  -webkit-border-radius: 50%;
  -moz-border-radius: 50%;
  border-radius: 50%;
  bottom:15px;
  left:50%;
  margin-left:-25px;
}
.content .list{
  height:575px;
  list-style-type: none;
  overflow: hidden;
}
.list li{
  margin-top:30px;
}
.content .list .left img{
  display:inline-block;
  margin: 0;
  float: left;
  margin-left:15px;
}
.content .list .left p{
  color:#333333;
  margin-left:78px;
  width:320px;
  padding:20px 10px;
  font-size:20px;
  background:pink;
  border-radius: 6px;
  text-align: left;
}
.content .list .right img{
  display:inline-block;
  margin: 0;
  float:right;
  margin-right:15px;
}
.content .list .right p {
  text-align: right;
  color: #333333;
  margin-left: 37px;
  width: 320px;
  padding: 20px 10px;
  font-size: 20px;
  background: pink;
  border-radius: 6px;
}
 .content-bottom{
  overflow: hidden;
  -webkit-box-sizing: border-box;
  -moz-box-sizing: border-box;
  box-sizing: border-box;
  height: 65px;
  background:rgba(0,0,0,0.2);
  padding:10px 30px;
  position: relative;
}
.content-bottom .myInput{
  display: inline-block;
  height:30px;
  width:250px;
  font-size:20px;
  border-radius:5px;
  border:1px solid #999999;
  text-indent:10px;
  outline:none;
  position:absolute;
  top:50%;
  margin-top: -15px;
  margin-left:20px;
}
.content-bottom .out{
  height:32px;
  width: 60px;
  display: inline-block;
  position: absolute;
  right:30px;
  top:50%;
  border:1px solid #999999;
  margin-top: -16px;
  font-size:17px;
  outline: none;
  background:none;
  cursor:pointer;
}
.content-bottom .out:hover{
  background-color: pink;
}
var out = document.querySelector(".out");//获取发送按钮
var myInput = document.querySelector(".myInput");
var pic = document.getElementById("pic");//获取图片
var onOff = true;
var list = document.querySelector(".list");//获取ul
pic.onclick=function(){
  if(onOff){
    pic.src = "../image/two.jpeg";
    onOff = false;
  }else {
    pic.src = "../image/one.jpeg";
    onOff = true;
  }
};
out.onclick=function () {
  var value = myInput.value;//获取文字内容
  if(value == ""){
    alert("请输入内容");
  }else{
    if(onOff){
      list.innerHTML += "<li class='left'><img src='../image/one.jpeg'/><p>" +value+ "</p></li>";
    }else{
      list.innerHTML += "<li class='right'><img src='../image/two.jpeg'/><p>" +value+ "</p></li>";
    }
  }
  myInput.blur(myInput.value='');//失去焦点,文本框清空
};
学习收获:加深对if语句的理解
以上就是本文的全部内容,希望对大家的学习有所帮助,也希望大家多多支持脚本之家。
