使用Python将图片转正方形的两种方法实例代码详解
作者:嘿嘿骑士
这篇文章主要介绍了使用Python将图片转正方形的两种方法,本文通过实例代码给大家给大家介绍的非常详细,对大家的学习或工作具有一定的参考借鉴价值,需要的朋友可以参考下
一、将原图粘贴到一张正方形的背景上
def trans_square(image):
  r"""Open the image using PIL."""
  image = image.convert('RGB')
  w, h = image.size
  background = Image.new('RGB', size=(max(w, h), max(w, h)), color=(127, 127, 127)) # 创建背景图,颜色值为127
  length = int(abs(w - h) // 2) # 一侧需要填充的长度
  box = (length, 0) if w < h else (0, length) # 粘贴的位置
  background.paste(image, box)
  return background
二、切片填充的方式使用numpy创建背景,使用切片将原图的值填充到背景中。
 def trans_square(image):
  	r"""Open the image using PIL."""
    img = image.convert('RGB')
    img = np.array(img, dtype=np.uint8) # 图片转numpy
    img_h, img_w, img_c = img.shape
    if img_h != img_w:
      long_side = max(img_w, img_h)
      short_side = min(img_w, img_h)
      loc = abs(img_w - img_h) // 2
      img = img.transpose((1, 0, 2)) if img_w < img_h else img # 如果高是长边则换轴,最后再换回来
      background = np.zeros((long_side, long_side, img_c), dtype=np.uint8) # 创建正方形背景
      background[loc: loc + short_side] = img[...] # 数据填充在中间位置
      img = background.transpose((1, 0, 2)) if img_w < img_h else background
    return Image.fromarray(img, 'RGB')
使用 nn.ZeroPad2d() 或者 nn.ConstantPad2d() 进行填充
def trans_square(image):
  r"""transform square.
  :return PIL image
  """
  img = transforms.ToTensor()(image)
  C, H, W = img.shape
  pad_1 = int(abs(H - W) // 2) # 一侧填充长度
  pad_2 = int(abs(H - W) - pad_1) # 另一侧填充长度
  img = img.unsqueeze(0) # 加轴
  if H > W:
    img = nn.ZeroPad2d((pad_1, pad_2, 0, 0))(img) # 左右填充,填充值是0
    # img = nn.ConstantPad2d((pad_1, pad_2, 0, 0), 127)(img) # 左右填充,填充值是127
  elif H < W:
    img = nn.ZeroPad2d((0, 0, pad_1, pad_2))(img) # 上下填充,填充值是0
    # img = nn.ConstantPad2d((0, 0, pad_1, pad_2), 127)(img) # 上下填充,填充值是127
  img = img.squeeze(0) # 减轴
  img = transforms.ToPILImage()(img)
  return img
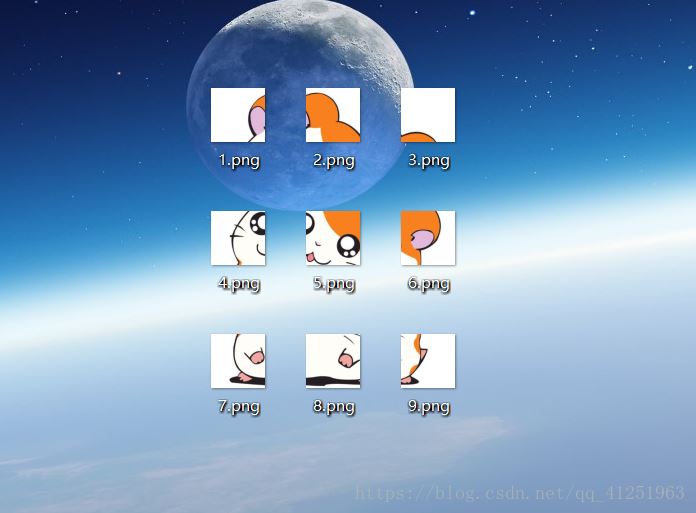
ps:下面看下python 将图片转换成九宫格形式
用到的模块PIL(安装:pip install pillow)
完整代码:
from PIL import Image
import sys
#先将 input image 填充为正方形
def fill_image(image):
  width, height = image.size
  #选取长和宽中较大值作为新图片的
  new_image_length = width if width > height else height
  #生成新图片[白底]
  new_image = Image.new(image.mode, (new_image_length, new_image_length), color='white')  #注意这个函数!
  #将之前的图粘贴在新图上,居中
  if width > height:#原图宽大于高,则填充图片的竖直维度 #(x,y)二元组表示粘贴上图相对下图的起始位置,是个坐标点。
    new_image.paste(image, (0, int((new_image_length - height) / 2)))
  else:
    new_image.paste(image, (int((new_image_length - width) / 2),0))
  return new_image
def cut_image(image):
  width, height = image.size
  item_width = int(width / 3)
  box_list = []
  # (left, upper, right, lower)
  for i in range(0,3):
    for j in range(0,3):
      #print((i*item_width,j*item_width,(i+1)*item_width,(j+1)*item_width))
      box = (j*item_width,i*item_width,(j+1)*item_width,(i+1)*item_width)
      box_list.append(box)
  image_list = [image.crop(box) for box in box_list]
  return image_list
#保存
def save_images(image_list):
  index = 1
  for image in image_list:
    image.save(str(index) + '.png', 'PNG')
    index += 1
if __name__ == '__main__':
  file_path = "***"#填入图片名
  image = Image.open(file_path)
  #image.show()
  image = fill_image(image)
  image_list = cut_image(image)
  save_images(image_list)
原图:

运行程序后效果图:

到此这篇关于使用Python将图片转正方形的两种方法的文章就介绍到这了,更多相关python 图片转正方形内容请搜索脚本之家以前的文章或继续浏览下面的相关文章希望大家以后多多支持脚本之家!
