微信小程序自定义模态弹窗组件详解
作者:here962464
这篇文章主要为大家详细介绍了微信小程序自定义模态弹窗组件,文中示例代码介绍的非常详细,具有一定的参考价值,感兴趣的小伙伴们可以参考一下
小程序自带一个showModal弹窗,调用很简单,但是限制很多,title有字数限制,中间的content也只能放文字不能放组件,所以作为一个前端碰到那种连续好几个跟微信自带的模态弹窗风格一模一样,但是功能又花里胡哨的UI稿,就不能忍受频繁的复制粘贴了。自己写了一个组件,虽然调用起来比微信自带的麻烦一点,但是还蛮实用的。
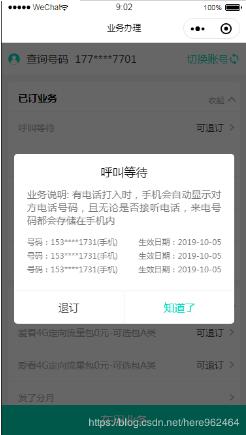
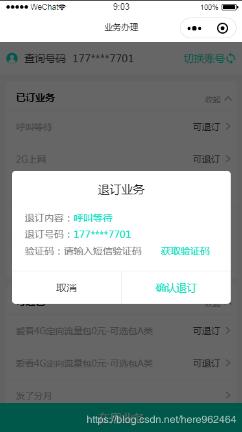
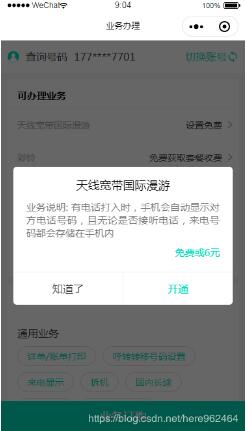
效果大概长这样。
上代码:
wxml:
<!-- 自定义模态弹窗 -->
<view class="modalDIY" wx:if="{{showModal}}">
 <view class="bg">
 <view class="modalTitle">{{title}}</view>
 <view class="modalContent">
  <view>{{content}}</view>
  <slot></slot>
 </view>
 <view class="modalOperate">
  <view bindtap="_cancel" hidden="{{!showCancel}}" style="color:{{cancelColor}}" class="cancelBtn">{{cancelText}}</view>
  <view bindtap="_comfirm" class="comfirmBtn" style="color:{{confirmColor}}">{{confirmText}}</view>
 </view>
 </view>
</view>
js:
const regeneratorRuntime = require('../../dependence/generator-runtime.js'); //这是一个es6转es5的js
Component({
 properties: {
 // 这里定义了innerText属性,属性值可以在组件使用时指定
 },
 data: {
 showModal: false,
 title: '温馨提示',
 content: '',
 showCancel: true,
 cancelColor: '#3a3a3a',
 cancelText: '取消',
 confirmColor: '#00800',
 confirmText: '确认',
 comfirm() { },
 cancel() { }
 },
 methods: {
 // 外部方法调用
 showModal(params) {
  this.setData({
  showModal: true,
  title: params.title || '温馨提示', //title
  content: params.content || '',//中间内容
  showCancel: params.showCancel == undefined ? true : params.showCancel,//是否显示左侧
  cancelColor: params.cancelColor || '#3a3a3a',//取消按钮文字颜色
  cancelText: params.cancelText || '取消',//左侧按钮文字
  confirmColor: params.confirmColor || '#09BA07',//右侧按钮文字颜色
  confirmText: params.confirmText || '确认',//右侧按钮文字
  /* 回调函数 */
  comfirm: params.comfirm || function(){},//点击确认(右侧按钮)
  cancel: params.cancel || function(){}//点击取消(左侧按钮)
  })
 },
 // 点击确定
 _comfirm() {
  this.setData({
  showModal: false
  },()=>{
  this.data.comfirm();
  })
 },
 // 点击取消
 _cancel() {
  this.setData({
  showModal: false
  },()=>{
  this.data.cancel();
  })
 }
 }
})

// 调用示例
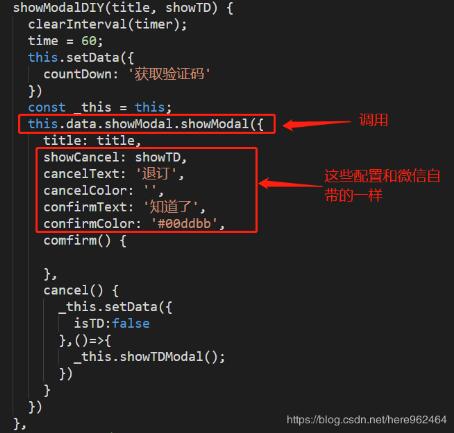
// 引入组件后通过js selectComponent('#id')方法获得组件对象 再调用组件对象下的showModal方法 传入配置参数即可 可以在组件中自定义内容节点
wxss:
.modalDIY{
 position: fixed;
 z-index: 99999999;
 top: 0;
 left: 0;
 width: 100vw;
 height: 100vh;
 background: rgba(0,0,0,0.6);
 display: flex;
 align-items: center;
 align-content: center;
 justify-content: center;
}
.bg{
 background: #fff;
 text-align: center;
 border-radius: 10rpx;
 width: 90%;
}
.modalTitle{
 padding: 30rpx 40rpx 0 40rpx;
 font-size: 36rpx;
 line-height: 55rpx;
 color: #000;
}
.modalContent{
 padding: 20rpx 40rpx;
 font-size: 30rpx;
 color: #7a7a7a;
}
.modalOperate{
 height: 100rpx;
 line-height: 100rpx;
 border-top: 2rpx solid #eee;
 display: flex;
}
.cancelBtn{
 border-right: 2rpx solid #eee;
 flex: 1;
}
.comfirmBtn{
 flex: 1;
}
json:(记住要把component设置成true)
{
 "component": true,
 "usingComponents": {}
}
调用的时候需要贴别说明一下,拿我上面示例图的第二个弹窗的调用为例
首先引入组件
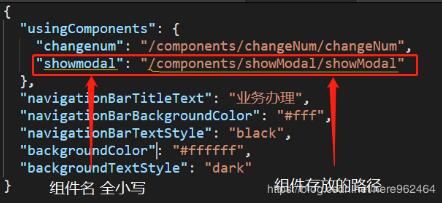
在wxml中引用组件
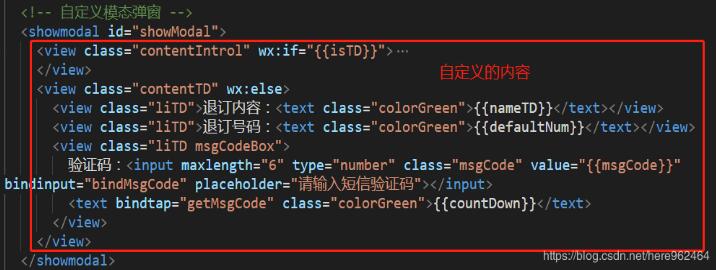
在js中可以配置一些颜色之类的样式
首先通过selectComponent这个方法获得组件对象,可以存成全局的常量。

我们要调用这个对象下自己封装的showModal方法
完毕。
为大家推荐现在关注度比较高的微信小程序教程一篇:《微信小程序开发教程》小编为大家精心整理的,希望喜欢。
以上就是本文的全部内容,希望对大家的学习有所帮助,也希望大家多多支持脚本之家。
