SpringMVC+EasyUI实现页面左侧导航菜单功能
作者:hejjon
这篇文章主要介绍了SpringMVC+EasyUI实现页面左侧导航菜单功能,本文通过实例代码给大家介绍的非常详细,具有一定的参考借鉴价值,需要的朋友可以参考下
1. 效果图展示

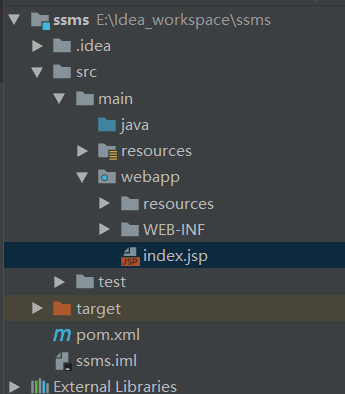
2. 工程目录结构
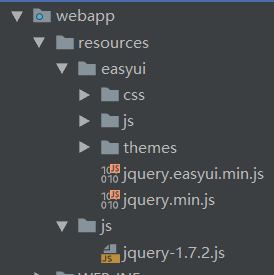
注意: webapp下的resources目录放置easyui和js(jQuery文件是另外的)


3. 代码
index.jsp
<%@ page contentType="text/html;charset=UTF-8" language="java" %>
<html>
<head>
  <title>学生成绩管理系统 管理员后台</title>
  <link rel="stylesheet" type="text/css" href="/resources/easyui/css/default.css" rel="external nofollow" rel="external nofollow" />
  <link rel="stylesheet" type="text/css" href="/resources/easyui/themes/default/easyui.css" rel="external nofollow" rel="external nofollow" >
  <link rel="stylesheet" type="text/css" href="/resources/easyui/themes/icon.css" rel="external nofollow" rel="external nofollow" >
  <%--以下三个js文件导入顺序不要调整!!--%>
  <script type="text/javascript" src="/resources/js/jquery-1.7.2.js"></script>
  <script type="text/javascript" src="/resources/easyui/jquery.easyui.min.js"></script>
  <script type="text/javascript" src="/resources/easyui/js/outlook2.js"></script>
  <script type="text/javascript">
    var _menus = {
      "menus": [
        {
          "menuid": "1", "icon": "", "menuname": "成绩统计分析",
          "menus": [
            {
              "menuid": "11",
              "menuname": "考试列表",
              "icon": "icon-exam",
              "url": "ExamServlet?method=toExamListView"
            }
          ]
        },
        {
          "menuid": "2", "icon": "", "menuname": "学生信息管理",
          "menus": [
            {
              "menuid": "21",
              "menuname": "学生列表",
              "icon": "icon-user-student",
              "url": "StudentServlet?method=toStudentListView"
            },
          ]
        },
        {
          "menuid": "3", "icon": "", "menuname": "教师信息管理",
          "menus": [
            {
              "menuid": "31",
              "menuname": "教师列表",
              "icon": "icon-user-teacher",
              "url": "TeacherServlet?method=toTeacherListView"
            },
          ]
        },
        {
          "menuid": "4", "icon": "", "menuname": "基础信息管理",
          "menus": [
            {
              "menuid": "41",
              "menuname": "年级列表",
              "icon": "icon-world",
              "url": "GradeServlet?method=toGradeListView"
            },
            {
              "menuid": "42",
              "menuname": "班级列表",
              "icon": "icon-house",
              "url": "ClazzServlet?method=toClazzListView"
            },
            {
              "menuid": "43",
              "menuname": "课程列表",
              "icon": "icon-book-open",
              "url": "CourseServlet?method=toCourseListView"
            }
          ]
        },
        {
          "menuid": "5", "icon": "", "menuname": "系统管理",
          "menus": [
            {
              "menuid": "51",
              "menuname": "系统设置",
              "icon": "icon-set",
              "url": "SystemServlet?method=toAdminPersonalView"
            },
          ]
        }
      ]
    };
  </script>

</head>
<body class="easyui-layout" style="overflow-y: hidden" scroll="no">
<div region="north" split="true" border="false" style="overflow: hidden; height: 30px;
    line-height: 20px;color: #fff; font-family: Verdana, 微软雅黑,黑体"></div>
<div data-options="region:'south',title:'South Title',split:true" style="height:100px;"></div>
<div data-options="region:'west',title:'导航菜单',split:true" style="width:200px;">
  <div id="nav" class="easyui-accordion" fit="true" border="false">

  </div>
</div>
<div data-options="region:'center',title:'center title'" style="padding:5px;background:#eee;"></div>
</body>
</html>
springmvc.xml配置静态资源
<!--静态资源-->
<mvc:resources mapping="/resources/**" location="/resources/"/>
注意:
1. EasyUI和JQuery文件是放在webapp/resources目录下的, 需要把 jquery-1.7.2.js也引进去.
2. jsp文件中引入EasyUI的css和js文件的顺序如下, 不要随意调整!!!
   <link rel="stylesheet" type="text/css" href="/resources/easyui/css/default.css" rel="external nofollow" rel="external nofollow" />
  <link rel="stylesheet" type="text/css" href="/resources/easyui/themes/default/easyui.css" rel="external nofollow" rel="external nofollow" >
  <link rel="stylesheet" type="text/css" href="/resources/easyui/themes/icon.css" rel="external nofollow" rel="external nofollow" >
  <%--以下三个js文件导入顺序不要调整!!--%>
  <script type="text/javascript" src="/resources/js/jquery-1.7.2.js"></script>
  <script type="text/javascript" src="/resources/easyui/jquery.easyui.min.js"></script>
  <script type="text/javascript" src="/resources/easyui/js/outlook2.js"></script>
3. springMVC的静态资源配置是针对resources目录下所有文件的, 所以之后的图片等静态资源文件也直接放在resources目录下即可.
4. 导航菜单是在以下id为nav的div里显示的
<div data-options="region:'west',title:'导航菜单',split:true" style="width:200px;">
  <div id="nav" class="easyui-accordion" fit="true" border="false">

  </div>
</div>
该div的id属性一定要是 nav, 试过其它的都没有效果.
总结
以上所述是小编给大家介绍的SpringMVC+EasyUI实现页面左侧导航菜单功能,希望对大家有所帮助,如果大家有任何疑问请给我留言,小编会及时回复大家的。在此也非常感谢大家对脚本之家网站的支持!
如果你觉得本文对你有帮助,欢迎转载,烦请注明出处,谢谢!
