微信小程序实现图片选择并预览功能
作者:chibimarukochan
这篇文章主要为大家详细介绍了微信小程序实现图片选择并预览,文中示例代码介绍的非常详细,具有一定的参考价值,感兴趣的小伙伴们可以参考一下
本文实例为大家分享了微信小程序实现图片选择并预览的具体代码,供大家参考,具体内容如下
(一)、功能说明
做的是一个意见反馈,用户发表意见和上传图片,限制了最多只能上传三张图片。
其他要点:textarea使用,底部保存按钮固定
(二)、小程序接口说明
wx.chooseLocation(Object object)
从本地相册选择图片或使用相机拍照。

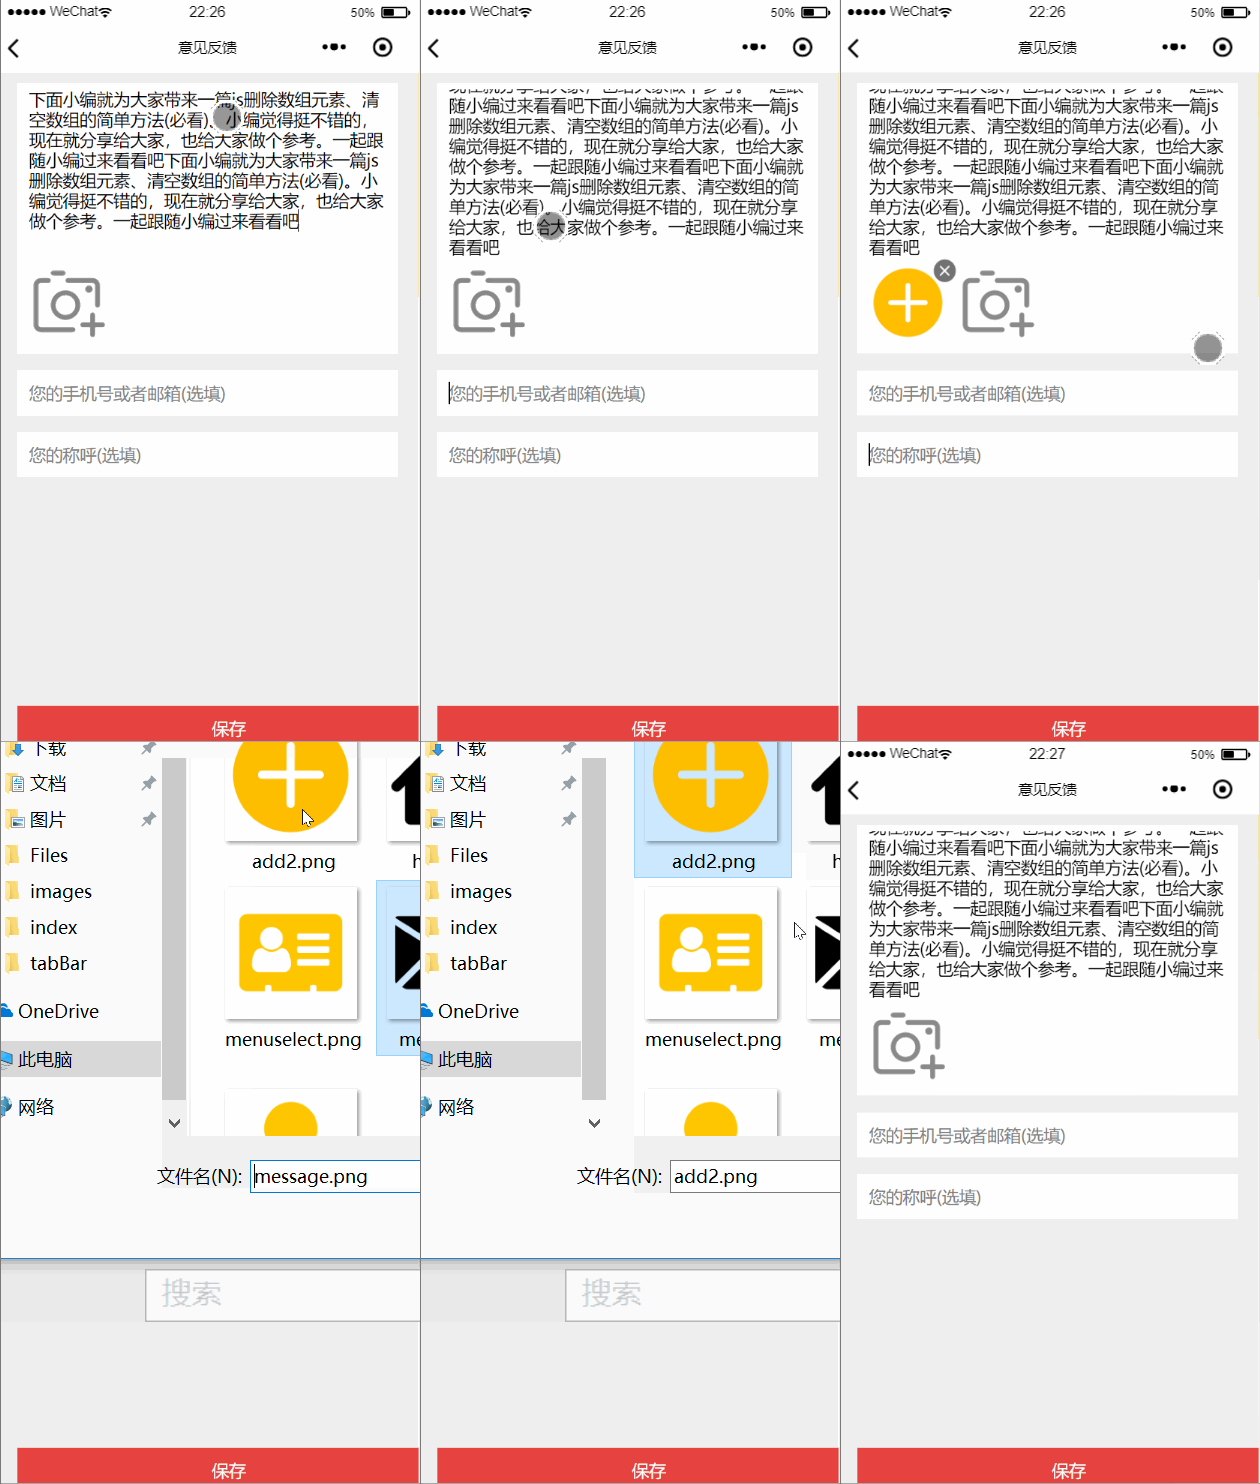
(三)、效果图
效果如下:

(四)、代码展示
WXML页面:
<view class="wrap">
 <view class="contant_wrap">
 <view class="contant">
 <textarea name="bindTextAreaBlur" bindblur="bindTextAreaBlur" auto-height placeholder="请描述您的问题或意见(必填)" maxlength="600"/>
 </view>
 <view class="contant-pic">
 <view class="pics-list" wx:for="{{pics}}" wx:key="" >
 <image src="{{item}}" class="uploadImg"></image>
 <image src="../../images/delete.png" class="uploadImg-error" data-img="{{item}}" bindtap='deleteImg'></image>
 </view>
 <image src="../../images/uploadImg.png" class="uploadImg {{isShow?'true':'hideTrue'}}" bindtap='uploadImage' ></image>
 </view>
 </view>
 <view class="phone">
 <input name="inputPhone" bindinput="inputPhone" placeholder="您的手机号或者邮箱(选填)" />
 </view>
 <view class="phone">
 <input name="inputName" bindinput="inputName" placeholder="您的称呼(选填)" />
 </view>
 <view class="bottom" bindtap='submitAdvice'> 保存</view>
</view>
wxss页面:
page{
 background-color: #efefef;
}
.wrap{
 width:90%;
 margin-left:5%;
 margin-top:10px;
 font-size:15px;
}
.contant_wrap{
 background-color: #fff;
}
.contant{
 width: 94%;
 margin: 0 auto
}
textarea{
 min-height:300rpx;
 max-height: 300rpx;
 padding: 10rpx 0;
 width: 100%;

}
.contant-pic{
 width: 94%;
 margin: 0 auto;
 height:80px;

}
.pics-list{
 width:73px;
 height:73px;
 float:left;
 margin-right:6px;

}
.uploadImg{
 width:70px;
 height:70px;
}
.uploadImg-error{
 height:25px;
 width:25px;
 position:relative;
 top:-80px;
 left:55px;
}
.hideTrue {
 display: none
}
.true {
 display: block
}
input{
 margin-top: 30rpx;
 height: 80rpx;
 padding-left: 20rpx;
 background-color: #fff;
}
.placeholder{
 color: #999999;
 font-size: 12pt;
}
.bottom{
 width:100%;
 height:40px;
 background-color:#e64340;
 position:fixed; bottom:0;
 color:#ffff;
 text-align: center;
 line-height: 40px;
}
js中:
// pages/advice/advice.js
Page({

 /** 页面的初始数据*/
 data: {
 content:'',
 phone:'',
 name:'',
 advice:'',
 pics:[],
 isShow: true
 },
 /**获取textarea值:评论内容 */
 bindTextAreaBlur:function(e){
 this.setData({
 advice:e.detail.value
 })
 },
 /**获取手机或邮箱*/
 inputPhone: function (e) {
 this.setData({
 phone: e.detail.value
 })
 },
 /**获取称呼 */
 inputName: function (e) {
 this.setData({
 name: e.detail.value
 })
 },

 /**上传图片 */
 uploadImage:function(){
 let that=this;
 let pics = that.data.pics;
 wx.chooseImage({
 count:3 - pics.length,
 sizeType: ['original', 'compressed'],
 sourceType: ['album', 'camera'],
 success: function(res) {
 let imgSrc = res.tempFilePaths;
  pics.push(imgSrc);
 if (pics.length >= 3){
  that.setData({
  isShow: false
  })
 }
 that.setData({
  pics: pics
 })
 },
 })

 },

 /**删除图片 */
 deleteImg:function(e){
 let that=this;
 let deleteImg=e.currentTarget.dataset.img;
 let pics = that.data.pics;
 let newPics=[];
 for (let i = 0;i<pics.length; i++){
 //判断字符串是否相等
 if (pics[i]["0"] !== deleteImg["0"]){
 newPics.push(pics[i])
 }
 }
 that.setData({
 pics: newPics,
 isShow: true
 })

 },

 /**提交 */
 submitAdvice:function(){
 let that=this;
 let advice = that.data.advice
 let name=this.data.name
 let phone=this.data.phone
 let pics=this.data.pics
 //保存操作
 }
})
以上就是本文的全部内容,希望对大家的学习有所帮助,也希望大家多多支持脚本之家。
