微信小程序template模板与component组件的区别和使用详解
作者:404的魔咒
前言:
除了component,微信小程序中还有另一种组件化你的方式template模板,这两者之间的区别是,template主要是展示,方法则需要在调用的页面中定义。而component组件则有自己的业务逻辑,可以看做一个独立的page页面。简单来说,如果只是展示,使用template就足够了,如果涉及到的业务逻辑交互比较多,那就最好使用component组件了。
一. template模板:
1. 模板创建:
建议单独创建template目录,在template目录中创建管理模板文件。
由于模板只有wxml、wxss文件,而且小程序开发工具并不支持快速创建模板,因此就需要直接创建wxml、wxss文件了,一个template的模板文件和样式文件只需要命名相同即可。如果模板较多,建议在template目录下再创建子目录,存放单独的模板。

2. 模板文件:
template.wxml文件中能写多个模板,用name区分:
<template name="demo">
<view class='tempDemo'>
 <text class='name'>FirstName: {{firstName}}, LastName: {{lastName}}</text>
 <text class='fr' bindtap="clickMe" data-name="{{'Hello! I am '+firstName+' '+LastName+'!'}}"> clcikMe </text>
</view>
</template>
3. 样式文件:
模板拥有自己的样式文件(用户自定义)。
/* templates/demo/index.wxss */
 .tempDemo{
 width:100%;
 }
 view.tempDemo .name{color:darkorange}
4. 页面引用:
page.wxml
<!--导入模板-->
<import src="../../templates/demo/index.wxml" />
<!--嵌入模板-->
<view>
 <text>嵌入模板</text>
 <template is="demo" data="{{...staffA}}"></template><!--传入参数,必须是对象-->
 <template is="demo" data="{{...staffB}}"></template><!--传入参数,必须是对象-->
 <template is="demo" data="{{...staffC}}"></template><!--传入参数,必须是对象-->
</view>
page.wxss
@import "../../templates/demo/index.wxss" /*引入template样式*/
page.js
Page({
 /**
  * 页面的初始数据
  */
 data: {
  staffA: { firstName: 'Hulk', lastName: 'Hu' },
  staffB: { firstName: 'Shang', lastName: 'You' },
  staffC: { firstName: 'Gideon', lastName: 'Lin' }
 },
 clickMe(e) {
  wx.showToast({ title: e.currentTarget.dataset.name, icon: "none", duration: 100000 })
 }
 ......
})
备注:
一个模板文件中可以有多个template,每个template均需定义name进行区分,页面调用的时候也是以name指向对应的template;
template模板没有配置文件(.json)和业务逻辑文件(.js),所以template模板中的变量引用和业务逻辑事件都需要在引用页面的js文件中进行定义;
template模板支持独立样式,需要在引用页面的样式文件中进行导入;
页面应用template模板需要先导入模板 <import src="../../templates/demo/index.wxml" /> ,然后再嵌入模板<template is="demo" data="{{...staffA}}"></template>
二. Component组件:
1. 组件创建:
新建component目录——创建子目录——新建Component;


2. 组件编写:
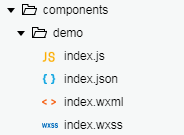
新建的component组件也由4个文件构成,与page类似,但是js文件和json文件与页面不同。
js代码:
// components/demo/index.js
Component({
 /**
  * 组件的属性列表
  */
 properties: {
  name: {
   type: String,
   value: ''
  }
 },

 /**
  * 组件的初始数据
  */
 data: {
  type: "组件"
 },

 /**
  * 组件的方法列表
  */
 methods: {
  click: function () {
   console.log("component!");
  }
 }
})
json配置文件:
{
  "component": true,
  "usingComponents": {}
}
3. 组件引用:
页面中引用组件需要在json配置文件中进行配置,代码如下:
 {
  "navigationBarTitleText": "模板demo",
  "usingComponents": {
   "demo": "../../components/demo/index"
  }
 }
然后在模板文件中进行使用就可以了,其中name的值为json配置文件中usingComponents的键值:
<demo name="comp" />
<!--使用demo组件,并传入值为“comp”的name属性(参数)-->
这样就可以了。
PS:组件中不会自动引用公共样式,如果需要则需在样式文件中引入:
@import "../../app.wxss";
以上就是本文的全部内容,希望对大家的学习有所帮助,也希望大家多多支持脚本之家。
