Asp.net MVC中Razor常见的问题与解决方法总结
作者:云中客
前言
最近在学习Asp.net MVC Razor,在使用中遇到了不少的问题,所以想着总结下来,没有经验的童鞋就是这样磕磕碰碰出来的经验。话不多说,来一起看看详细的介绍:
一、Datatype的错误提示消息无法自定义
这也许是Asp.net MVC的一个Bug。ViewModel中定义了DataType为Date字段:
[Required(ErrorMessage = "Birthday must be input!")]

[DataType(DataType.Date, ErrorMessage = "Please enter a date like(2017-07-19).")]

public DateTime BirthDay { get; set; }
Razor生成的HTML如下:
<input name="BirthDay" class="form-control" id="BirthDay" type="text" value="" data-val-required="Birthday must be input!" data-val="true" data-val-date="字段 BirthDay 必须是日期。">
Required的错误消息和定义的一样,而DataType的消息却没有??既然DataType有自定义消息的公开属性为啥不起作用?如果有知道的欢迎留言。
解决方法:
通过Javascript在页面Load的时候替换掉原来的消息。
$("#txtDesignatedDate").attr('data-val-date', 'Please enter a date like(2017/1/1)');
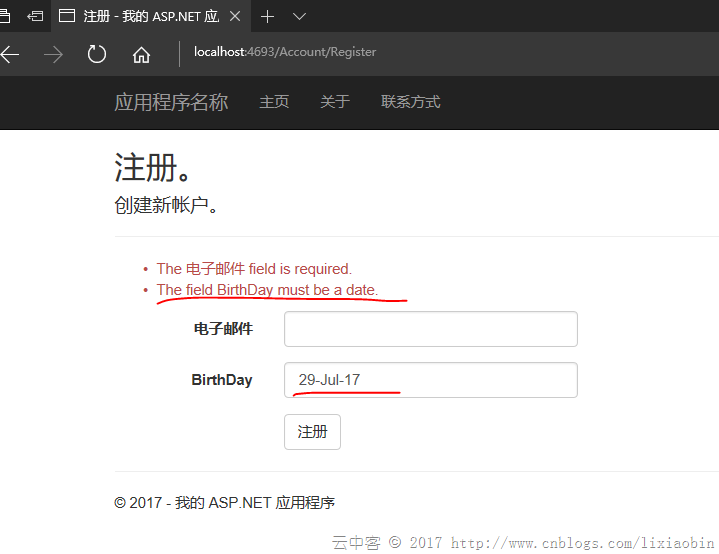
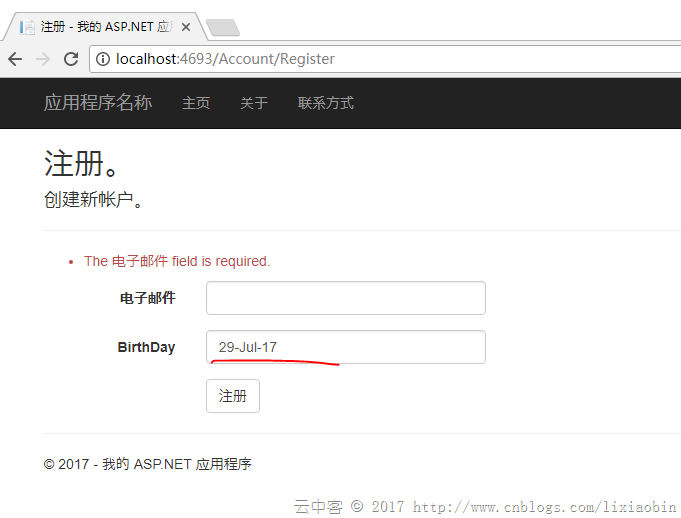
二、d-MMM-yy格式的英文日期在IE中验证出错,而在Chrome中没问题
Razor模型绑定设置如下:
@Html.LabelFor(m => m.BirthDay, new { @class = "col-md-2 control-label" })
@Html.TextBoxFor(m => m.BirthDay, "{0:d-MMM-yy}", new { @class = "form-control" })
Edge测试情况:显示日期不对的错误消息。

Chrome测试情况:居然没有错误提示!!

如果是英文以外同样格式的日期,都会显示日期不对错误消息。这到底怎么回事?
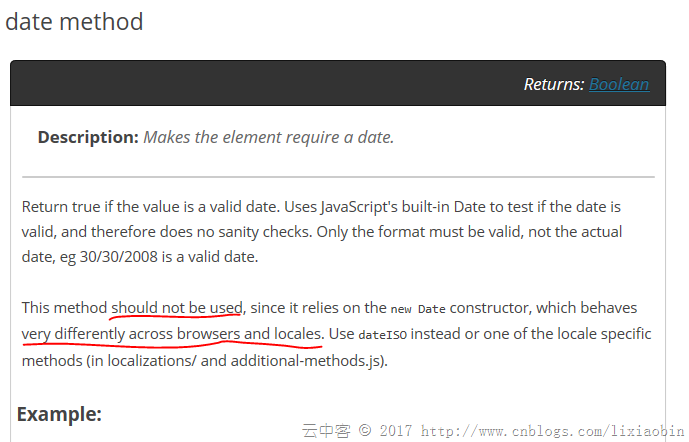
官网(http://jqueryvalidation.org/date-method/)其实也有说明:

翻看JS代码:
 // http://docs.jquery.com/Plugins/Validation/Methods/date

date: function( value, element ) {

 return this.optional(element) || !/Invalid|NaN/.test(new Date(value).toString());

},


// http://docs.jquery.com/Plugins/Validation/Methods/dateISO

dateISO: function( value, element ) {

 return this.optional(element) || /^\d{4}[\/\-]\d{1,2}[\/\-]\d{1,2}$/.test(value);

},
dateISO也只支持yyyy-MM-dd 或者yyyy/MM/dd格式的验证。没办法只能重写一个验证方法覆盖原来的。
解决方法:
(function ($) {

 $.validator.methods.date = function (value, element) {

 return this.optional(element) || DateCheck(value);

 }

}(jQuery));
自定义一个DateCheck函数就可以了。
三、DropDownList设置默认选择项偶尔会无效
Action端设置:
return View(new RegisterViewModel { BirthDay = DateTime.Now, BirthCity = City.Shanghai });
View端设置:
@Html.DropDownListFor(m => m.BirthCity, new SelectListItem[] {

 new SelectListItem{ Text="Jiangxi",Value="1"},

 new SelectListItem{ Text="Beijing",Value="2"},

 new SelectListItem{ Text="Shanghai",Value="3"},

 new SelectListItem{ Text="ShengZhen",Value="4"},

}, new { @class = "form-control" })
偶尔这样的设置无法选择Action中设置的选项,如果有知道原因的欢迎留言。
解决方法:用SelectList替代SelectItem列表。
@Html.DropDownListFor(m => m.BirthCity, new SelectList(new SelectListItem[] {

 new SelectListItem{ Text="Jiangxi",Value="1"},

 new SelectListItem{ Text="Beijing",Value="2"},

 new SelectListItem{ Text="Shanghai",Value="3"},

 new SelectListItem{ Text="ShengZhen",Value="4"},

}, "Value", "Text", Model.BirthCity), new { @class = "form-control" })
四、密码输入自动提示在Chrome中无法禁止
autocomplete = "off"在Chrome58以后都无效了。这个是浏览器的问题没办法了。
五、Disabled的控件值不上传给服务器
解决方法:通过Javascript在submit之前将控件的Disabled属性删除,submit完成之后再复原Disabled属性。
六、Html.HiddenFor()的控件值不更新
由于HiddenFor默认先使用ModelState的数据,所以在ModelState验证失败的情况下,重新加载画面可能HiddenFor的控件数据是旧的。
解决方法:
ModelState.Clear();
七、List与Dictionary的数据Razor如何绑定
ViewModel属性:
public List ListTest { get; set; }

public Dictionary> DicTest { get; set; }
View端绑定:
@for (int i = 0; i < Model.ListTest.Count; i++)

{

 @Html.TextBoxFor(m => m.ListTest[i].Name, new { @class = "form-control" })

 @Html.TextBoxFor(m => m.ListTest[i].Phone, new { @class = "form-control" })

}
@for (int i = 0; i < Model.DicTest.Count; i++)

{

 string key = Model.DicTest.Keys.ElementAt(i);

 < input type="hidden" name="DicTest[@i].Key" value="@key" />

 for (int j = 0; j < Model.DicTest[key].Count; j++)

 {

 @Html.TextBox($"DicTest[{i}].Value[{j}].Name", Model.DicTest[key][j].Name, new { @class = "form-control" })

 @Html.TextBox($"DicTest[{i}].Value[{j}].Phone", Model.DicTest[key][j].Phone, new { @class = "form-control" })

 }

}
生成的Html如下:
<input name="ListTest[0].Name" class="form-control" id="ListTest_0__Name" type="text" value="lxb1">

<input name="ListTest[0].Phone" class="form-control" id="ListTest_0__Phone" type="text" value="123">

<input name="ListTest[1].Name" class="form-control" id="ListTest_1__Name" type="text" value="lxb2">

<input name="ListTest[1].Phone" class="form-control" id="ListTest_1__Phone" type="text" value="1234">

<input name="ListTest[2].Name" class="form-control" id="ListTest_2__Name" type="text" value="lxb3">

<input name="ListTest[2].Phone" class="form-control" id="ListTest_2__Phone" type="text" value="12345">
<input name="DicTest[0].Key" type="hidden" value="JX">

<input name="DicTest[0].Value[0].Name" class="form-control" id="DicTest_0__Value_0__Name" type="text" value="lxb1">

<input name="DicTest[0].Value[0].Phone" class="form-control" id="DicTest_0__Value_0__Phone" type="text" value="123">

<input name="DicTest[0].Value[1].Name" class="form-control" id="DicTest_0__Value_1__Name" type="text" value="lxb2">

<input name="DicTest[0].Value[1].Phone" class="form-control" id="DicTest_0__Value_1__Phone" type="text" value="1234">

<input name="DicTest[1].Key" type="hidden" value="SZ">

<input name="DicTest[1].Value[0].Name" class="form-control" id="DicTest_1__Value_0__Name" type="text" value="lxb3">

<input name="DicTest[1].Value[0].Phone" class="form-control" id="DicTest_1__Value_0__Phone" type="text" value="12345">

<input name="DicTest[1].Value[1].Name" class="form-control" id="DicTest_1__Value_1__Name" type="text" value="lxb4">

<input id="DicTest_1__Value_1__Phone" class="form-control" value="123456" name="DicTest[1].Value[1].Phone">
其中控件的name很重要。
List: viewmodelpropertyname[index].modelpropertyname 格式。
Dictionary:key设置为viewmodelpropertyname[index].Key,Value设置为viewmodelpropertyname[index].Value
八、尽量多使用EditorFor
比如将第7点的DicTest使用EditorFor。首先需要在Shared或者Controller自身文件夹下创建EditorTemplates文件夹,然后在EditorTemplates文件夹中添加分部页。代码如下:
@using MVCDemo.Models;


@model List


@for (int i = 0; i < Model.Count; i++)

{

 @Html.TextBoxFor(m => m[i].Name, new { @class = "form-control" })

 @Html.TextBoxFor(m => m[i].Phone, new { @class = "form-control" })

}
调用页面设置:
List的时候
@Html.EditorFor(m => m.ListTest, "_PartialPerson", $"ListTest")
Dictionary的时候
@for (int i = 0; i < Model.DicTest.Count; i++)

{

 string key = Model.DicTest.Keys.ElementAt(i);

 <input type="hidden" name="DicTest[@i].Key" value="@key" />

 @Html.EditorFor(m => m.DicTest[key], "_PartialPerson", $"DicTest[{i}].Value")

}
生成的HTML:
<div class="col-md-10">

<input name="ListTest[0].Name" class="form-control" id="ListTest_0__Name" type="text" value="lxb1">

<input name="ListTest[0].Phone" class="form-control" id="ListTest_0__Phone" type="text" value="123">

<input name="ListTest[1].Name" class="form-control" id="ListTest_1__Name" type="text" value="lxb2">

<input name="ListTest[1].Phone" class="form-control" id="ListTest_1__Phone" type="text" value="1234">

<input name="ListTest[2].Name" class="form-control" id="ListTest_2__Name" type="text" value="lxb3">

<input name="ListTest[2].Phone" class="form-control" id="ListTest_2__Phone" type="text" value="12345">

</div>
<div class="col-md-10">

<input name="DicTest[0].Key" type="hidden" value="JX">

<input name="DicTest[0].Value[0].Name" class="form-control" id="DicTest_0__Value_0__Name" type="text" value="lxb1">

<input name="DicTest[0].Value[0].Phone" class="form-control" id="DicTest_0__Value_0__Phone" type="text" value="123">

<input name="DicTest[0].Value[1].Name" class="form-control" id="DicTest_0__Value_1__Name" type="text" value="lxb2">

<input name="DicTest[0].Value[1].Phone" class="form-control" id="DicTest_0__Value_1__Phone" type="text" value="1234">

<input name="DicTest[1].Key" type="hidden" value="SZ">

<input name="DicTest[1].Value[0].Name" class="form-control" id="DicTest_1__Value_0__Name" type="text" value="lxb3">

<input name="DicTest[1].Value[0].Phone" class="form-control" id="DicTest_1__Value_0__Phone" type="text" value="12345">

<input name="DicTest[1].Value[1].Name" class="form-control" id="DicTest_1__Value_1__Name" type="text" value="lxb4">

<input name="DicTest[1].Value[1].Phone" class="form-control" id="DicTest_1__Value_1__Phone" type="text" value="123456">

</div>
这样就简化了不少,也到达了重用。
总结
以上就是这篇文章的全部内容了,希望本文的内容对大家的学习或者工作能带来一定的帮助,如果有疑问大家可以留言交流,谢谢大家对脚本之家的支持。
