struts2+jsp+jquery+Jcrop实现图片裁剪并上传实例
作者:hanamingming
今天有业务需要制作用户头像的需求,在网上找了个可以裁剪大图制作自己希望大小的图片的方法(基于Struts2)。特此记录一下。
不废话,具体的步骤如下:
<1> 使用html标签上传需要裁剪的大图。
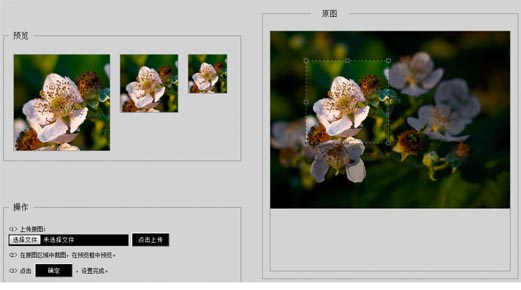
<2> 在页面呈现大图,使用Jcrop(Jquery)对大图进行裁剪,并且可以进行预览。
<3> 选择好截取部分之后发送数据给Action,在服务器端使用 Java API 对大图进行裁剪。
<4> 保存大图裁剪好的头像到指定目录,完成业务。
下面一步一步做:
第一步:使用html标签上传需要裁剪的大图。
这一步说白了也就是使用Struts2自带的FileUpload功能,把图片进行上传具体代码如下:
html页面:
<form id="ulform" action="uploadPic.action" enctype="multipart/form-data" method="post">
 <input type="file" name="pic" id="file" value="选择图片" />
 <input type="submit" value="点击上传" />
</form>
Struts2配置文件
<action name="uploadPic" class="com.luoxiao.tbms.user.action.UserAction" method="uploadPic">
 <result name="success" type="redirect">changePic.jsp</result>
 <result name="error">changePic.jsp</result>
</action>
根据配置点击提交按钮,会提交表单,把图片以流的形式发送给 UserAction的uploadPic方法,该方法如下:
public class UserAction{
 private File pic; //(在此省略 get 和 set 方法)
 private String picFileName; //(省略get和set方法, 该属性Struts2会自动赋值为上传文件的文件名)
 public String uploadPic() {
  String[] str = { ".jpg", ".jpeg", ".bmp", ".gif" };
  // 获取用户登录名
  TbUser curruser = (TbUser) getValue(SCOPE_SESSION, "curruser");
  // 限定文件大小是4MB
  if (pic == null || pic.length() > 4194304) {
   //文件过大
   return "error";
  }
  for (String s : str) {
   if (picFileName.endsWith(s)) {
    String realPath = ServletActionContext.getServletContext().getRealPath("/uploadpic");// 在tomcat中保存图片的实际路径 == "webRoot/uploadpic/"
    File saveFile = new File(new File(realPath), "新文件名.jpg"); // 在该实际路径下实例化一个文件
    // 判断父目录是否存在
    if (!saveFile.getParentFile().exists()) {
     saveFile.getParentFile().mkdirs();
    }
    try {
     // 执行文件上传
     // FileUtils 类名 org.apache.commons.io.FileUtils;
     // 是commons-io包中的,commons-fileupload 必须依赖
     // commons-io包实现文件上次,实际上就是将一个文件转换成流文件进行读写
     FileUtils.copyFile(pic, saveFile);
    } catch (IOException e) {
     return "imageError";
    }
   }
  }
  return "success";
 }
}
这样就可以把用户选择的图片上传到tomcat的webRoot/uploadpic/文件夹下。 然后访问页面,页面中就可以显示出刚刚上传的大图了。代码如下。
<div style="width: 500px; height: 500px;">
 <img style="margin-top:20px;" src="../uploadpic/上传文件名称.jpg"/>" id="target" alt="" />
</div>
第一步完成。
第二步:使用Jcrop插件裁剪该图片,并且在页面中预览。
Jcrop是一个基于JQuery的成熟的图片裁剪的插件。如图:

该插件使用比较简单:
<1> 在裁剪图片页面中,引入两个js文件,和1个Jcrop需要的css文件(Jcrop包中有,注意引入顺序,先引入jquery):
<script src="../js/jquery-1.8.3.min.js" type="text/javascript"></script>
<script src="../js/jquery.Jcrop.js" type="text/javascript"></script>
<link rel="stylesheet" href="../css/jquery.Jcrop.css" type="text/css" />
<2> 在html页面中按照Jcrop要求的格式编写两个img标签,一个用作裁剪后的预览,一个用作显示大图,代码如下:
预览:
<div style="width:200px;height:200px;overflow:hidden; border:1px solid gray;">
 <img id="preview" width="200px" height="200px" />
</div>
原图:
 <img src="../uploadpic/上传大图.jpg" id="target" alt="" />
<3> 在该页面中写js代码,使其可以裁剪图片并且预览:
<script type="text/javascript">
  var x;
 var y;
 var width;
 var height;
 $(function(){
  var jcrop_api, boundx, boundy;
  //使原图具有裁剪功能
  $('#target').Jcrop({
   onChange: updatePreview,
   onSelect: updatePreview,
   aspectRatio: 1
  },function(){
   // Use the API to get the real image size
   var bounds = this.getBounds();
   boundx = bounds[0];
   boundy = bounds[1];
   // Store the API in the jcrop_api variable
   jcrop_api = this;
  });
  //裁剪过程中,每改变裁剪大小执行该函数
  function updatePreview(c){
   if (parseInt(c.w) > 0){
    $('#preview').css({
     width: Math.round(<span style="color:#ff0000;">200 </span>/ c.w * boundx) + 'px', <span style="color:#ff0000;">//200 为预览div的宽和高</span>
     height: Math.round(<span style="color:#ff0000;">200 </span>/ c.h * boundy) + 'px',
     marginLeft: '-' + Math.round(200 / c.w * c.x) + 'px',
     marginTop: '-' + Math.round(200 / c.h * c.y) + 'px'
    });
    $('#width').val(c.w); //c.w 裁剪区域的宽
    $('#height').val(c.h); //c.h 裁剪区域的高
    $('#x').val(c.x); //c.x 裁剪区域左上角顶点相对于图片左上角顶点的x坐标
    $('#y').val(c.y); //c.y 裁剪区域顶点的y坐标
   }
   };
 });
 </script>
至此我们已经可以看到裁剪之后的样子了,并且也可以得到裁剪区域的x,y,height,width属性。
第三步:把截取的该区域的属性传递给action,让action根据所得属性,利用javaAPI把原图裁剪成小图。
<1> 设置form表单与隐藏域表单组件,并且在裁剪的时候对该四个组件的value属性赋值
<form action="cutPic.action" method="post">
 点击
 <input type="hidden" name="image.x" id="x"/>
 <input type="hidden" name="image.y" id="y"/>
 <input type="hidden" name="image.width" id="width"/>
 <input type="hidden" name="image.height" id="height"/>
 <input type="submit" value="确定" />
 ,设置完成。
</form>
<2> 点击确定,提交该表单,访问action,配置如下:
<action name="cutPic" class="com.luoxiao.tbms.user.action.UserAction" method="cutPic">
 <result name="success" type="redirectAction">../announcement/announcement_list.action</result>
</action>
<3>Struts2带着四个参数访问UserAction,并且会自动给UserAction中的image属性赋值,该image属性为OperateImage的一个实例对象,该类为裁剪图片类,代码如下:
package com.luoxiao.util;

import java.awt.Rectangle;
import java.awt.image.BufferedImage;
import java.io.File;
import java.io.FileInputStream;
import java.io.IOException;
import java.util.Iterator;
import javax.imageio.ImageIO;
import javax.imageio.ImageReadParam;
import javax.imageio.ImageReader;
import javax.imageio.stream.ImageInputStream;

public class OperateImage {
 // ===源图片路径名称如:c:\1.jpg
 private String srcpath;
 // ===剪切图片存放路径名称.如:c:\2.jpg
 private String subpath;
 // ===剪切点x坐标
 private int x;
 private int y;
 // ===剪切点宽度
 private int width;
 private int height;
 public OperateImage() {
 }
 /** 对图片裁剪,并把裁剪完的新图片保存 */
 public void cut() throws IOException {
  FileInputStream is = null;
  ImageInputStream iis = null;
  try {
   // 读取图片文件
   is = new FileInputStream(srcpath);
   /*
    * 返回包含所有当前已注册 ImageReader 的 Iterator,这些 ImageReader 声称能够解码指定格式。
    * 参数:formatName - 包含非正式格式名称 . (例如 "jpeg" 或 "tiff")等 。
    */
   Iterator<ImageReader> it = ImageIO.getImageReadersByFormatName("jpg");
   ImageReader reader = it.next();
   // 获取图片流
   iis = ImageIO.createImageInputStream(is);
   /*
    * <p>iis:读取源.true:只向前搜索 </p>.将它标记为 ‘只向前搜索'。
    * 此设置意味着包含在输入源中的图像将只按顺序读取,可能允许 reader 避免缓存包含与以前已经读取的图像关联的数据的那些输入部分。
    */
   reader.setInput(iis, true);
   /*
    * <p>描述如何对流进行解码的类<p>.用于指定如何在输入时从 Java Image I/O
    * 框架的上下文中的流转换一幅图像或一组图像。用于特定图像格式的插件 将从其 ImageReader 实现的
    * getDefaultReadParam 方法中返回 ImageReadParam 的实例。
    */
   ImageReadParam param = reader.getDefaultReadParam();
   /*
    * 图片裁剪区域。Rectangle 指定了坐标空间中的一个区域,通过 Rectangle 对象
    * 的左上顶点的坐标(x,y)、宽度和高度可以定义这个区域。
    */
   Rectangle rect = new Rectangle(x, y, width, height);
   // 提供一个 BufferedImage,将其用作解码像素数据的目标。
   param.setSourceRegion(rect);
   /*
    * 使用所提供的 ImageReadParam 读取通过索引 imageIndex 指定的对象,并将 它作为一个完整的
    * BufferedImage 返回。
    */
   BufferedImage bi = reader.read(0, param);
   // 保存新图片
   ImageIO.write(bi, "jpg", new File(subpath));
  } finally {
   if (is != null)
    is.close();
   if (iis != null)
    iis.close();
  }

 }
}
<4> 给该类的实例的四个属性 x,y,width,height赋值之后,访问action中的cutPic方法,代码如下:
public class UserAction extends BaseAction {
 private OperateImage image;(省略get set)

 private File pic; // 接收这个上传的文件
 private String picFileName; // Struts2提供的格式,在文件名后+FileName就是上传文件的名字

 /**
  * 裁剪头像
  */
 public String cutPic(){
        String name = ServletActionContext.getServletContext().getRealPath("/uploadpic/原图名.jpg");
  image.setSrcpath(name);
  image.setSubpath(ServletActionContext.getServletContext().getRealPath("/uploadpic/裁剪目标图名.jpg"));
  try {
   image.cut(); //执行裁剪操作 执行完后即可生成目标图在对应文件夹内。
  } catch (IOException e) {
   e.printStackTrace();
  }
  return "success";
 }
}
第四步:把截取好的头像保存在具体文件夹下即可,裁剪过程完成。
以上就是本文的全部内容,希望对大家的学习有所帮助,也希望大家多多支持脚本之家。
