ASP.NET Core 导入导出Excel xlsx 文件实例
作者:LineZero
本篇文章主要介绍了ASP.NET Core 导入导出Excel xlsx 文件,非常具有实用价值,需要的朋友可以参考下。
ASP.NET Core 使用EPPlus.Core导入导出Excel xlsx 文件,EPPlus.Core支持Excel 2007/2010 xlsx文件导入导出,可以运行在Windows, Linux和Mac。
EPPlus.Core 是基于EPPlus 更改而来,在Linux 下需要安装libgdiplus 。
EPPlus:http://epplus.codeplex.com/
EPPlus.Core:https://github.com/VahidN/EPPlus.Core
下面在ASP.NET Core 中导入导出Excel xlsx 文件。
新建项目
新建一个ASP.NET Core Web Application 项目ASPNETCoreExcel,选择Web 应用程序 不进行身份验证。
然后添加EPPlus.Core 引用。
使用NuGet 命令行:
Install-Package EPPlus.Core
也可以使用NuGet包管理器安装。
导出xlsx文件
新建一个XlsxController ,添加Export 操作。
 public class XlsxController : Controller
 {
  private IHostingEnvironment _hostingEnvironment;

  public XlsxController(IHostingEnvironment hostingEnvironment)
  {
   _hostingEnvironment = hostingEnvironment;
  }
  public IActionResult Index()
  {
   return View();
  }

  public IActionResult Export()
  {
   string sWebRootFolder = _hostingEnvironment.WebRootPath;
   string sFileName = $"{Guid.NewGuid()}.xlsx";
   FileInfo file = new FileInfo(Path.Combine(sWebRootFolder, sFileName));
   using (ExcelPackage package = new ExcelPackage(file))
   {
    // 添加worksheet
    ExcelWorksheet worksheet = package.Workbook.Worksheets.Add("aspnetcore");
    //添加头
    worksheet.Cells[1, 1].Value = "ID";
    worksheet.Cells[1, 2].Value = "Name";
    worksheet.Cells[1, 3].Value = "Url";
    //添加值
    worksheet.Cells["A2"].Value = 1000;
    worksheet.Cells["B2"].Value = "LineZero";
    worksheet.Cells["C2"].Value = "http://www.cnblogs.com/linezero/";

    worksheet.Cells["A3"].Value = 1001;
    worksheet.Cells["B3"].Value = "LineZero GitHub";
    worksheet.Cells["C3"].Value = "https://github.com/linezero";
    worksheet.Cells["C3"].Style.Font.Bold = true;

    package.Save();
   }
   return File(sFileName, "application/vnd.openxmlformats-officedocument.spreadsheetml.sheet");
  }
 }
通过依赖注入获取HostingEnvironment,对应可以获取程序的相关目录及属性。
然后添加Index 视图增加一个链接导出Excel
@{
}
<h2>ASP.NET Core 导入导出Excel xlsx 文件</h2>
<a asp-action="Export">导出Excel</a>
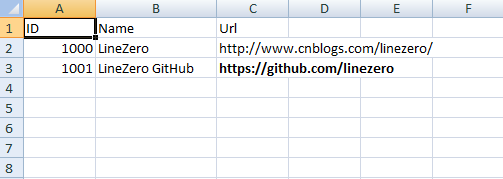
点击导出文件,打开结果如下。

导入xlsx文件
在index视图中添加一个上传文件,添加Import操作。
Index.cshtml
@{
}
<h2>ASP.NET Core 导入导出Excel xlsx 文件</h2>
<a asp-action="Export">导出Excel</a>
<hr />
<form enctype="multipart/form-data" method="post" asp-action="Import">
 <input type="file" name="excelfile" />
 <input type="submit" value="上传" />
</form>
 [HttpPost]
  public IActionResult Import(IFormFile excelfile)
  {
   string sWebRootFolder = _hostingEnvironment.WebRootPath;
   string sFileName = $"{Guid.NewGuid()}.xlsx";
   FileInfo file = new FileInfo(Path.Combine(sWebRootFolder, sFileName));
   try
   {
    using (FileStream fs = new FileStream(file.ToString(), FileMode.Create))
    {
     excelfile.CopyTo(fs);
     fs.Flush();
    }
    using (ExcelPackage package = new ExcelPackage(file))
    {
     StringBuilder sb = new StringBuilder();
     ExcelWorksheet worksheet = package.Workbook.Worksheets[1];
     int rowCount = worksheet.Dimension.Rows;
     int ColCount = worksheet.Dimension.Columns;
     bool bHeaderRow = true;
     for (int row = 1; row <= rowCount; row++)
     {
      for (int col = 1; col <= ColCount; col++)
      {
       if (bHeaderRow)
       {
        sb.Append(worksheet.Cells[row, col].Value.ToString() + "\t");
       }
       else
       {
        sb.Append(worksheet.Cells[row, col].Value.ToString() + "\t");
       }
      }
      sb.Append(Environment.NewLine);
     }
     return Content(sb.ToString());
    }
   }
   catch (Exception ex)
   {
    return Content(ex.Message);
   }
  }
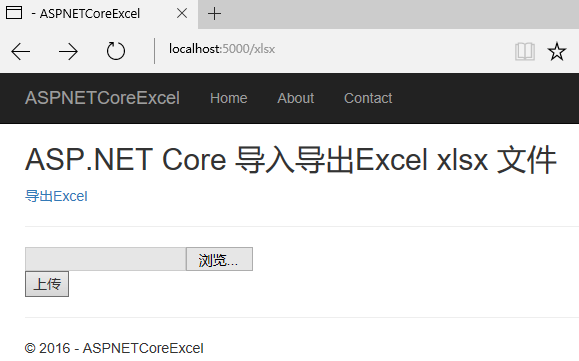
运行程序打开http://localhost:5000/xlsx

上传对应文件,显示如下。

ASP.NET Core简单的导入导出Excel 功能也就完成了。
以上就是本文的全部内容,希望对大家的学习有所帮助,也希望大家多多支持脚本之家。
