Vue3(三)网站首页布局开发
作者:久曲健
这篇文章主要介绍了Vue3网站首页布局开发,上篇文章已经提到集成Ant Design Vue后,和Element Ui一样,还是组件的使用,接下俩我们就来看看Vue3网站首页布局开发的相关资料,需要的朋友可以参考下面文章的具体内容
一、前言
上篇文章Vue3集成Ant Design Vue 已经提到集成Ant Design Vue后,和Element Ui一样,还是组件的使用,然后就是复制粘贴改了。
二、实际案例
先搞个布局布局看看,也就是我们说的layout,如下图:

不在Home中修改,因为什么,每个页面都有头部和底部,写起来较麻烦,而变化动态的部分放在Home里面维护即可。
1、修改App.vue
先忽略路由问题,在App.vue中修改,示例代码如下:
html:
<template>
  <a-layout>
    <a-layout-header class="header">
      <div class="logo" />
      <a-menu
          theme="dark"
          mode="horizontal"
          v-model:selectedKeys="selectedKeys1"
          :style="{ lineHeight: '64px' }"
      >
        <a-menu-item key="1">nav 1</a-menu-item>
        <a-menu-item key="2">nav 2</a-menu-item>
        <a-menu-item key="3">nav 3</a-menu-item>
      </a-menu>
    </a-layout-header>
    <a-layout>
      <a-layout-sider width="200" style="background: #fff">
        <a-menu
            mode="inline"
            v-model:selectedKeys="selectedKeys2"
            v-model:openKeys="openKeys"
            :style="{ height: '100%', borderRight: 0 }"
        >
          <a-sub-menu key="sub1">
            <template #title>
              <span>
                <user-outlined />
                subnav 1
              </span>
            </template>
            <a-menu-item key="1">option1</a-menu-item>
            <a-menu-item key="2">option2</a-menu-item>
            <a-menu-item key="3">option3</a-menu-item>
            <a-menu-item key="4">option4</a-menu-item>
          </a-sub-menu>
          <a-sub-menu key="sub2">
            <template #title>
              <span>
                <laptop-outlined />
                subnav 2
              </span>
            </template>
            <a-menu-item key="5">option5</a-menu-item>
            <a-menu-item key="6">option6</a-menu-item>
            <a-menu-item key="7">option7</a-menu-item>
            <a-menu-item key="8">option8</a-menu-item>
          </a-sub-menu>
          <a-sub-menu key="sub3">
            <template #title>
              <span>
                <notification-outlined />
                subnav 3
              </span>
            </template>
            <a-menu-item key="9">option9</a-menu-item>
            <a-menu-item key="10">option10</a-menu-item>
            <a-menu-item key="11">option11</a-menu-item>
            <a-menu-item key="12">option12</a-menu-item>
          </a-sub-menu>
        </a-menu>
      </a-layout-sider>
      <a-layout style="padding: 0 24px 24px">
        <a-breadcrumb style="margin: 16px 0">
          <a-breadcrumb-item>Home</a-breadcrumb-item>
          <a-breadcrumb-item>List</a-breadcrumb-item>
          <a-breadcrumb-item>App</a-breadcrumb-item>
        </a-breadcrumb>
        <a-layout-content
            :style="{ background: '#fff', padding: '24px', margin: 0, minHeight: '280px' }"
        >
          Content
        </a-layout-content>
      </a-layout>
    </a-layout>
    <a-layout-footer style="text-align: center">
      Ant Design ©2018 Created by Ant UED
    </a-layout-footer>
  </a-layout>
</template>

<style>
#components-layout-demo-top-side-2 .logo {
  float: left;
  width: 120px;
  height: 31px;
  margin: 16px 24px 16px 0;
  background: rgba(255, 255, 255, 0.3);
}

.ant-row-rtl #components-layout-demo-top-side-2 .logo {
  float: right;
  margin: 16px 0 16px 24px;
}

.site-layout-background {
  background: #fff;
}
</style>
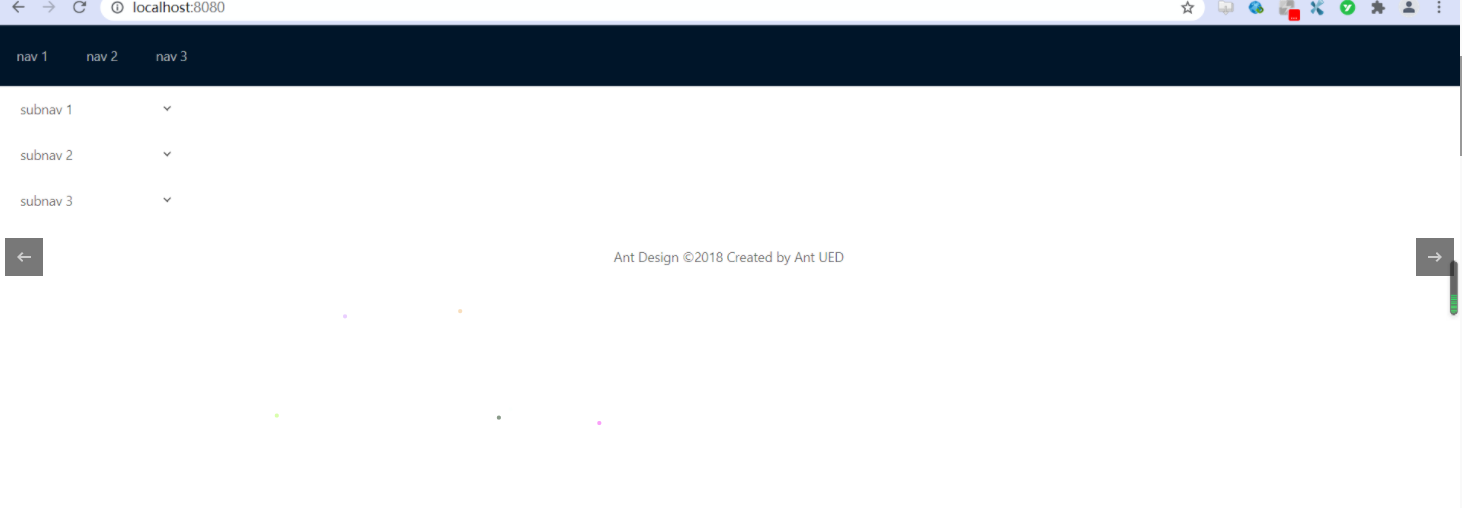
效果如图:

2、调整布局
咋一看,样式和布局比较乱,我在调整下布局,对代码进行修改如下:
html:
<template>
  <a-layout>
    <a-layout-header class="header">
      <div class="logo" />
      <a-menu
          theme="dark"
          mode="horizontal"
          v-model:selectedKeys="selectedKeys1"
          :style="{ lineHeight: '64px' }"
      >
        <a-menu-item key="1">nav 1</a-menu-item>
        <a-menu-item key="2">nav 2</a-menu-item>
        <a-menu-item key="3">nav 3</a-menu-item>
      </a-menu>
    </a-layout-header>
    <a-layout>
      <a-layout-sider width="200" style="background: #fff">
        <a-menu
            mode="inline"
            v-model:selectedKeys="selectedKeys2"
            v-model:openKeys="openKeys"
            :style="{ height: '100%', borderRight: 0 }"
        >
          <a-sub-menu key="sub1">
            <template #title>
                <span>
                  <user-outlined />
                  subnav 1
                </span>
            </template>
            <a-menu-item key="1">option1</a-menu-item>
            <a-menu-item key="2">option2</a-menu-item>
            <a-menu-item key="3">option3</a-menu-item>
            <a-menu-item key="4">option4</a-menu-item>
          </a-sub-menu>
          <a-sub-menu key="sub2">
            <template #title>
                <span>
                  <laptop-outlined />
                  subnav 2
                </span>
            </template>
            <a-menu-item key="5">option5</a-menu-item>
            <a-menu-item key="6">option6</a-menu-item>
            <a-menu-item key="7">option7</a-menu-item>
            <a-menu-item key="8">option8</a-menu-item>
          </a-sub-menu>
          <a-sub-menu key="sub3">
            <template #title>
                <span>
                  <notification-outlined />
                  subnav 3
                </span>
            </template>
            <a-menu-item key="9">option9</a-menu-item>
            <a-menu-item key="10">option10</a-menu-item>
            <a-menu-item key="11">option11</a-menu-item>
            <a-menu-item key="12">option12</a-menu-item>
          </a-sub-menu>
        </a-menu>
      </a-layout-sider>
      <a-layout-content
          :style="{ background: '#fff', padding: '24px', margin: 0, minHeight: '280px' }"
      >
        Content
      </a-layout-content>
    </a-layout>
    <a-layout-footer style="text-align: center">
      软件测试君 ©2021 Created by 六哥
    </a-layout-footer>
  </a-layout>
</template>

<style>
#components-layout-demo-top-side-2 .logo {
  float: left;
  width: 120px;
  height: 31px;
  margin: 16px 24px 16px 0;
  background: rgba(255, 255, 255, 0.3);
}

.ant-row-rtl #components-layout-demo-top-side-2 .logo {
  float: right;
  margin: 16px 0 16px 24px;
}

.site-layout-background {
  background: #fff;
}
</style>
修改完效果如下:

3、修改路由实现跳转
前面已经说到,只需修改动态部分建立路由,实现跳转访问动态部分即可,这里的页头和页脚不会改变及二级菜单,只修改content部分即可。
修改Home.vue,示例代码如下:
js:
<template>
  <a-layout>
    <a-layout-sider width="200" style="background: #fff">
      <a-menu
          mode="inline"
          v-model:selectedKeys="selectedKeys2"
          v-model:openKeys="openKeys"
          :style="{ height: '100%', borderRight: 0 }"
      >
        <a-sub-menu key="sub1">
          <template #title>
                <span>
                  <user-outlined />
                  subnav 1
                </span>
          </template>
          <a-menu-item key="1">option1</a-menu-item>
          <a-menu-item key="2">option2</a-menu-item>
          <a-menu-item key="3">option3</a-menu-item>
          <a-menu-item key="4">option4</a-menu-item>
        </a-sub-menu>
        <a-sub-menu key="sub2">
          <template #title>
                <span>
                  <laptop-outlined />
                  subnav 2
                </span>
          </template>
          <a-menu-item key="5">option5</a-menu-item>
          <a-menu-item key="6">option6</a-menu-item>
          <a-menu-item key="7">option7</a-menu-item>
          <a-menu-item key="8">option8</a-menu-item>
        </a-sub-menu>
        <a-sub-menu key="sub3">
          <template #title>
                <span>
                  <notification-outlined />
                  subnav 3
                </span>
          </template>
          <a-menu-item key="9">option9</a-menu-item>
          <a-menu-item key="10">option10</a-menu-item>
          <a-menu-item key="11">option11</a-menu-item>
          <a-menu-item key="12">option12</a-menu-item>
        </a-sub-menu>
      </a-menu>
    </a-layout-sider>
    <a-layout-content
        :style="{ background: '#fff', padding: '24px', margin: 0, minHeight: '280px' }"
    >
      Content
    </a-layout-content>
  </a-layout>
</template>

<script lang="ts">
import { defineComponent } from 'vue';
import HelloWorld from '@/components/HelloWorld.vue'; // @ is an alias to /src

export default defineComponent({
  name: 'Home',
  components: {
    HelloWorld,
  },
});
</script>
修改App.vue实现路由跳转:示例代码如下:
html:
<template>
  <a-layout>
    <a-layout-header class="header">
      <div class="logo" />
      <a-menu
          theme="dark"
          mode="horizontal"
          v-model:selectedKeys="selectedKeys1"
          :style="{ lineHeight: '64px' }"
      >
        <a-menu-item key="1">nav 1</a-menu-item>
        <a-menu-item key="2">nav 2</a-menu-item>
        <a-menu-item key="3">nav 3</a-menu-item>
      </a-menu>
    </a-layout-header>
    <router-view/>
    <a-layout-footer style="text-align: center">
      软件测试君 ©2021 Created by 六哥
    </a-layout-footer>
  </a-layout>
</template>

<style>
#components-layout-demo-top-side-2 .logo {
  float: left;
  width: 120px;
  height: 31px;
  margin: 16px 24px 16px 0;
  background: rgba(255, 255, 255, 0.3);
}

.ant-row-rtl #components-layout-demo-top-side-2 .logo {
  float: right;
  margin: 16px 0 16px 24px;
}

.site-layout-background {
  background: #fff;
}
</style>
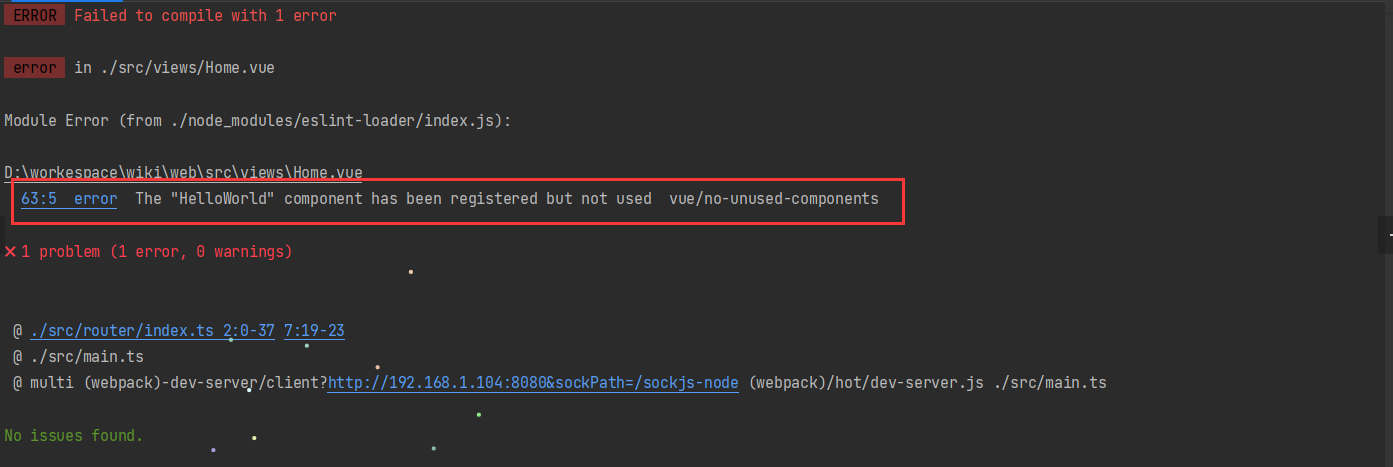
热部署编译后报错如下图:

从报错的得知,校验规则报错,很简单一个是删除未注册组件HelloWorld,第二种方法,就是修改校验文件规则,在eslintrc.js中添加如下内容:
js:
  rules: {
    'no-console': process.env.NODE_ENV === 'production' ? 'warn' : 'off',
    'no-debugger': process.env.NODE_ENV === 'production' ? 'warn' : 'off',
    'vue/no-unused-components':'off'
  }
这是自动编译还是会报错,如下图:

报错并没有什么可怕的,不要慌,重启服务如下:

这次我直接访问页面地址,效果如下:

再来访问about页面,如下图:

三、最后
router-view的用法
相当于一个界面占位符
router-link to的用法
用于页面跳转
到此这篇关于Vue3网站首页布局开发 的文章就介绍到这了,更多相关Vue3网站首页布局开发内容请搜索脚本之家以前的文章或继续浏览下面的相关文章希望大家以后多多支持脚本之家!
